17 Above-Cabinet Halloween Touches Your Kitchen Needs
The empty space above kitchen cabinets can either collect dust or complete the room. For Halloween, that narrow ledge is especially useful: it sits above the working zone, catches evening light beautifully, and can carry seasonal atmosphere without sacrificing a single inch of counter space.
1. Build a Black-and-Cream Crockery Skyline
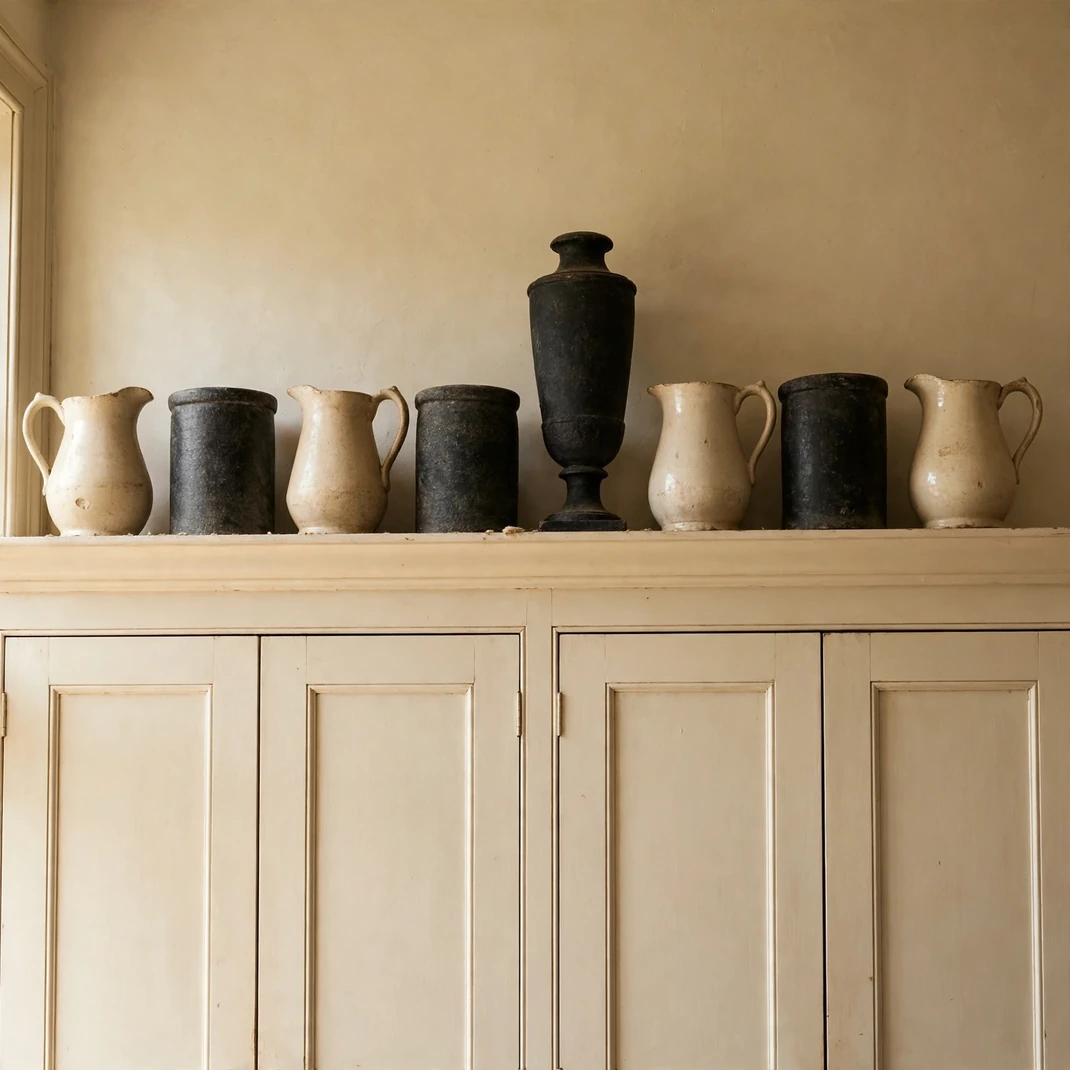
A measured row of chalky cream pitchers, charcoal crocks, and one tall black urn turns the empty strip above cabinetry into a handsome kitchen skyline. The alternating light and dark forms create Halloween contrast, but the useful, timeworn vessels keep the look grounded in real kitchen character.
- How to Style It: Gather five or seven vessels in three heights, ideally between 8 and 16 inches tall. Set the tallest piece slightly off-center, overlap two smaller forms by an inch, and leave a full hand-width of open space at both ends so the arrangement does not appear squeezed beneath the ceiling.
- Why It Photographs Beautifully: The repeated handles, shoulders, and rims form a clear silhouette against a pale wall, while the black-and-cream palette reads instantly in both wide kitchen views and tight detail shots. Soft side light also reveals glaze variation without introducing visual clutter.
- Pro Tip: Raise the shortest crock on a concealed wood block so every rim is visible from floor level; styling for the actual viewing angle matters more than how the objects look while standing on a ladder.
- Budget-Smart Swap: Paint mismatched thrift-store vases with matte mineral paint in warm white and soot black, then leave two original stoneware pieces unpainted to keep the collection believable.
2. Nest Oversized Harvest Baskets by Scale
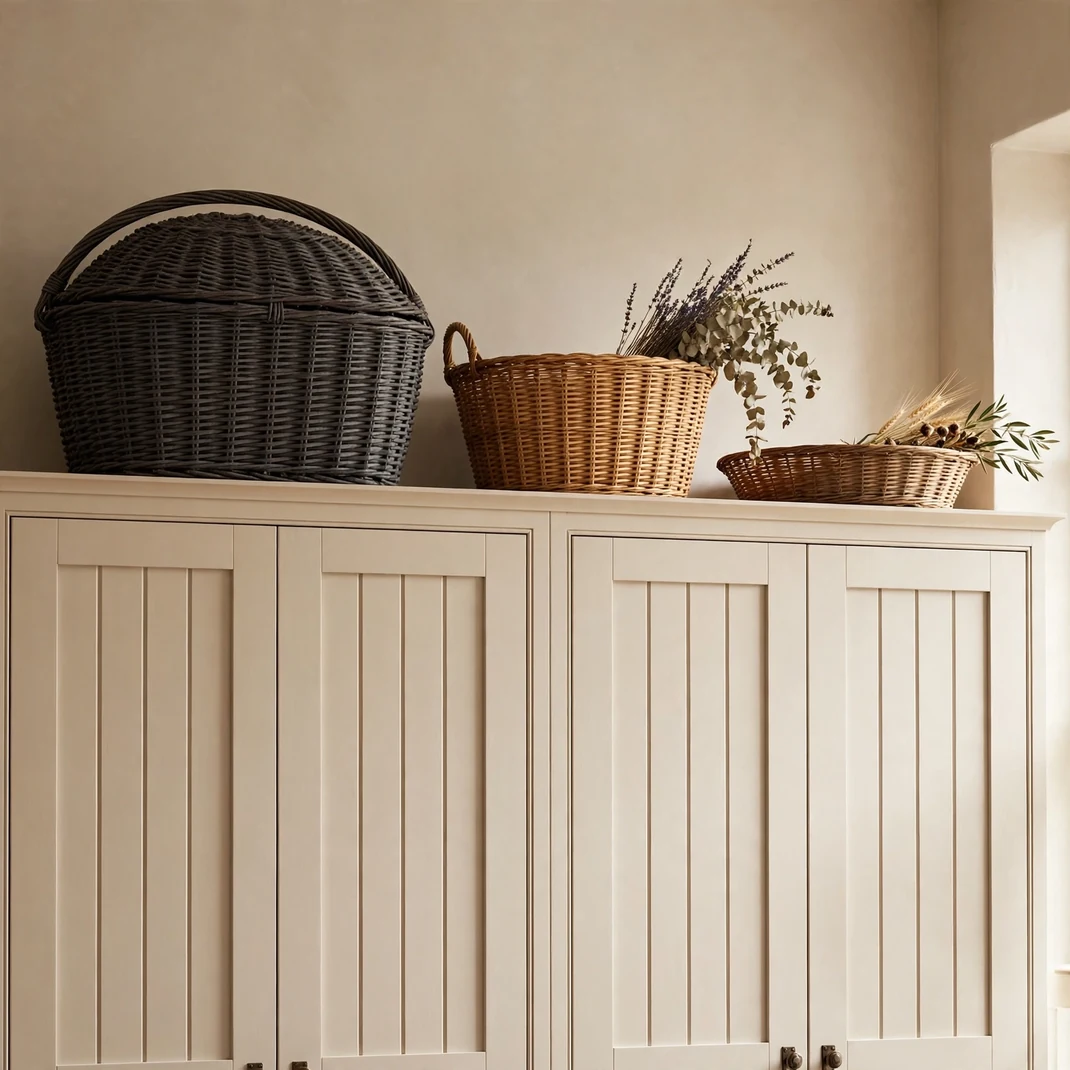
Three generous baskets tucked above tall cabinets bring warmth, texture, and useful storage to an otherwise awkward gap. In dark willow, honey cane, and smoked rattan, the grouping hints at harvest season without relying on a single orange pumpkin.
- How to Style It: Choose one lidded hamper, one open market basket, and one shallow gathering basket, then nest or overlap them rather than lining them up. Turn handles at different angles, keep the tallest basket at least 3 inches below the ceiling, and use the lidded piece for rarely needed linens or seasonal tableware.
- Why It Photographs Beautifully: Basket weave catches grazing light and softens the hard right angles of cabinet boxes. The graduated forms carry the eye upward, while the tonal browns give a bright kitchen a richer, late-October temperature.
- Pro Tip: Stuff open baskets with acid-free tissue or an empty box before placing a folded flax cloth at the rim; the fabric will sit visibly without filling the entire basket or collapsing over time.
- Budget-Smart Swap: Use baskets already owned in different finishes and unify them with one repeated detail, such as narrow black cotton ribbon tied once around each handle.
3. Line Up Ebony-Handled Rolling Pins
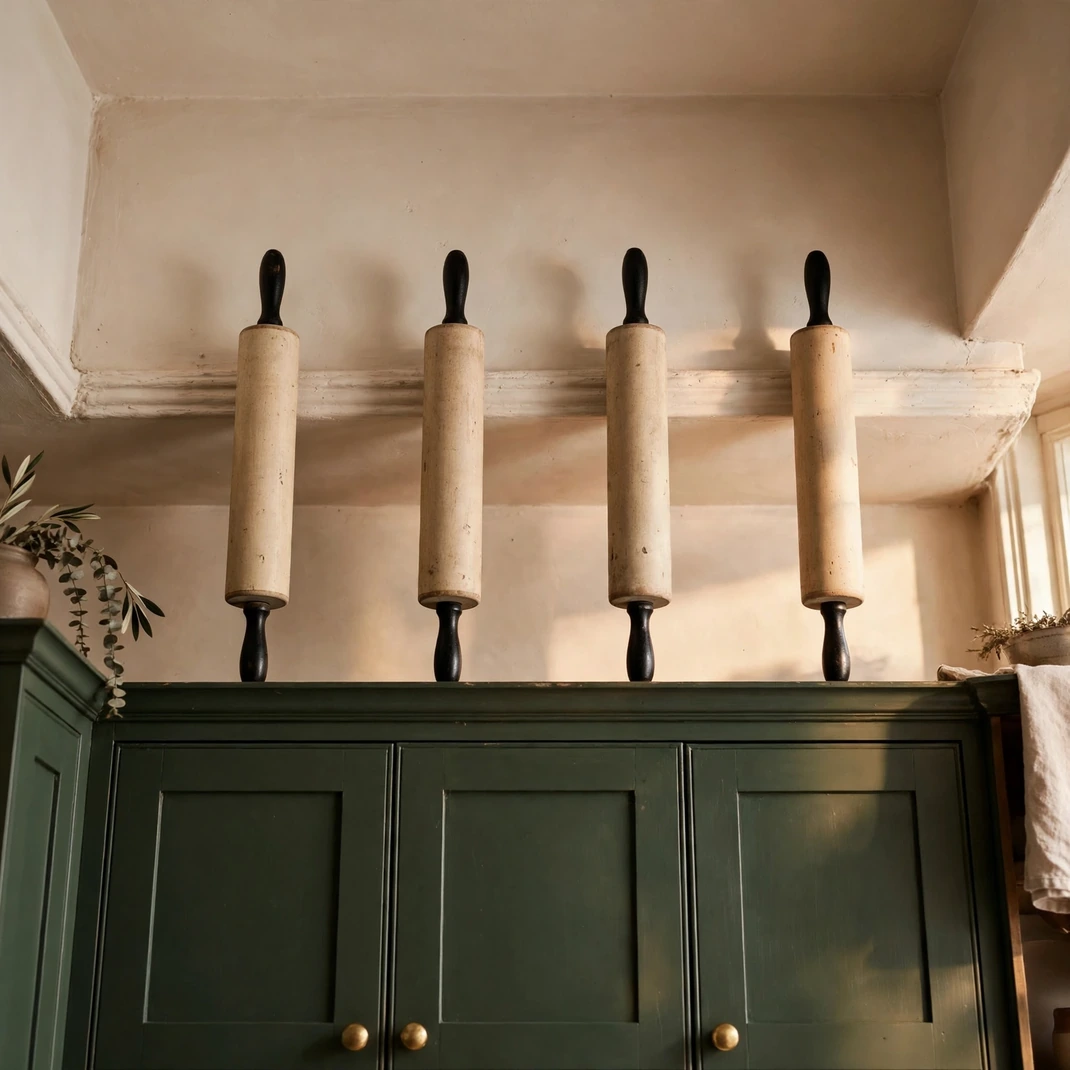
A row of vintage rolling pins with ebony-black handles turns a familiar baking tool into a crisp, graphic frieze above the cabinets. Pale wood keeps the display rooted in the kitchen, while the repeated dark handles add a subtle witchy rhythm without becoming novelty décor.
- How to Style It: Rest four or five rolling pins horizontally in shallow, secured plate grooves or custom wood cradles, alternating handle directions from one piece to the next. Space them 2 inches apart, keep the row several inches behind the cabinet edge, and choose pins with noticeably different wood tones for a collected look.
- Why It Photographs Beautifully: The long parallel cylinders echo the cabinet crown, and the black handle ends punctuate the composition like musical notes. Side light reveals worn flour marks and wood grain, giving the image believable working-kitchen texture.
- Pro Tip: Do not stack the pins directly; a thin shadow line around every silhouette is what makes the arrangement readable from floor level and keeps it from looking like stored equipment.
- Budget-Smart Swap: Paint the handles of inexpensive secondhand rolling pins in one matte black finish, then rub a little food-safe wax over the wooden barrels to revive their grain.
4. Lean Two Shadowy Botanical Panels
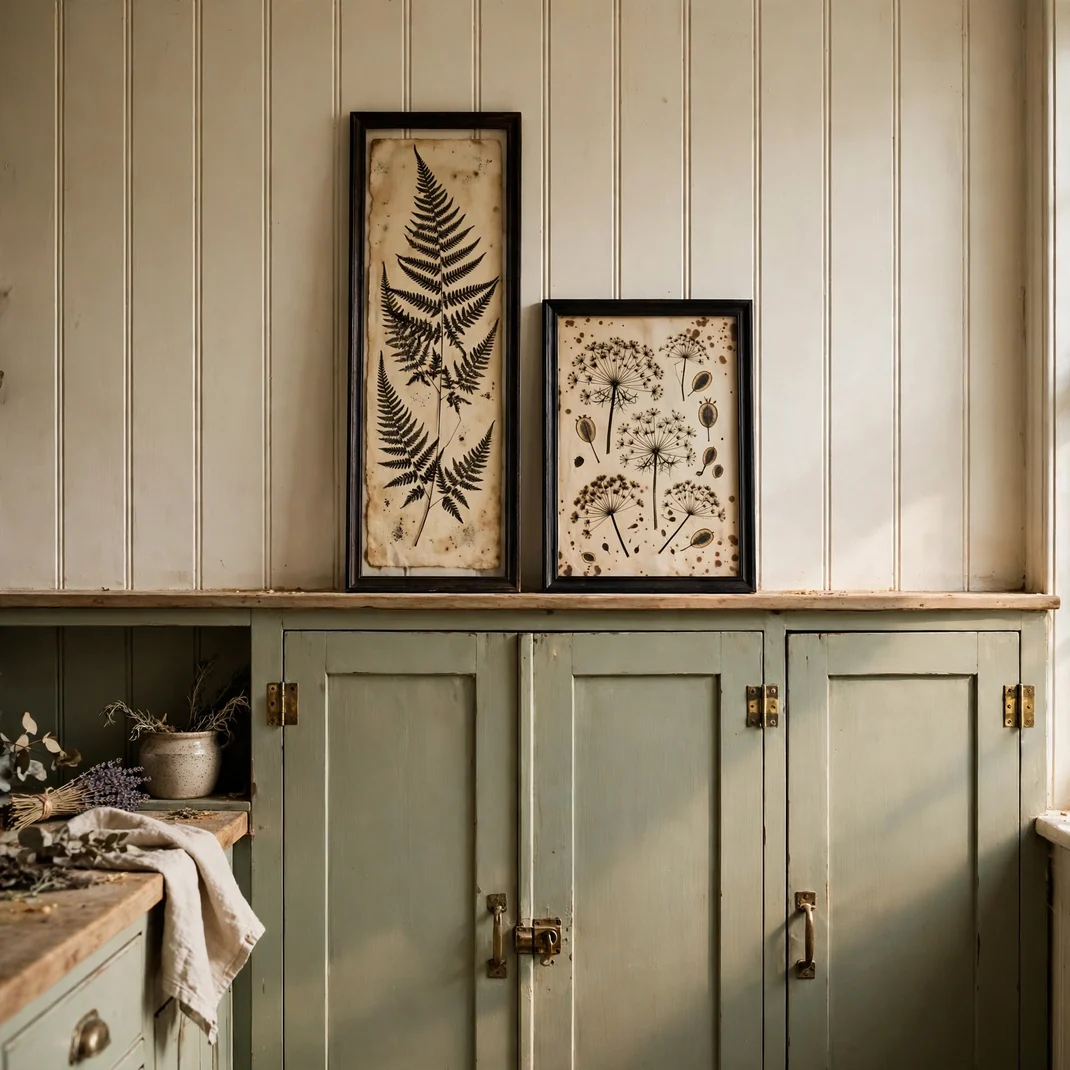
Pressed fern and seed-head studies in narrow black frames give above-cabinet space the atmosphere of an old naturalist’s kitchen. Their vertical lines add height, while parchment grounds and inky specimens suggest Halloween through shadow and age rather than obvious symbols.
- How to Style It: Lean two frames of different heights against the wall, overlapping them by 2 to 3 inches and securing both with removable anti-tip strips. Keep the artwork at least 4 inches from the ceiling, and place one low earthenware bowl in front to bridge the composition horizontally.
- Why It Photographs Beautifully: The pale paper separates the dark plant silhouettes from the wall, making fine details readable from across the room. Layered frames create depth, and the slight overlap feels collected rather than gallery-perfect.
- Pro Tip: Choose specimens with contrasting structures—one feathery and one architectural—so the pair does not merge into a single dark mass when viewed from below.
- Budget-Smart Swap: Press garden clippings between heavy books, mount them on tea-stained watercolor paper, and slip them into secondhand frames painted the same soft black.
5. Crown the Cabinets with Architectural Salvage
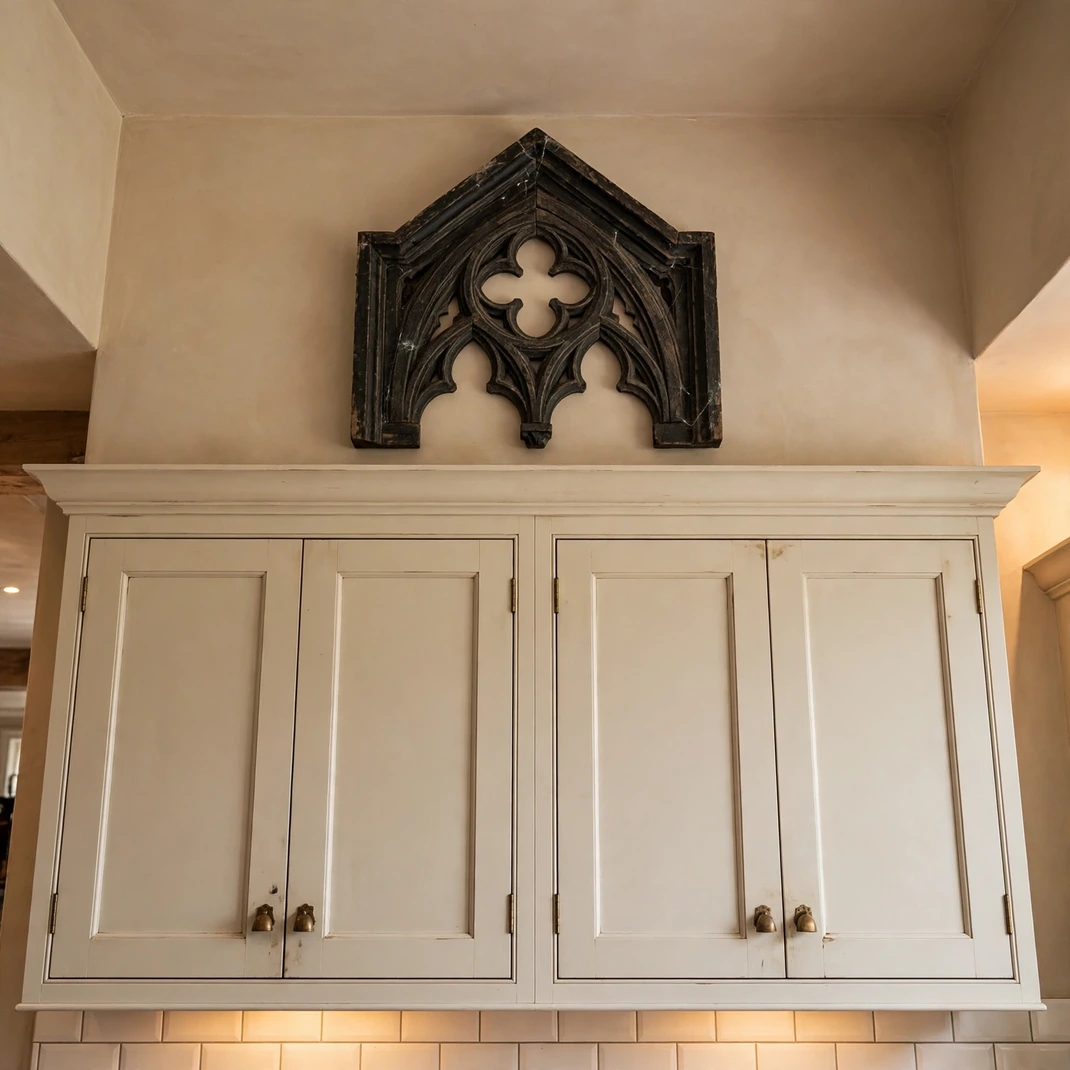
A carved pediment, shallow corbel, or fragment of old molding can make standard cabinetry feel as though it belongs to a storied house. Finished in distressed ebony or tobacco-brown wood, the single salvaged piece supplies gothic shape while still relating to the kitchen’s architecture.
- How to Style It: Center one lightweight architectural fragment over the widest cabinet bank and keep its width to roughly one-third of that run. Stabilize it with museum putty and a hidden bracket if needed, then flank it with nothing more than two low cream crocks so the carving remains the focus.
- Why It Photographs Beautifully: A strong central silhouette gives the upper wall a sense of purpose and frames the cabinetry below. Worn edges catch light beautifully, revealing dimension that flat seasonal signs cannot provide.
- Pro Tip: Repeat one finish already present in the room—black hardware, aged oak, or antique brass—so the salvage reads as part of the kitchen rather than a stray flea-market find.
- Budget-Smart Swap: Cut a simple pointed pediment from lightweight foam board, layer on narrow wood trim, and finish it with matte paint plus a dry-brushed brown glaze for convincing depth from floor level.
6. Arrange a Trio of Papier-Mâché Pumpkins
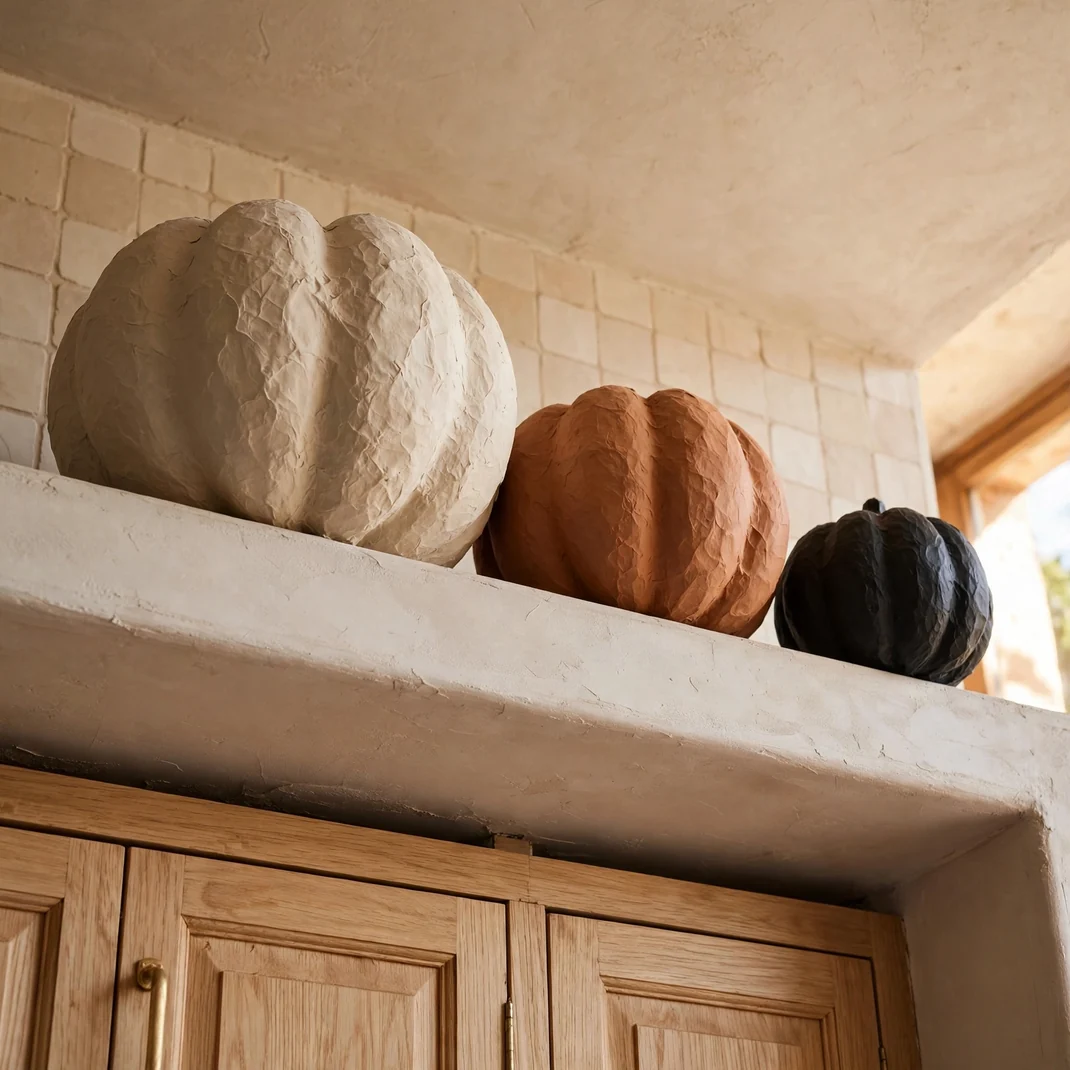
Oversized papier-mâché pumpkins in putty, terracotta, and near-black make a playful but sophisticated statement above a short cabinet run. Their dry, chalky finish absorbs light, so the familiar Halloween forms feel sculptural rather than glossy or cartoonish.
- How to Style It: Use exactly three pumpkins in clearly different sizes, placing the largest toward the back and the smallest slightly forward. Keep stems irregular, rotate each form to show a different profile, and contain the trio on one shallow wood board for easy seasonal removal.
- Why It Photographs Beautifully: The rounded forms contrast with rectilinear cabinets, while the graduated scale creates a satisfying triangular composition. Matte surfaces hold subtle shadows in every ridge, which gives close images tangible handmade character.
- Pro Tip: Match the darkest pumpkin to the cabinet hardware and keep the other two within the wall or countertop palette; this prevents the display from floating as an unrelated block of color.
- Budget-Smart Swap: Cover inexpensive plastic pumpkins with torn kraft paper and diluted matte glue, then brush on muted sample-pot paint once dry.
7. Stage a Pewter-and-Persimmon Still Life
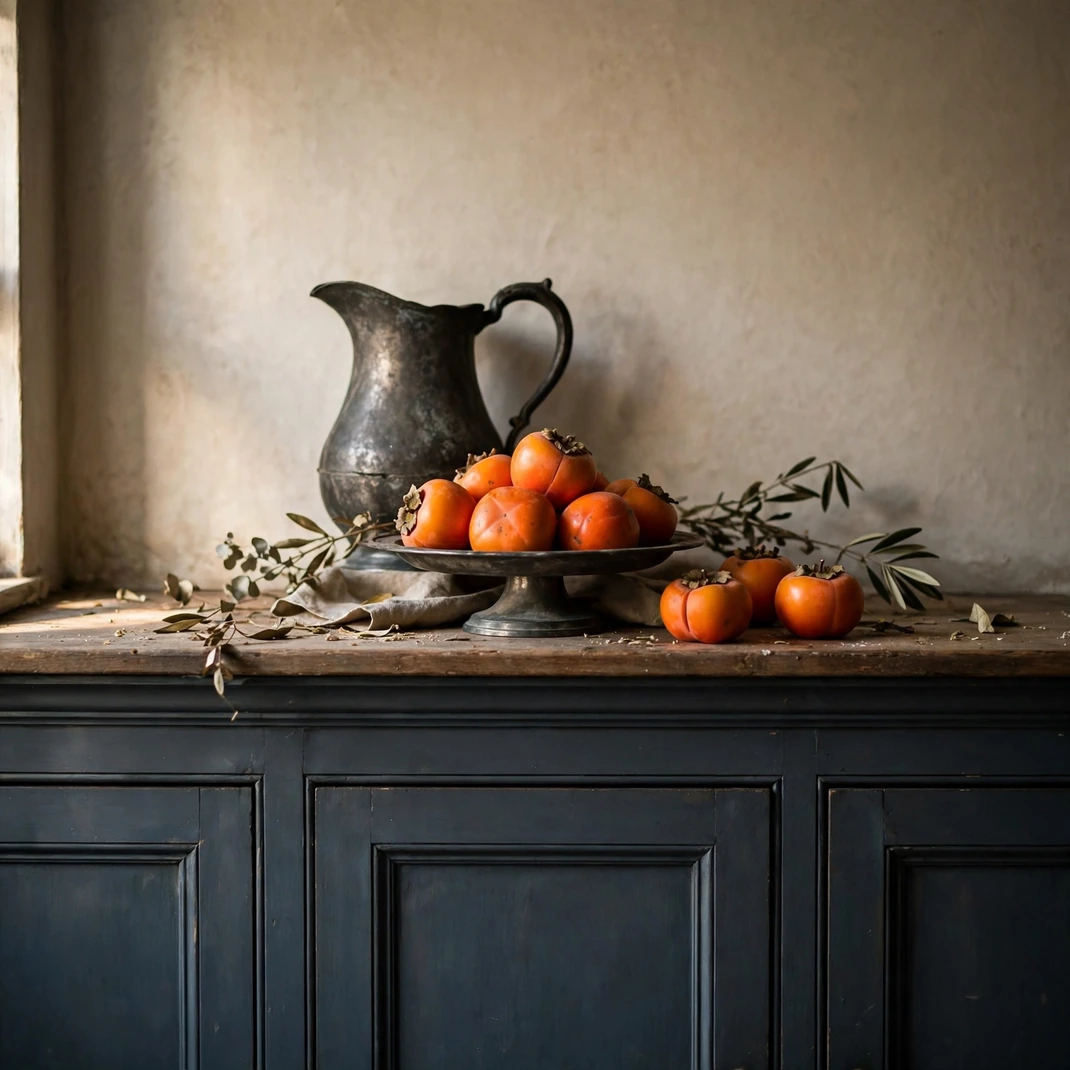
A tarnished pewter pitcher, a low pedestal dish, and a handful of persimmons create a moody old-master still life above the cabinets. The fruit supplies a controlled flash of Halloween orange, while the cool metal keeps the composition elegant and culinary.
- How to Style It: Place the pitcher at the rear, angle its handle outward, and mound five faux persimmons on a low dish in front. Add one folded tobacco linen beneath the dish, allowing only a narrow edge to show, and keep the entire grouping within a 20-inch span.
- Why It Photographs Beautifully: Orange fruit becomes the bright focal point against softly reflective gray metal. The varied heights and gentle overlap create painterly depth, especially when lit from one side rather than evenly from the front.
- Pro Tip: Rub only the raised rim and handle with a polishing cloth; preserving tarnish in the recesses gives pewter dimension and keeps the vignette from looking newly purchased.
- Budget-Smart Swap: Spray a thrifted metal pitcher and cake tin with pewter-finish paint, then use realistic faux fruit so the setup lasts through the month.
8. Perch a Tiny Lit Village Above White Cabinets
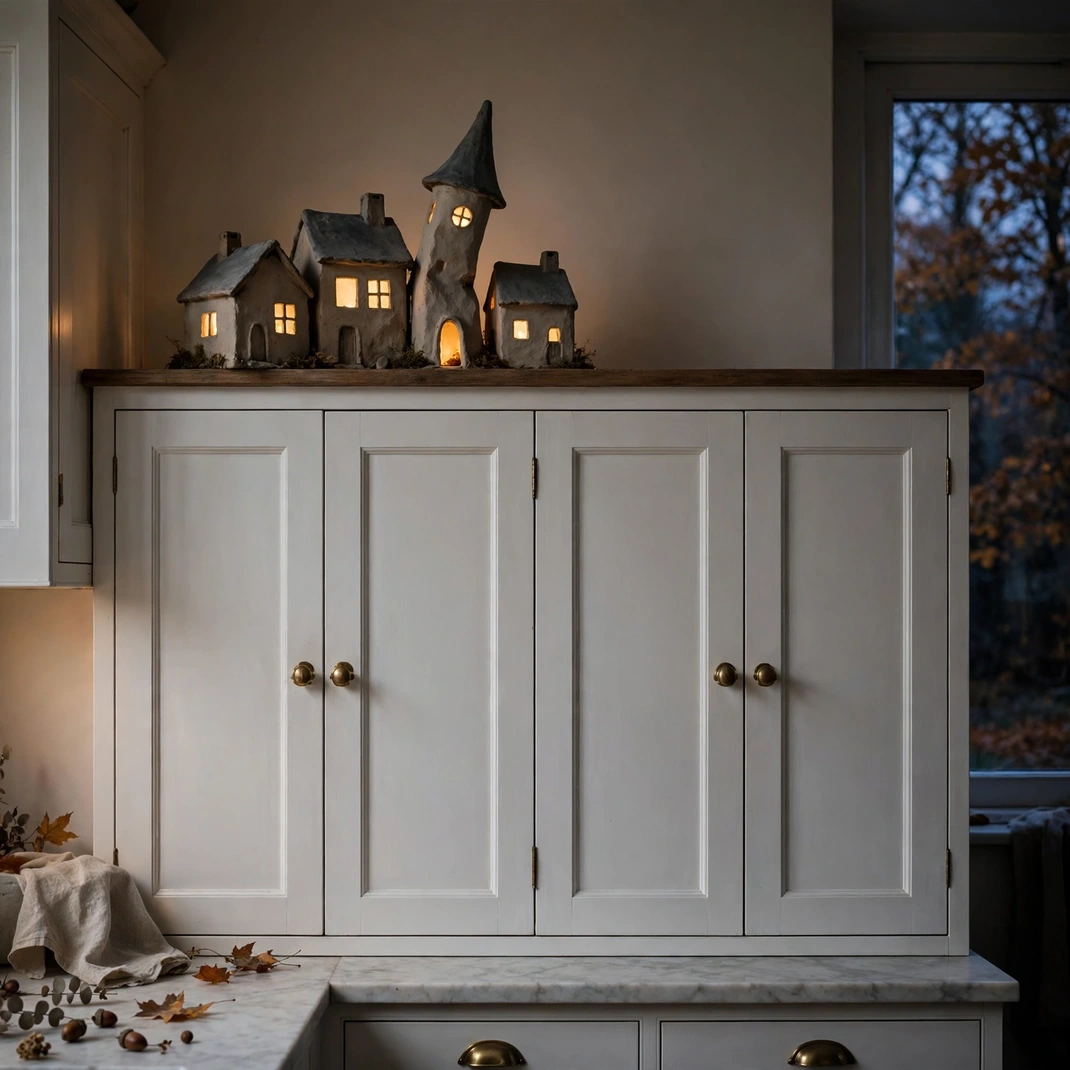
A small cluster of unglazed ceramic houses turns the high ledge into a quiet village seen at twilight. Warm pinpoints in the windows feel charming from the room below, while soot-gray roofs and one crooked tower lend just enough October mystery.
- How to Style It: Group four or five houses across no more than one-third of the cabinet run, arranging them in two shallow depths rather than a straight line. Use battery tea lights or a low-heat LED strand, hide the battery pack behind the tallest house, and keep all openings unobstructed.
- Why It Photographs Beautifully: Illuminated windows punctuate the pale architecture with tiny amber squares, creating a strong dusk photograph without overpowering the kitchen. The miniature scale also makes the upper ledge feel intentionally distant, like a hillside beyond the room.
- Pro Tip: Place a matte charcoal board behind the village if the wall is light; the removable backdrop sharpens rooflines and makes every window glow more clearly.
- Budget-Smart Swap: Cut simple house fronts from sturdy white card, back the windows with vellum, and illuminate the row from behind with one warm rechargeable light bar.
9. Run a Tailored Tartan Band Behind the Cabinet Crown
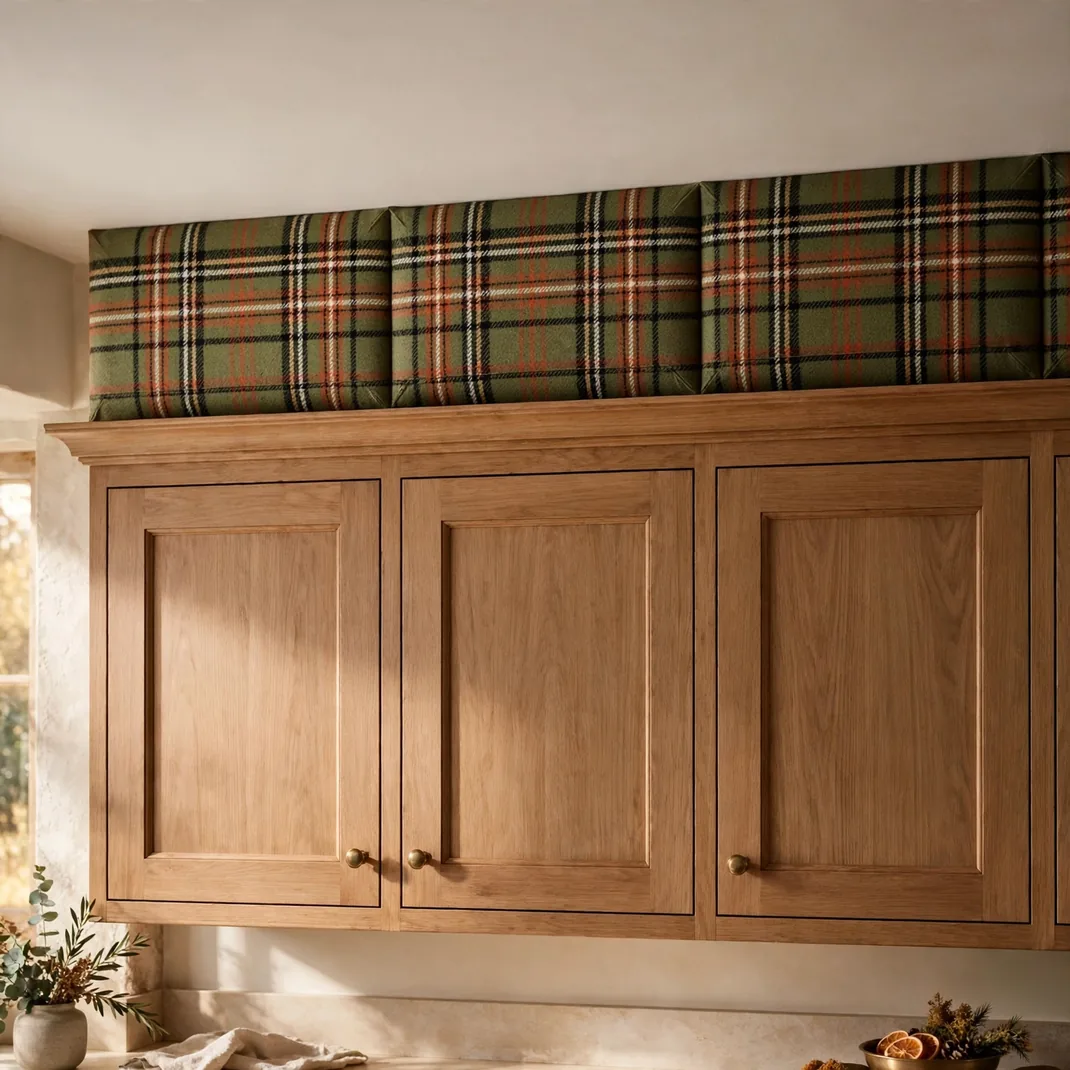
A slim panel of moss, rust, cream, and black tartan adds a warm textile note where walls above cabinets can feel unfinished. Used as a narrow architectural band rather than draped fabric, the pattern looks tailored, seasonal, and surprisingly polished.
- How to Style It: Wrap fabric smoothly around lightweight foam-core panels cut 8 to 12 inches high, then stand the panels along the back wall above the cabinets. Align the plaid at each seam, leave the upper wall visible, and keep the front cabinet edge completely clear for a crisp reveal.
- Why It Photographs Beautifully: The horizontal band visually connects separated cabinets and adds fine pattern behind simpler objects. Its woven surface responds softly to natural light, while the dark grid gives the frame October structure.
- Pro Tip: Choose a tartan with a quiet ground and one thin rust stripe; broad orange checks can dominate the room and make the installation look like gift wrap.
- Budget-Smart Swap: Use a plaid tablecloth or wool-look scarf, mounting it with removable double-sided fabric tape on reused cardboard panels.
10. Display a Moon-Phase Plate Sequence
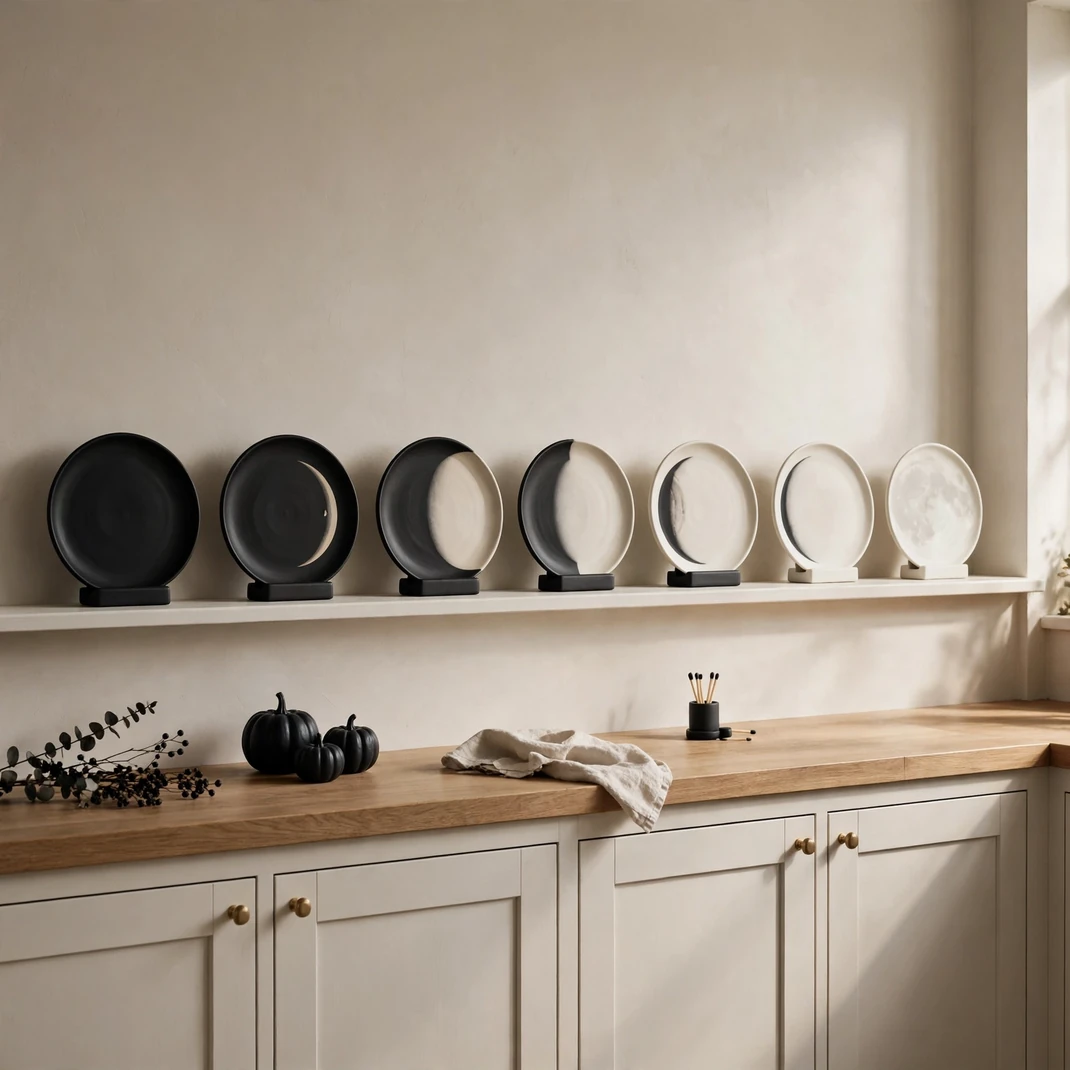
Seven small plates progressing from black to crescent to full cream moon create a graphic lunar rhythm above a long cabinet run. The concept feels clearly Halloween, yet the monochrome ceramic treatment is refined enough for a modern, transitional, or cottage kitchen.
- How to Style It: Stand the plates in low-profile display holders, spacing them 2 to 3 inches apart and centering the full-moon plate in the sequence. Use plates between 6 and 8 inches across, secure each stand with museum putty, and keep the display well behind the cabinet’s front edge.
- Why It Photographs Beautifully: Repeated circles create instant visual order, while the changing black-and-cream shapes guide the eye across a wide composition. The simple silhouettes stay legible even in an establishing photograph of the whole kitchen.
- Pro Tip: Paint the lunar shapes on the back of clear glass plates; the glossy face remains wipeable and the brushwork appears sealed beneath the surface.
- Budget-Smart Swap: Use mismatched thrifted saucers unified with matte ceramic-safe paint, or cut the phases from removable black vinyl for a one-season version.
11. Anchor a Cabinet Corner with Black Olive Branches
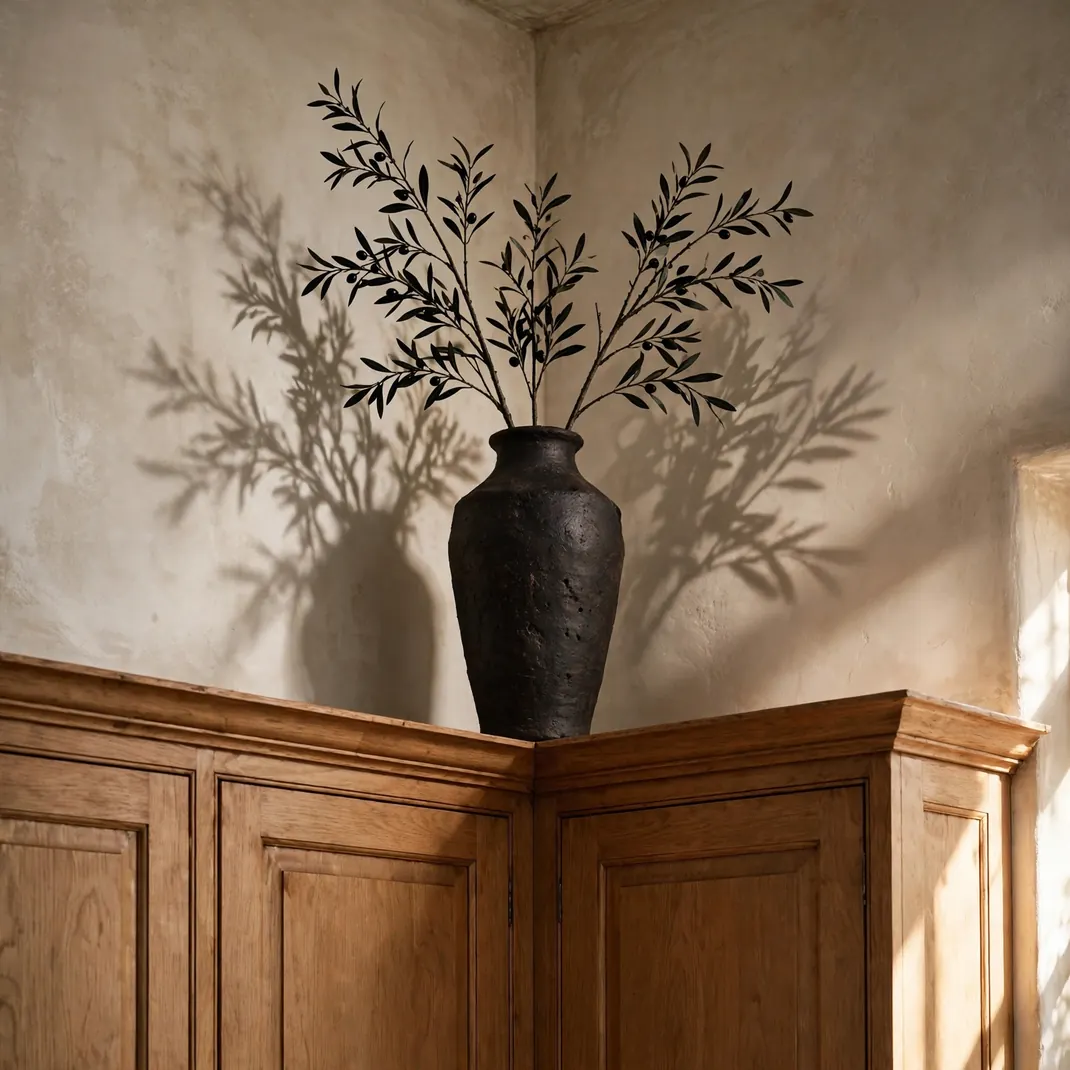
A tall earthenware vessel filled with airy black olive branches gives an empty upper corner movement and height without filling every inch. The slender leaves make natural, feathered shadows, while a cocoa or ash-black pot keeps the look earthy and subtly ominous.
- How to Style It: Set the vessel where two cabinet runs meet and use three branches of unequal length, with the tallest stopping 3 to 5 inches below the ceiling. Bend the stems outward so they occupy the corner rather than leaning over the cabinet doors, and weight the vessel discreetly with clean stones.
- Why It Photographs Beautifully: The branches soften a hard architectural junction and throw delicate shadows that change through the day. Their open structure preserves negative space, giving the scene drama without the visual heaviness of a full garland.
- Pro Tip: View the arrangement from the kitchen entrance before trimming; upper-cabinet branches often need to be shorter and wider than they appear while you are arranging them at eye level.
- Budget-Smart Swap: Spray two or three bare branching stems in charcoal brown and add sparse faux leaves rather than purchasing a full artificial tree spray.
12. Stack Vintage Recipe Boxes as Color Blocks
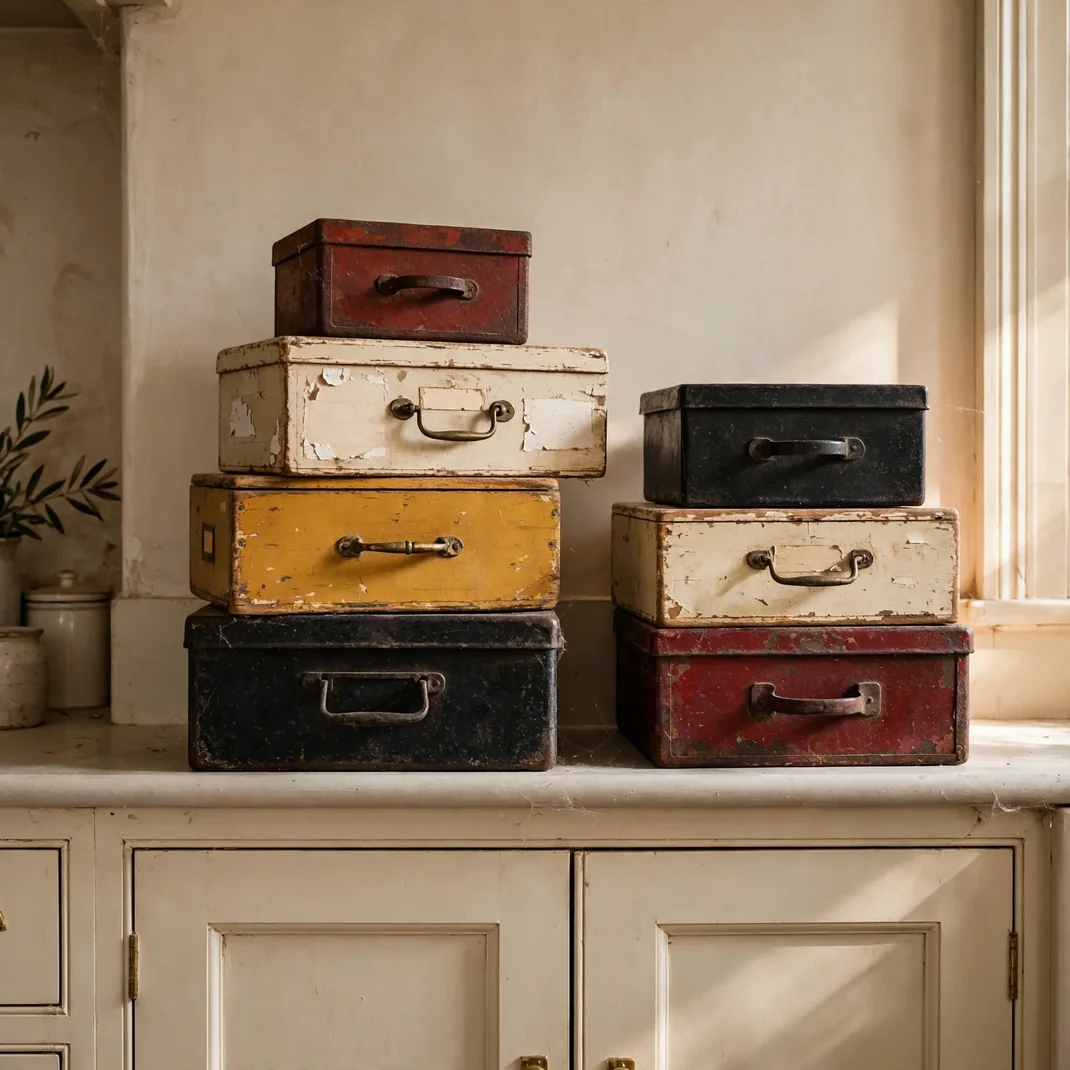
A stack of old metal and wood recipe boxes in mustard, oxblood, cream, and black gives above-cabinet space a nostalgic pantry story. Their compact rectangular shapes bring orderly color, and worn labels or handles make the display feel inherited rather than themed.
- How to Style It: Create two uneven stacks of two or three boxes, turning one box sideways to vary the face dimensions. Place a shallow black tray beneath the smaller stack, leave 6 to 10 inches between groups, and reserve the interiors for cookie cutters or table linens used only occasionally.
- Why It Photographs Beautifully: The boxes echo cabinet geometry while their chipped finishes provide close-up texture. Blocks of muted color read clearly from below, and the negative space between stacks keeps the line from becoming storage clutter.
- Pro Tip: Remove or cover any bright commercial branding; one tiny handwritten label is charming, but several labels create distracting text in photographs.
- Budget-Smart Swap: Paint small lidded gift boxes in a restrained autumn palette and add inexpensive card-holder pulls to mimic vintage recipe files.
13. Create a Cabinet of Curiosities Under Glass Cloches
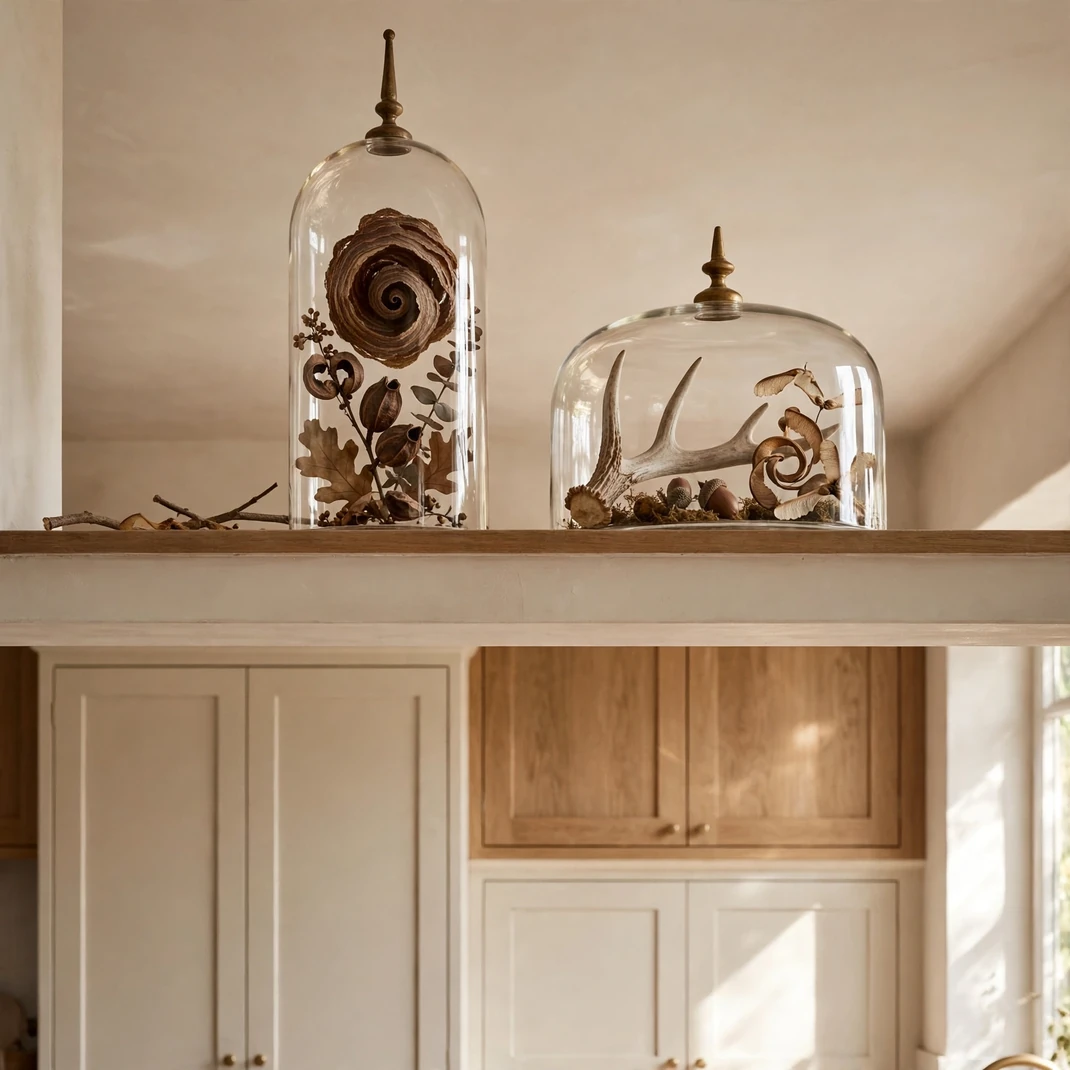
Two glass cloches shelter small October finds—an empty paper wasp nest, curled seed pods, or a pale shed antler—turning the cabinet top into a restrained natural-history display. Clear glass keeps the objects visible but contained, so the mood feels collected rather than cluttered.
- How to Style It: Use one tall narrow cloche and one lower dome, setting each on a dark wood or slate base. Limit every dome to a single specimen, stagger them by several inches, and place the more delicate object where it will not be washed out by a bright window behind it.
- Why It Photographs Beautifully: The domes catch thin highlights that outline each composition, while the enclosed specimens make compelling focal details. Different glass heights add rhythm without introducing more color to the upper wall.
- Pro Tip: Angle glossy cloches slightly away from windows and pendant lights before photographing; a few degrees can eliminate a large reflection without changing the arrangement.
- Budget-Smart Swap: Pair clear glass mixing bowls or large jars with thrifted wood plates, turning the vessels upside down over dried pods gathered responsibly outdoors.
14. Layer a Reclaimed Window with Wheat Sheaves
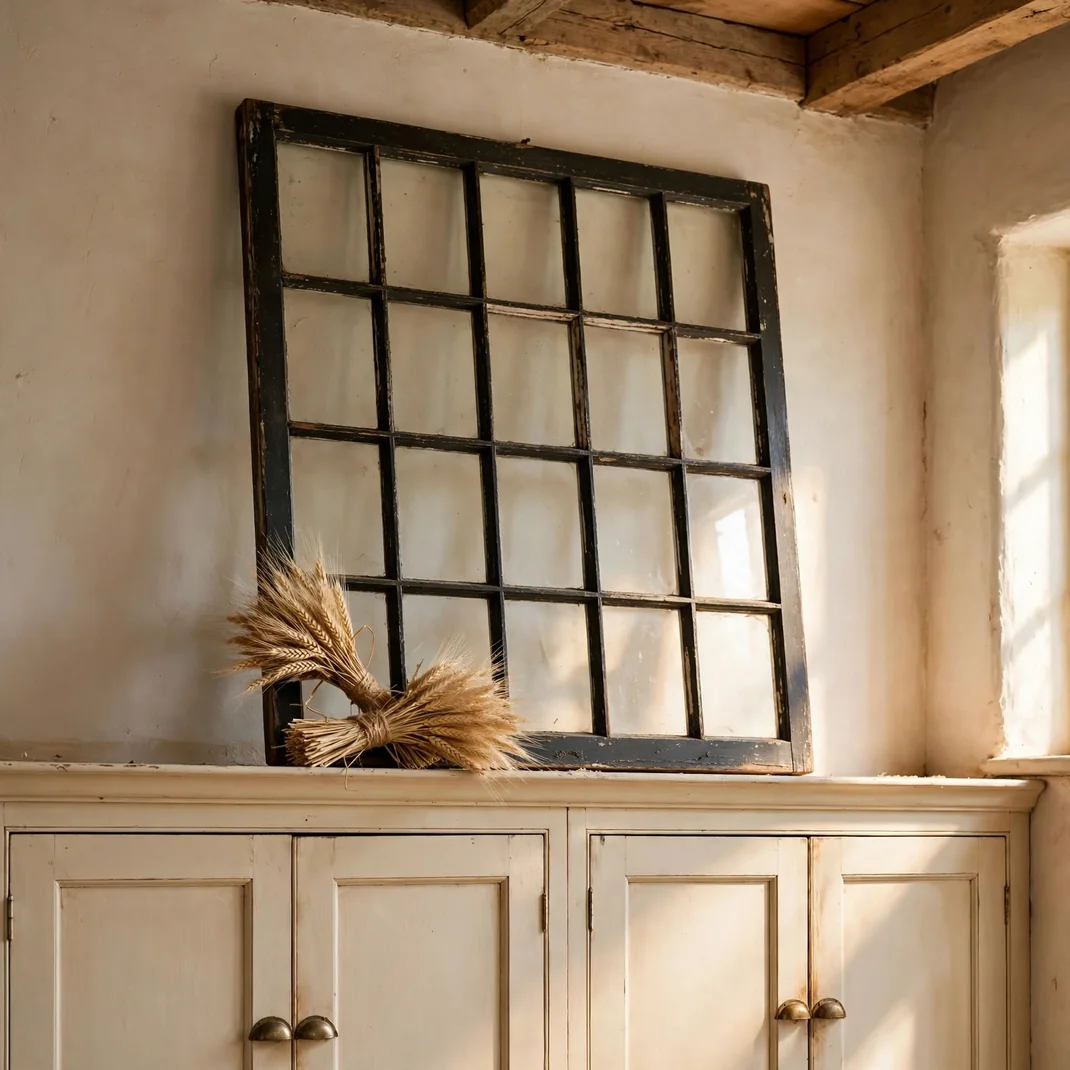
An old divided-light window frame leaned above the cabinets adds instant farmhouse architecture, especially when two compact wheat sheaves overlap one lower corner. A charcoal-painted frame makes the pale grain feel moonlit and turns the composition toward Halloween without covering it in motifs.
- How to Style It: Choose a lightweight frame no wider than half the cabinet run, remove unsafe glass, and secure it to the wall with anti-tip hardware. Tie two short sheaves with black linen ribbon, angle them in opposite directions, and keep the stems fully supported behind the cabinet crown.
- Why It Photographs Beautifully: The muntins create a strong grid behind the organic grain heads, producing layered depth and crisp shadow lines. Pale wheat catches warm light, while the black frame provides the contrast needed for a memorable wide shot.
- Pro Tip: Leave at least two-thirds of the frame unobstructed; the negative panes are what make the wheat feel intentional instead of like stored dried flowers.
- Budget-Smart Swap: Use an empty secondhand picture frame and add thin balsa strips to imitate divided panes, then gather a small bundle of dried ornamental grass.
15. Balance an Antique Scale with Clove Pomanders
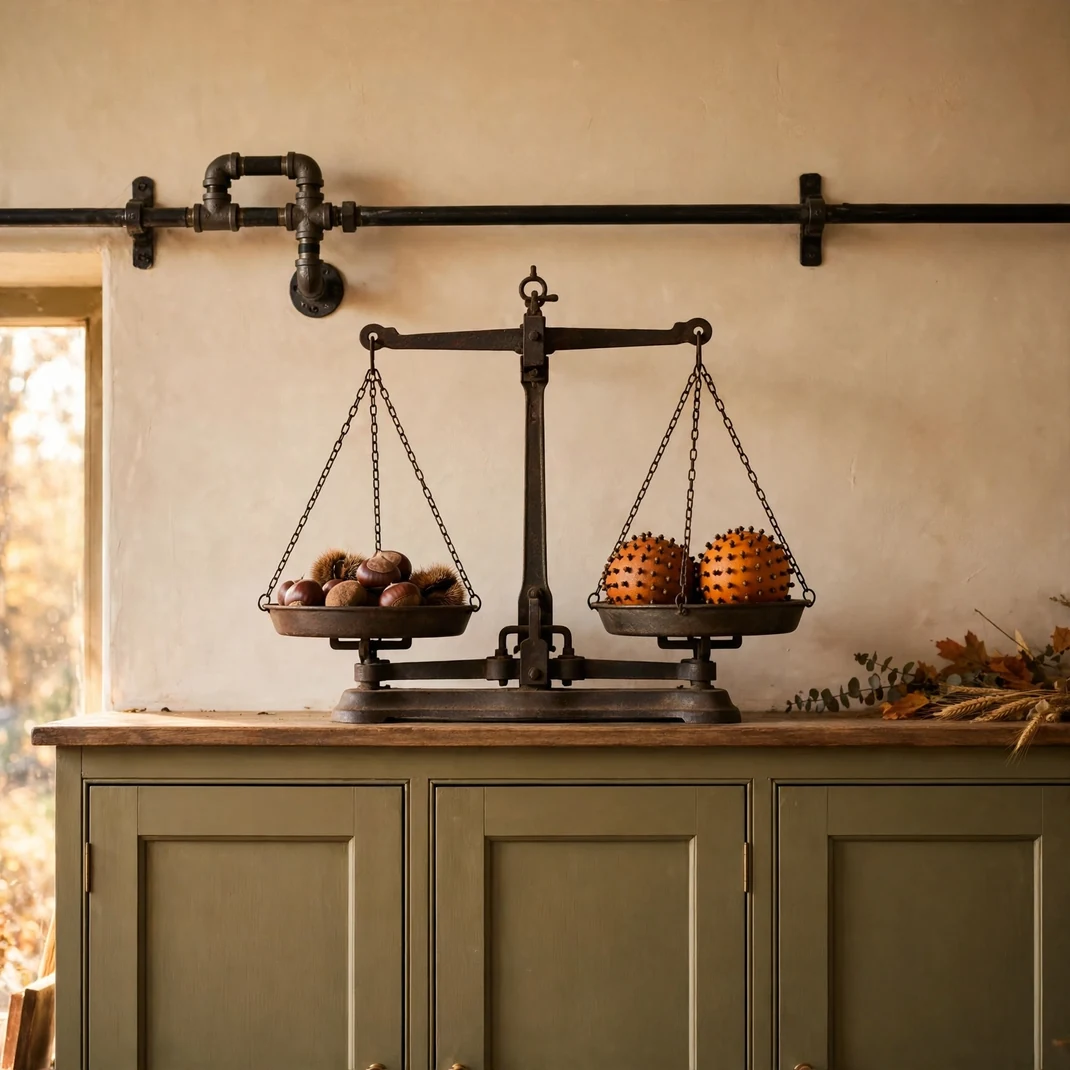
A vintage balance scale holding chestnuts and two clove-studded pomanders turns a practical kitchen relic into a fragrant-looking October focal point. Its dark metal arms add a delicate industrial line above the cabinets, while the burnished fruit and nuts bring warmth without repeating a pumpkin display.
- How to Style It: Center the scale over a shorter cabinet bank, heap chestnuts in one pan, and place two preserved or realistic faux pomanders in the other. Keep the beam level, add one folded flour sack behind the base, and leave at least 8 inches of empty space on either side.
- Why It Photographs Beautifully: The symmetrical pans frame the central mechanism, making the object easy to read from below. Textured cloves and glossy chestnuts soften the ironwork, and side light gives the arrangement the character of an old editorial still life.
- Pro Tip: Use dried pomanders only after they are fully cured and inspect them regularly; for a long display in a warm kitchen, faux oranges dotted with whole-clove heads are the cleaner choice.
- Budget-Smart Swap: Use an old kitchen scale with a single tray, filling it with gathered chestnuts and balancing the composition visually with a small dark wood bowl beside the base.
16. March Smoky Lanterns Along a Short Cabinet Run
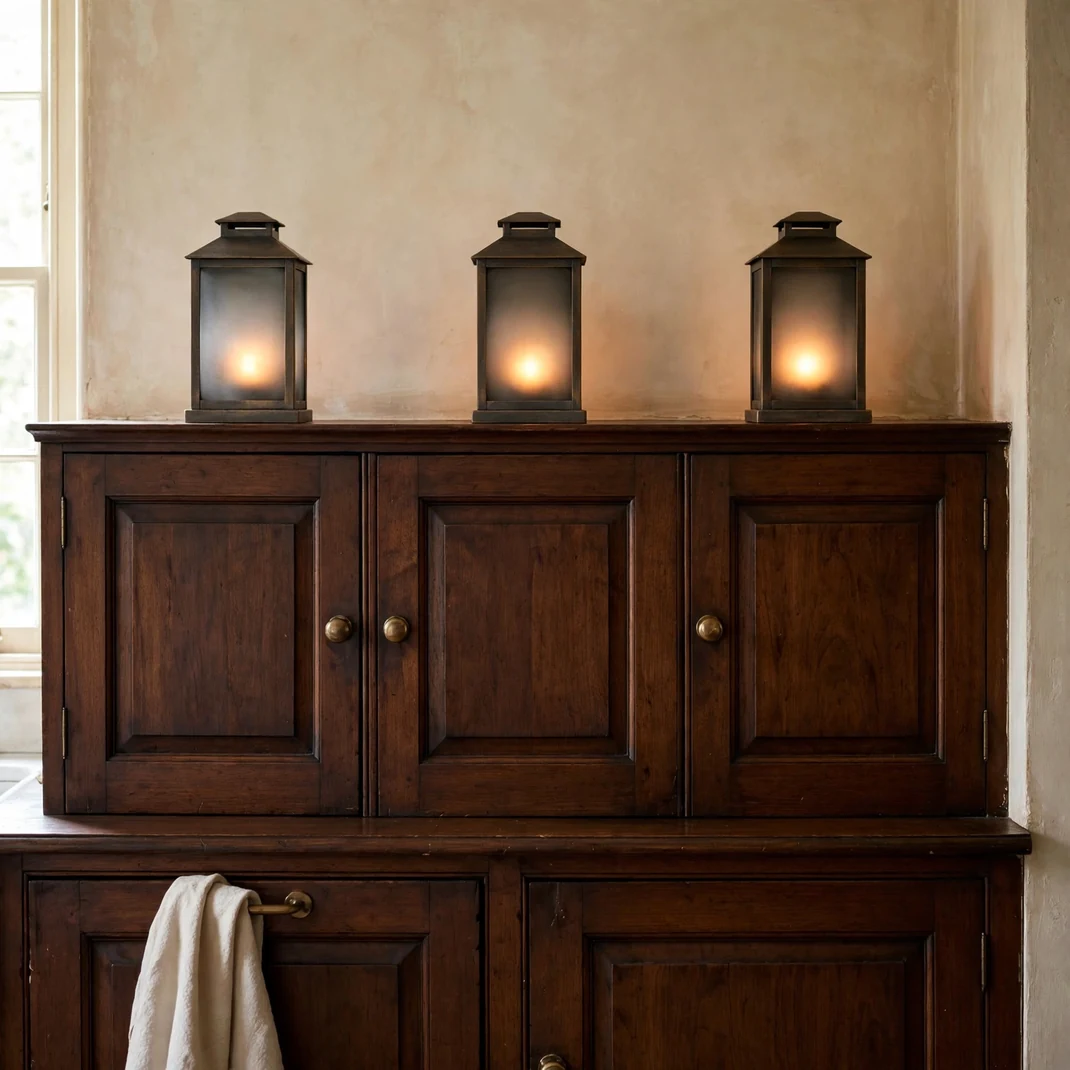
Three compact lanterns in smoke-gray glass create a measured procession of warm light above dark or wood-toned cabinets. Their contained glow suggests a path through an old house, but the simple repeated form keeps the effect quiet and architectural.
- How to Style It: Choose lanterns no taller than 12 inches and space them evenly across one short cabinet run, not the entire kitchen. Fit each with the same rechargeable flicker candle, align their bases several inches behind the front edge, and use a remote so they can be switched off without climbing.
- Why It Photographs Beautifully: Repeated amber points establish depth across the upper wall, and smoked glass prevents the LEDs from becoming harsh. The lantern frames echo cabinet lines, so the seasonal lighting feels integrated with the room.
- Pro Tip: Use an odd number and vary only one detail—such as the center lantern being 2 inches taller—to avoid both rigid symmetry and a mismatched collection.
- Budget-Smart Swap: Place battery tea lights inside three clean smoked-glass tumblers and add simple black wire handles, keeping all improvised pieces stable on flat coasters.
17. Wash the Ceiling with a Hidden Coppery Glow
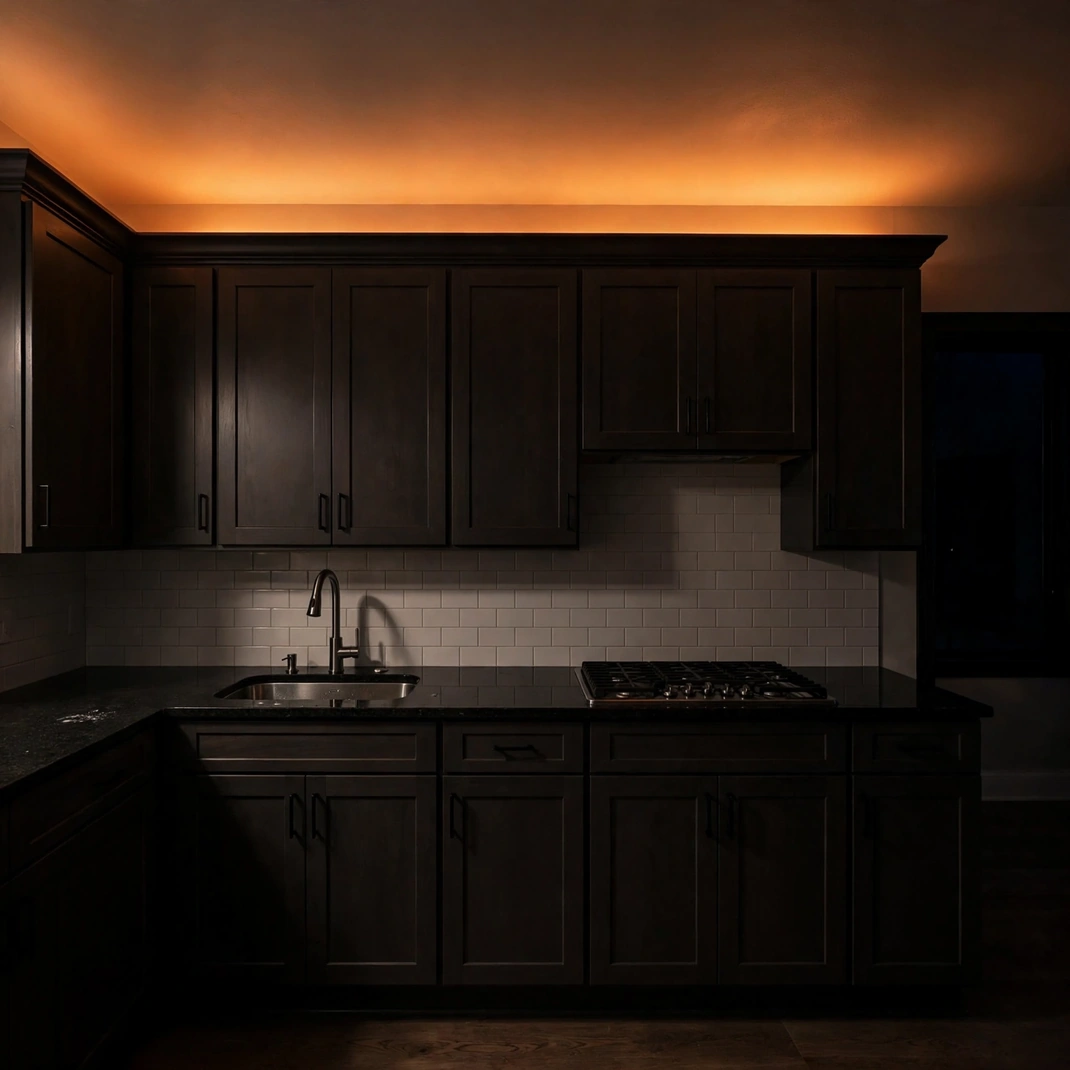
A concealed amber light wash above the cabinet crown can change the whole kitchen after dark without adding a single decorative object. The coppery halo warms the ceiling, deepens cabinet shadows, and gives everyday surfaces a subtle Halloween atmosphere that disappears at the touch of a switch.
- How to Style It: Install a dimmable, warm LED strip in an aluminum diffuser channel at the back of the cabinet top, aiming the light toward the wall and ceiling. Choose a color temperature around warm candlelight rather than bright orange, hide all wiring, and keep the strip clear of grease, heat, and ventilation paths.
- Why It Photographs Beautifully: Indirect light creates a smooth gradient instead of visible bulbs, outlining the cabinet silhouette and making the room appear deeper at dusk. Because the effect is architectural, it supports every other styled zone without competing for attention.
- Pro Tip: Stop the light 4 to 6 inches before each exposed cabinet end; this prevents a bright line from revealing the strip and preserves the illusion that the glow comes from nowhere.
- Budget-Smart Swap: Use a rechargeable motion-sensor light bar behind one central cabinet run and cover it with an amber lighting gel or warm diffuser made for LEDs.
Style the High Ledge, Then Know When to Stop
Above-cabinet décor succeeds when it creates one clear rhythm and leaves enough breathing room for the kitchen’s architecture to show. Choose one concept for a short run or repeat two related materials across a larger room, but resist filling every gap; open wall is part of the composition. Before finishing, view the display from the kitchen entrance, the dining area, and your usual standing position. Secure every object, keep décor away from heat and ventilation, and choose pieces that can be removed for cleaning. The result should add warmth and intrigue from below while leaving the kitchen practical, calm, and unmistakably yours.