21 Garage Halloween Haunts Made to Turn Heads
The garage is the largest blank canvas on any Halloween street. A single garage door covers more square footage than most living-room walls, the driveway is a natural stage, and the interior — that big, dark, echoing cave — begs to be filled with something strange. These 21 ideas treat the whole setup as one production: the door draws the eye from the curb, the driveway keeps it, and the garage itself pays it off. Park the cars on the street for the season, open that door wide, and give passing traffic a reason to slow down.
1. Frame the Garage Door as a Giant Coffin Front
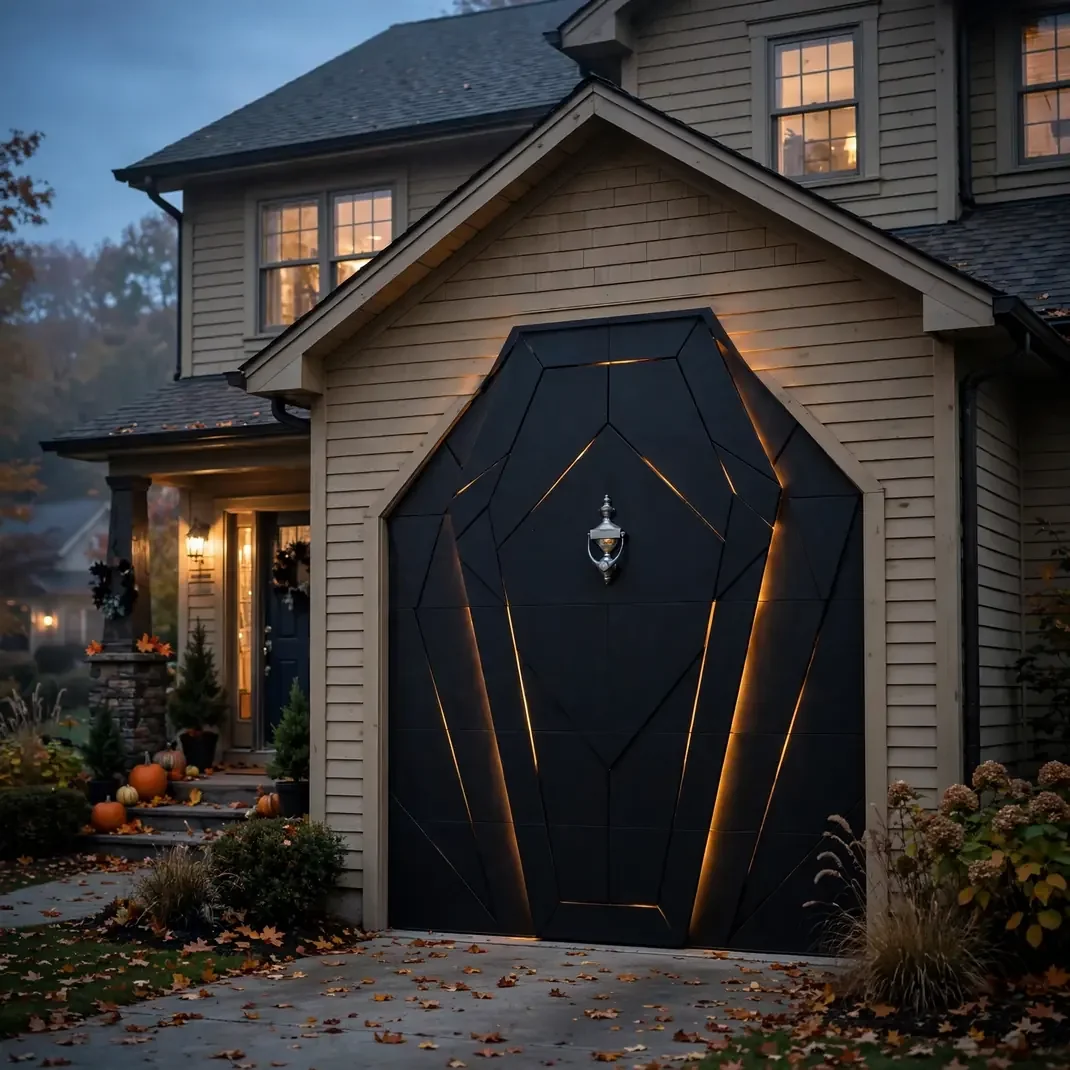
Six black foam-board panels taped to the garage door transform it into a towering coffin lid, and the scale is what stops traffic — a standard door is the exact height of a storybook coffin, so the illusion reads at full size. Cut the panels with a gentle inward taper at top and bottom, seam them with black gaffer tape so the lines disappear at dusk, and add one silver door-knocker shape in the center. At night, backlight the edges with a single amber floodlight so the coffin seems to glow from within its own seams.
How to Style It — Measure each door panel and cut foam board to match, then use a heat gun or a warm wall to gently bow each board so it hugs the door’s curve. Attach with removable exterior mounting squares rated for temperature swings; plain tape curls off in autumn cold.
Why It Photographs Beautifully — The strict geometry reads even from a moving car, and the amber edge-glow against matte black gives every photo a deep, rich tonal range with no flash needed.
Pro Tip — Seal the foam board edges with black spray paint before mounting; unsealed edges show a telltale white core line that ruins the illusion in close-up photos.
Budget-Smart Swap — Paint the coffin shape directly onto a dark drop cloth hung over the door — same silhouette, one piece to wash and reuse next year.
2. Turn the Open Garage Into a Fog-Filled Pumpkin Den
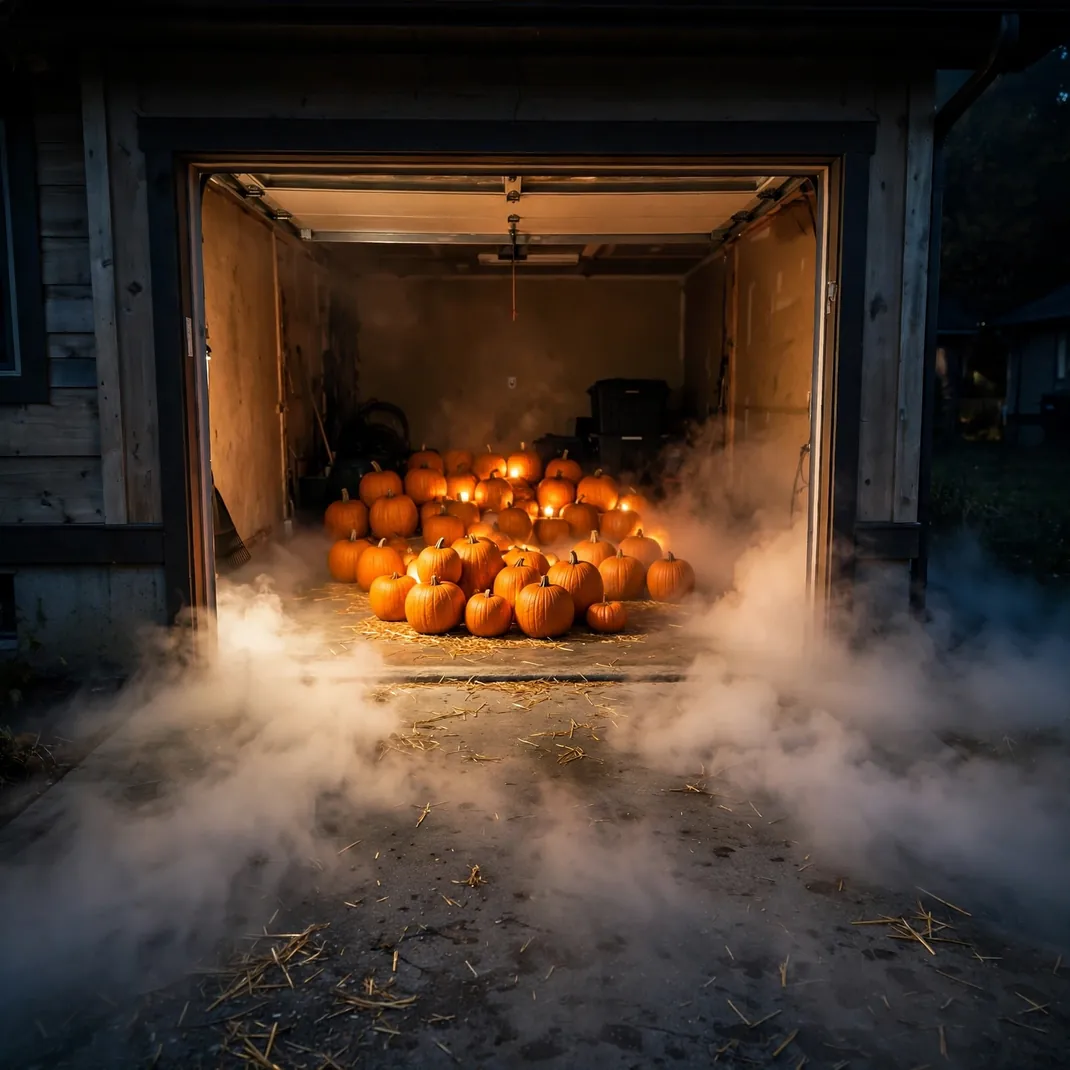
Pull the car out, rake a layer of straw across the concrete, and scatter thirty or more lit pumpkins at floor level around a ground fogger. Fog clings to cold concrete, so a garage stays misty far longer than a porch does — the low ceiling traps it like a jar. Place the fogger at the back so the mist rolls forward out of the open door toward the street, and cluster the pumpkins in three depth layers: big carved ones up front, foam light-up ones in the middle, candle jars at the back. The doorway becomes a glowing, breathing threshold.
How to Style It — Lay the straw in a thin, flat mat rather than a pile so nobody trips in the fog; keep the fogger’s output nozzle clear of pumpkins by at least two feet so warm vapor doesn’t melt wax candles. Battery LED candles keep every pumpkin worry-free.
Why It Photographs Beautifully — Fog softens the harsh overhead lighting of a garage and wraps each pumpkin in its own halo; shoot from the driveway at knee height for the full glowing-den effect.
Pro Tip — Wet the concrete lightly before fogging; damp concrete keeps fog hugging the ground instead of rising and thinning out.
Budget-Smart Swap — Mix real carved pumpkins up front with orange paper lanterns strung at floor level behind them; the lanterns read as pumpkins in the fog for a fraction of the carving time.
3. Hang a Life-Size Creature from the Rafters
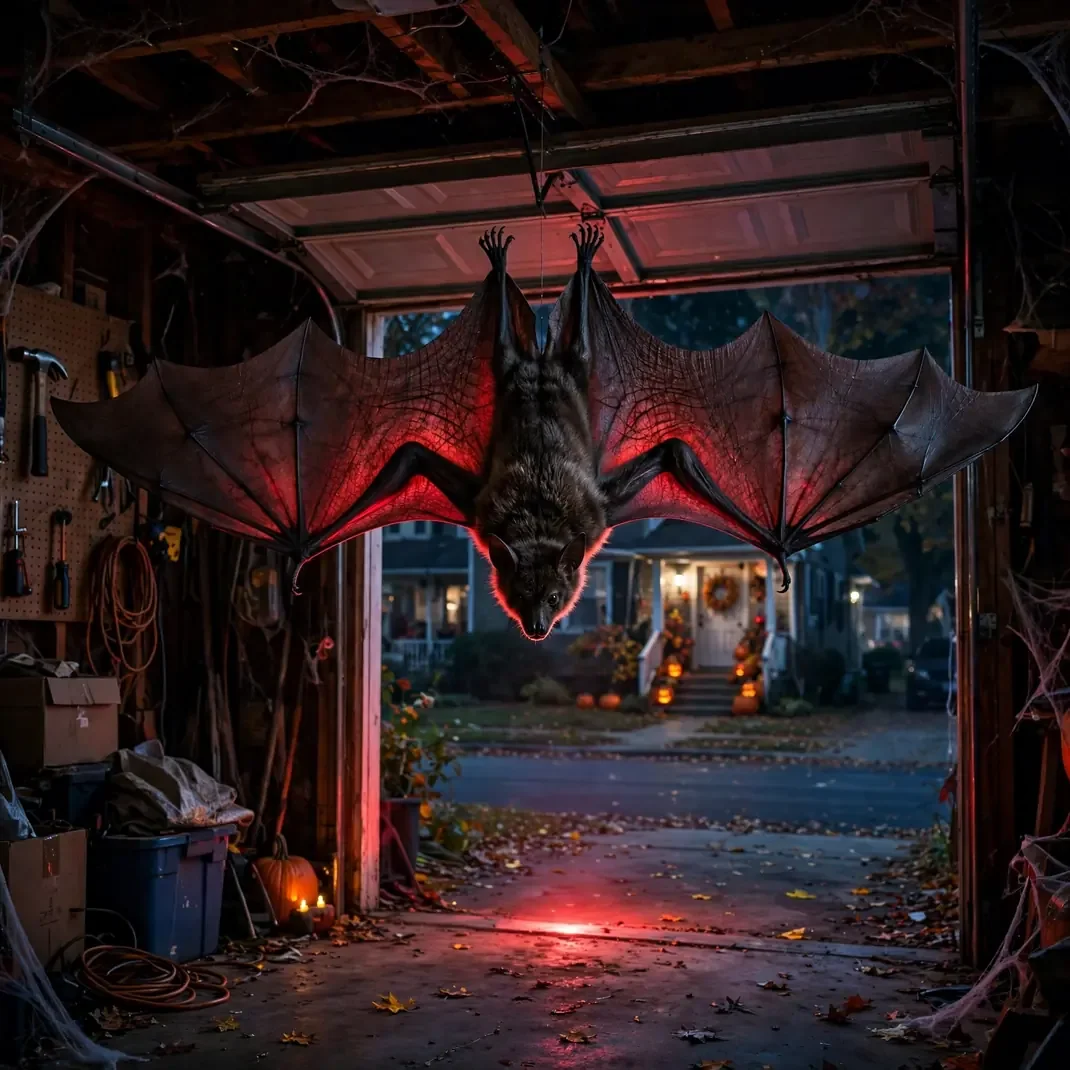
Garage rafters are the one ceiling in the house tall and sturdy enough to hold something truly big. Suspend a life-size winged creature — a dragon, a giant bat, a pterodactyl — from two rafter hooks with fishing line, angled nose-down toward the open door so it looks like it’s diving out at the street. The height does the scaring: viewers never expect something to be above eye level in a garage, and the wingspan fills the whole doorway frame when the door is up.
How to Style It — Drill pilot holes into the bottom chord of two rafters and set screw-in hooks rated for at least 20 pounds; most store creatures weigh under ten but wind from the open door adds pull. Use four lines — two per wing — so it can’t spin in the draft.
Why It Photographs Beautifully — Backlight it with one red uplight on the garage floor; the creature’s silhouette stretches across the ceiling in photos and looks three times its size.
Pro Tip — Tie a small sandbag to the creature’s tail end so the nose stays angled down toward visitors; without it, drafts lift the nose and the dive illusion breaks.
Budget-Smart Swap — Build the creature from black trash bags stuffed with newspaper over a pool-noodle frame; spray with matte finish and the plastic sheen disappears.
4. Drop a Giant Spider on a Pulley from the Ceiling
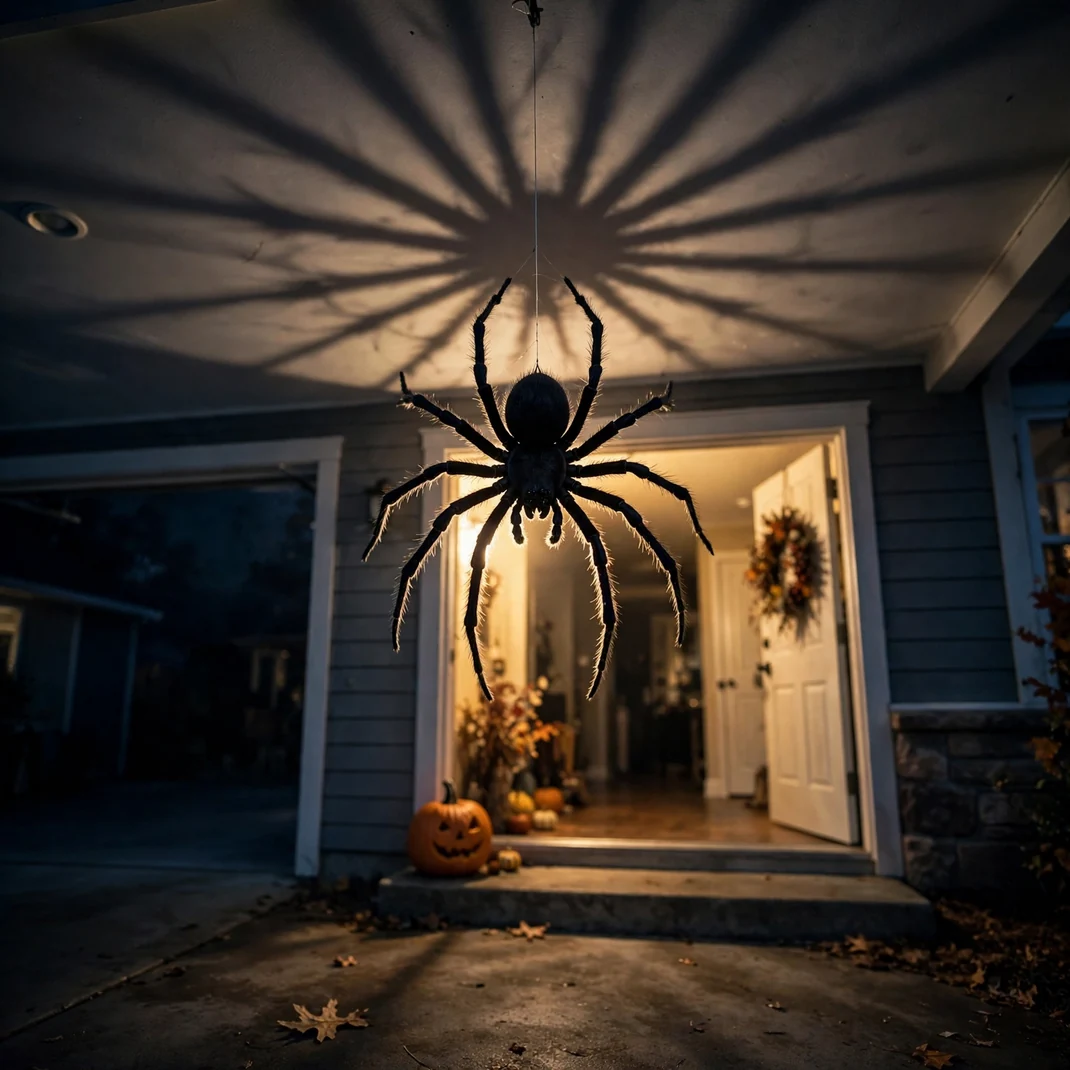
A three-foot spider that lowers silently from the garage ceiling is the single most reliable startle on this list. Mount a small pulley on a rafter above the main walkway, run the cord to a hidden corner, and hang the spider on thin black line. When someone walks underneath — a slow, steady hand-lowering of the cord drops it to face height in about three seconds. The garage ceiling is high enough that the spider hides in the dark until the moment it matters.
How to Style It — Use a fixed pulley (not a swivel) screwed into the rafter so the line can’t twist; route the cord along the wall behind a cobweb strand so it’s invisible. Mark the cord with a knot at the “fully lowered” point so you never drop the spider onto someone’s head.
Why It Photographs Beautifully — Shoot the spider backlit against the open doorway; the legs throw long radial shadows across the ceiling that look spectacular in a single frame.
Pro Tip — Keep the drop to the side of the walkway, not directly overhead; a spider landing on a child reads as an accident, not a scare. Side-drop startles without contact.
Budget-Smart Swap — A beach ball spray-painted black with pipe-cleaner legs, hung on yarn, startles just as well from six feet up.
5. Pose Skeletons Climbing Ladders onto the Roof
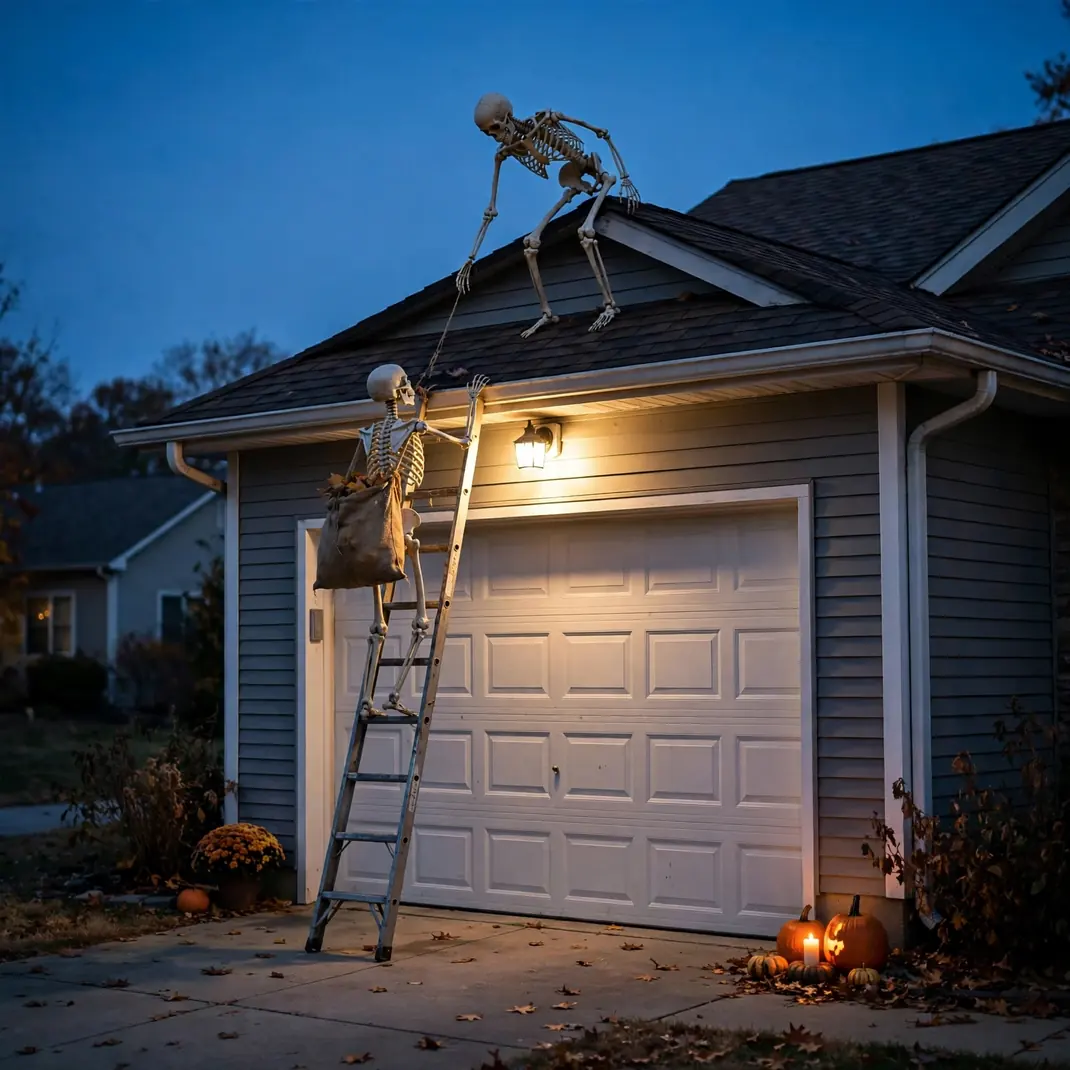
A stepladder leaned against the garage with a skeleton mid-climb tells a whole story in one glance — the heist is in progress. Pose one skeleton gripping the ladder rails with a burlap sack slung over its shoulder, and perch a second one on the roof ridge reaching down. Ladders are garage-native objects, so the scene reads as found, not staged. Leave the garage door light on so the climbers cast long climbing shadows up the door face.
How to Style It — Strap the ladder’s top to the garage’s roof anchor or a sturdy vent with a ratchet tie so wind can’t walk it; zip-tie the skeleton’s hands to the rails at two points so it holds through a storm. Weight the roof skeleton’s pelvis with a sandbag inside the ribcage.
Why It Photographs Beautifully — The diagonal ladder line against the flat door creates instant composition; the scene photographs best from across the street, where the full climb reads in one frame.
Pro Tip — Angle the ladder so the climber faces the street; skeletons posed in profile photograph twice as expressively as ones facing the wall.
Budget-Smart Swap — One skeleton halfway up a short stepladder in the driveway sells the same joke; the roof companion is a bonus, not a requirement.
6. Run a Drive-Through Candy Lane Through the Garage
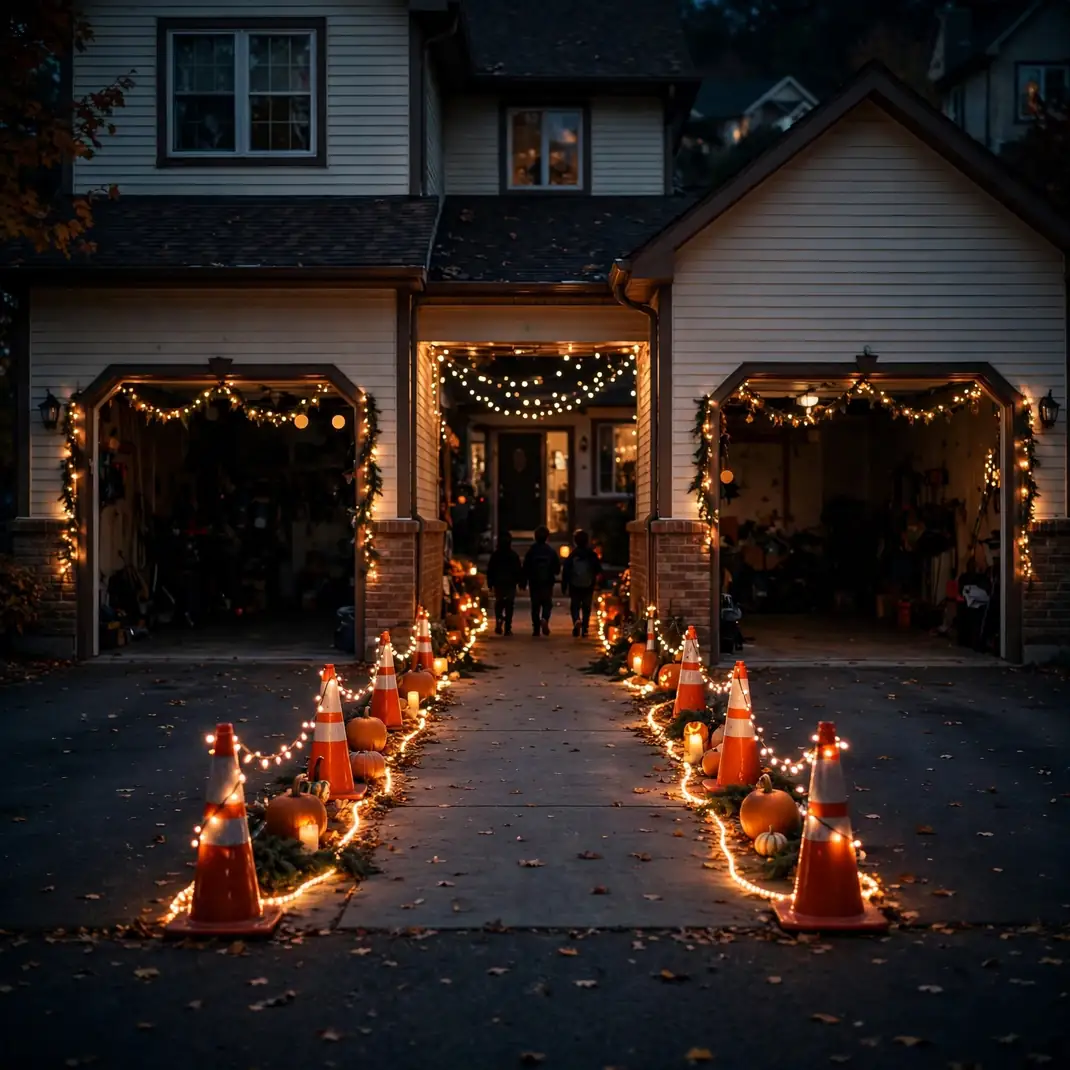
Open both the main door and the side door (or pull the car out and open the back service door) so trick-or-treaters can walk straight through the garage without ever turning around — a one-way candy lane. Traffic flows in the big door and out the side, which eliminates the crowd crush that builds up on a porch. Rope the lane with orange traffic cones, hand out candy from a decorated table at the midpoint, and let the interior decorations do their work as kids pass through. It turns a garage into a haunted-house queue with treats at the end.
How to Style It — Lay rubber-backed runner rugs over the concrete so the lane feels intentional and nobody slips on damp floors; stake rope lights along both edges so the path reads clearly even in full fog. Keep the candy table at the far end so visitors pass every decoration first.
Why It Photographs Beautifully — The long sightline through two open doors gives photos a natural vanishing point; shoot from the entrance as kids exit glowing into the night.
Pro Tip — Post a simple “CANDY THIS WAY →” sign at the curb; without wayfinding, half your visitors will queue at the front door out of habit.
Budget-Smart Swap — If there’s no side door, make the lane a U-turn: in the big door, around a center display, and back out the same door — the flow still beats a dead-end porch.
7. Turn the Garage into a Haunted Auto Shop
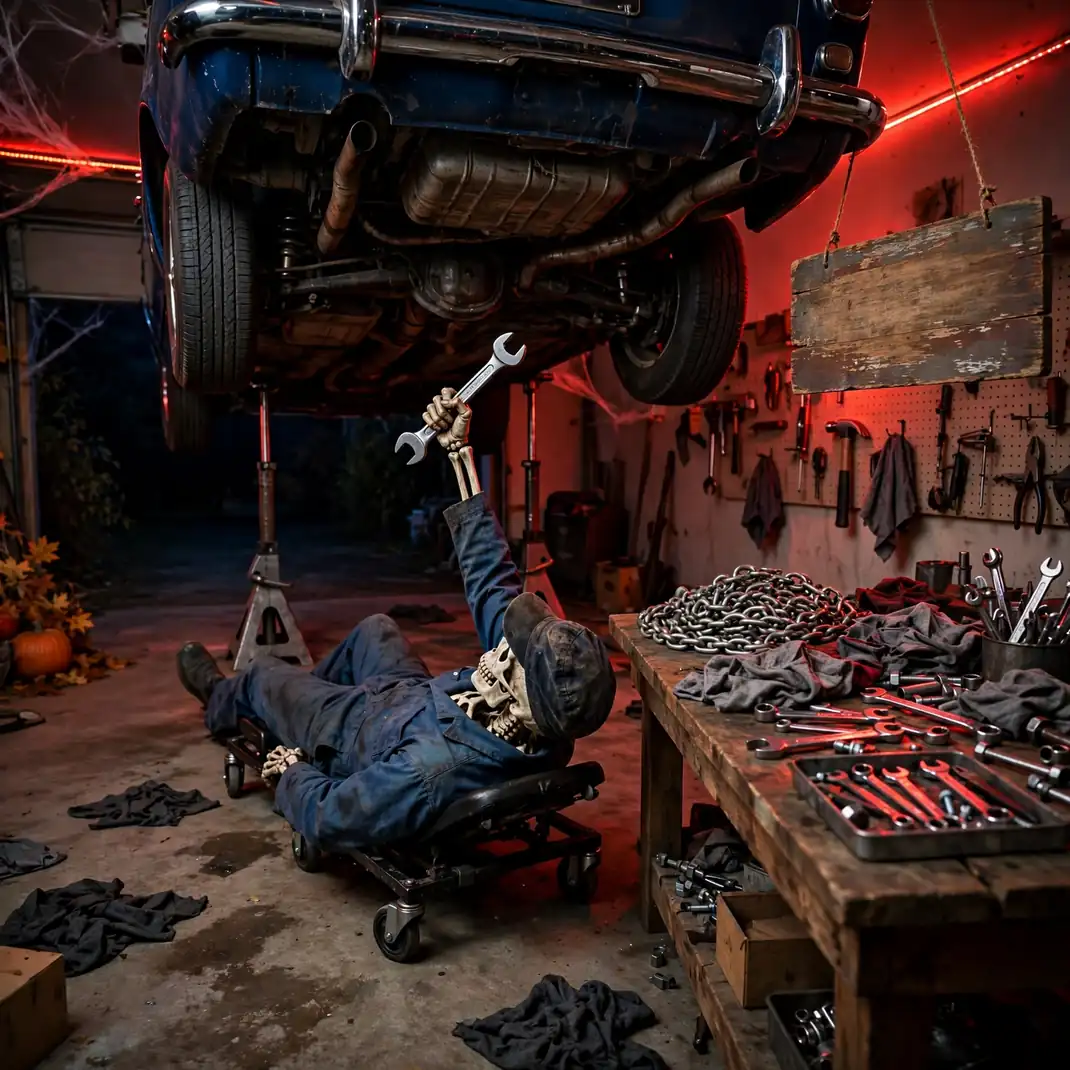
The garage already is an auto shop — so lean into it. Hang a hand-painted “Graveyard Garage — No Appointment Necessary” sign, pose a skeleton mechanic under a lifted creeper, drape chains and shop rags over the workbench, and scatter a few “spare parts” (foam bones, a plastic skull on the tool chest) among the real tools. The joke lands because every prop sits where its real-world counterpart would: the realism of the garage does half the decorating for you. Red shop-light gels over the fluorescents finish the mood.
How to Style It — Keep the real tools on the pegboard and add only five or six spooky accents; overcrowding breaks the believable shop illusion. Red lighting gels clip onto fluorescent fixtures in seconds and change the whole room’s temperature.
Why It Photographs Beautifully — Red shop light on chrome tools creates a chrome-and-blood palette that looks genuinely cinematic; the pegboard grid gives every shot structure.
Pro Tip — Put the skeleton on the creeper with one arm raised holding a wrench toward the undercarriage of a real car; the narrative reads instantly, no sign needed.
Budget-Smart Swap — A cardboard sign, one skeleton, and two red gels deliver 80% of the effect for almost nothing.
8. Park a Mock Hearse in the Driveway
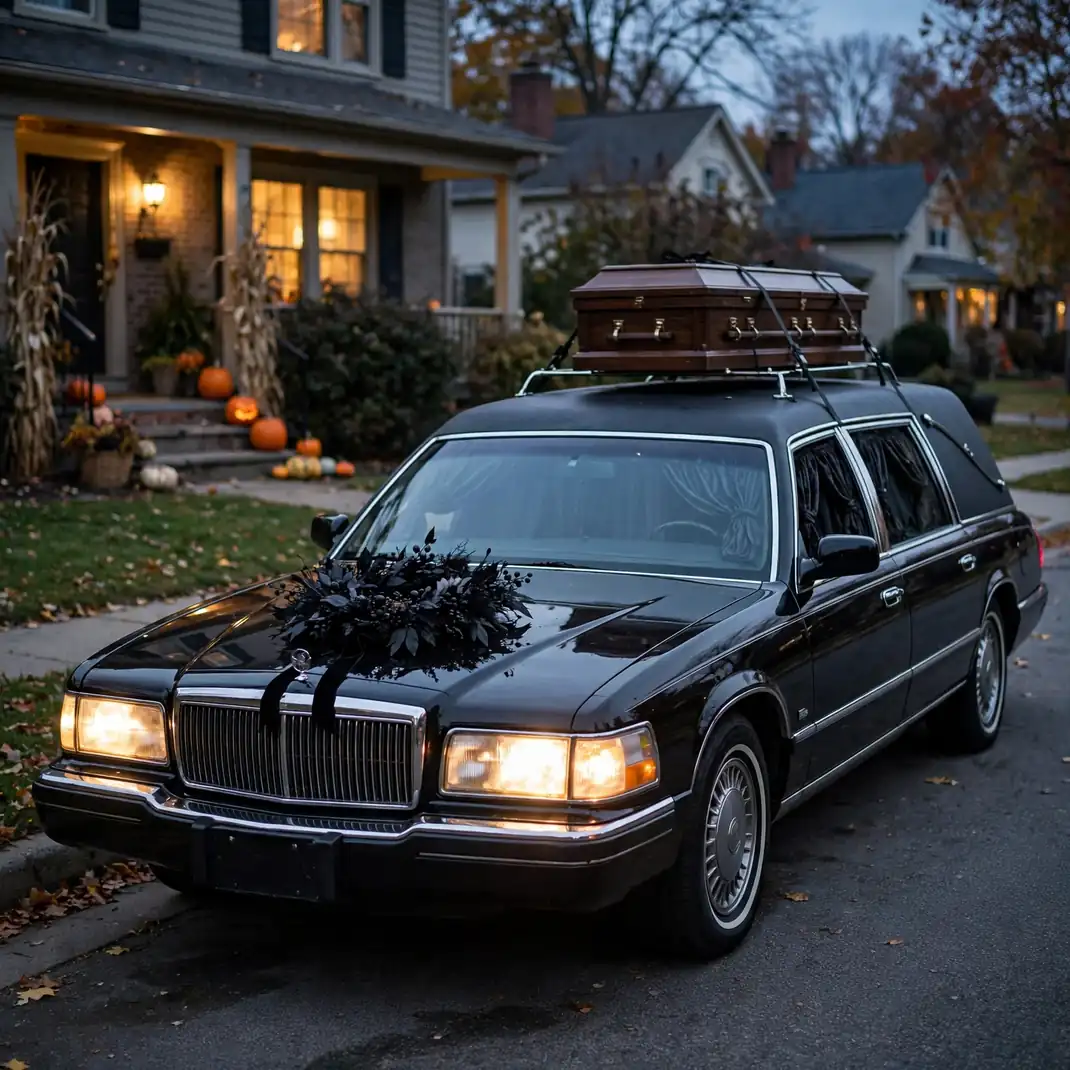
Any long dark car becomes a hearse with the right dressing. Drape black velvet curtains across the rear side windows, tie a black wreath to the hood ornament, and lay a small coffin (cardboard, painted black) across the roof strapped to the rack. Park it angled at the curb so headlights sweep the street at dusk. Neighbors will slow down to check whether it’s real — that’s the turn-heads moment working exactly as designed.
How to Style It — Use suction-cup hooks inside the windows to hang the velvet so nothing touches the paint; strap the roof coffin with soft ratchet straps over a blanket layer to protect the finish. Remove the wreath on windy nights — it becomes a sail.
Why It Photographs Beautifully — Long black lines and the roof silhouette photograph like a film still; shoot at dusk with the headlights on for the full funeral-procession glow.
Pro Tip — Put a pair of skeleton hands on the steering wheel; the tiny detail is what people photograph up close.
Budget-Smart Swap — Black crepe paper window covers and a wreath alone, on any car, get the double-take without the roof build.
9. Stage a Skeleton Garage Band in the Open Door
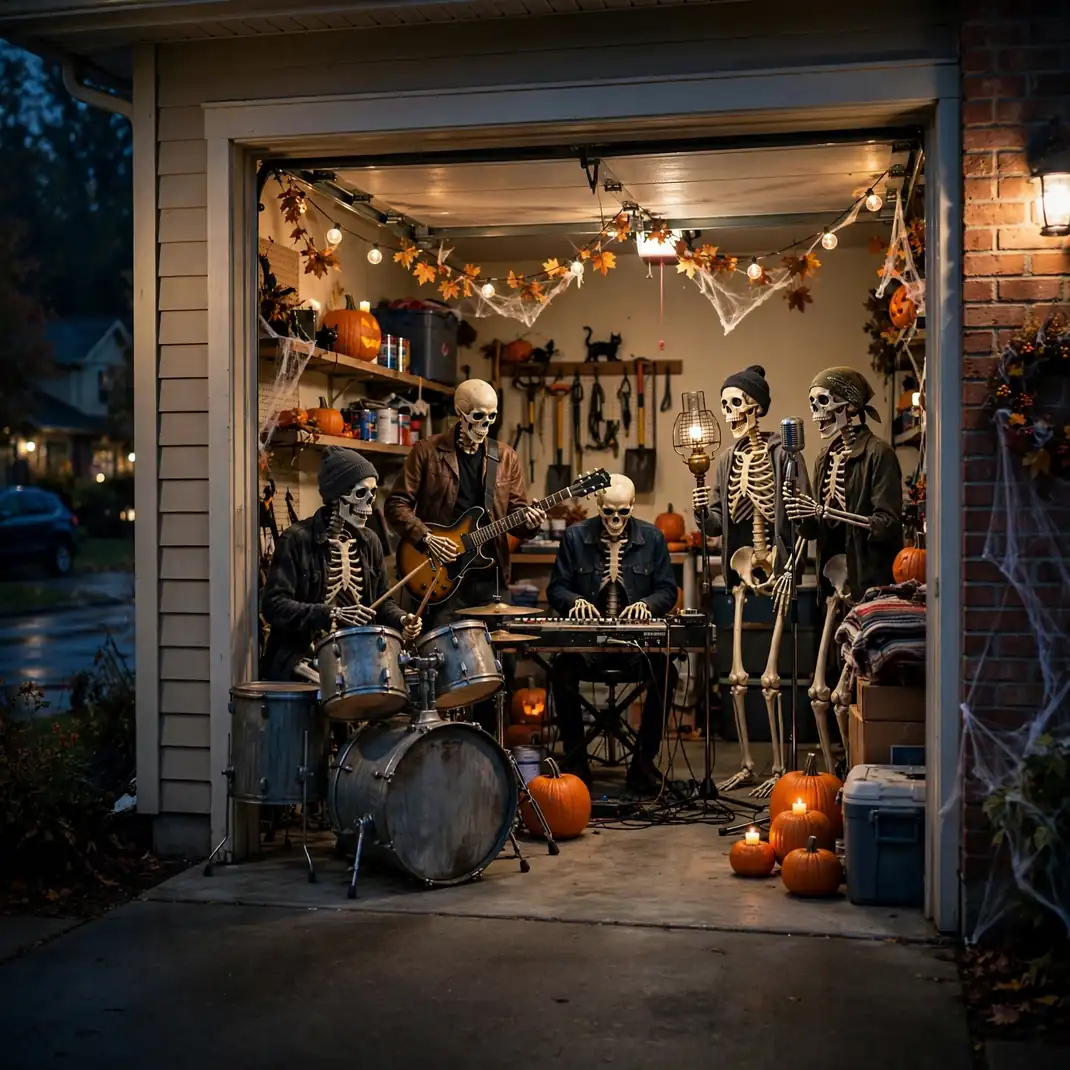
Five skeletons with instruments, framed by the open garage door like a stage proscenium, is the scene every passerby films. Pose a drummer on an overturned trash can, a guitarist with a real instrument, a keyboardist at a folding table, and two backup singers with microphones made from desk lamps. Run a Bluetooth speaker with a surf-rock or monster-mash playlist at street-friendly volume. The garage’s natural acoustics give the music a live-venue echo that no porch setup can match.
How to Style It — Anchor each skeleton’s feet with zip ties to a plywood base plate so they stand through wind and bass vibration; pose the guitarist’s fingers on the frets with floral wire — the fine detail is what sells it. Keep the speaker behind the band so the sound projects forward.
Why It Photographs Beautifully — The doorframe crops the scene like a concert poster; shoot straight-on from the street at night with the garage lit and the band reads as a real gig.
Pro Tip — Tilt the drummer’s head down toward the cans; a skeleton looking at its instrument reads as “playing,” one staring at the street reads as “posed.”
Budget-Smart Swap — Two skeletons with air guitar and one with drumsticks on paint cans still reads as a band from the curb.
10. Turn the Garage into a Pumpkin-Carving HQ
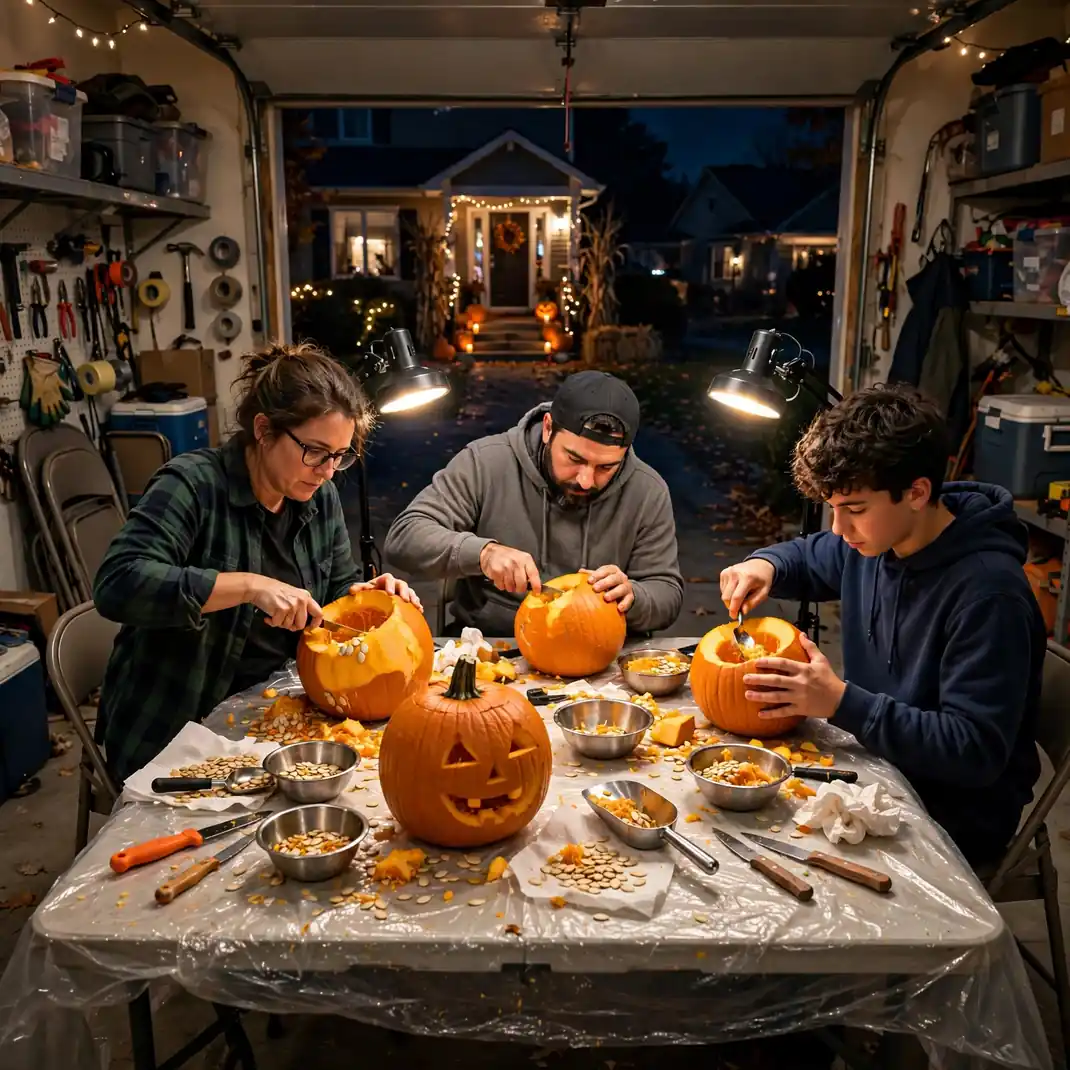
Move the carving party where the mess belongs. Cover a folding table with a plastic drop cloth, set out carving kits, bowls for seeds, and a trash bin for guts, and hang a string of work-lights over the table so every cut is visible. The genius is in the cleanup: hose the floor when you’re done. Post a “Carve Here — Tools Provided” sign at the driveway so neighbors drift in; a garage carving party doubles as the friendliest decoration on the block because it’s alive with people.
How to Style It — Tape the drop cloth’s edges to the table legs so it can’t slide; set the seed bowls and trash bin on the floor beside the table to keep the work surface clear. A cheap clip-on shop light per carver beats one overhead light every time.
Why It Photographs Beautifully — Orange pumpkins, bright work lights, and hands mid-carve give every photo warmth and motion; the garage backdrop keeps the scene from looking like a staged kitchen shoot.
Pro Tip — Display finished pumpkins along the driveway the same night, lit; the growing lineup is a decoration that builds itself over the week.
Budget-Smart Swap — Sawdust-free version: carve with the $5 stencil kits and light with phone flashlights — the party is the point, not the gear.
11. Glow the Tool Bench with Jack-o’-Lantern Lanterns
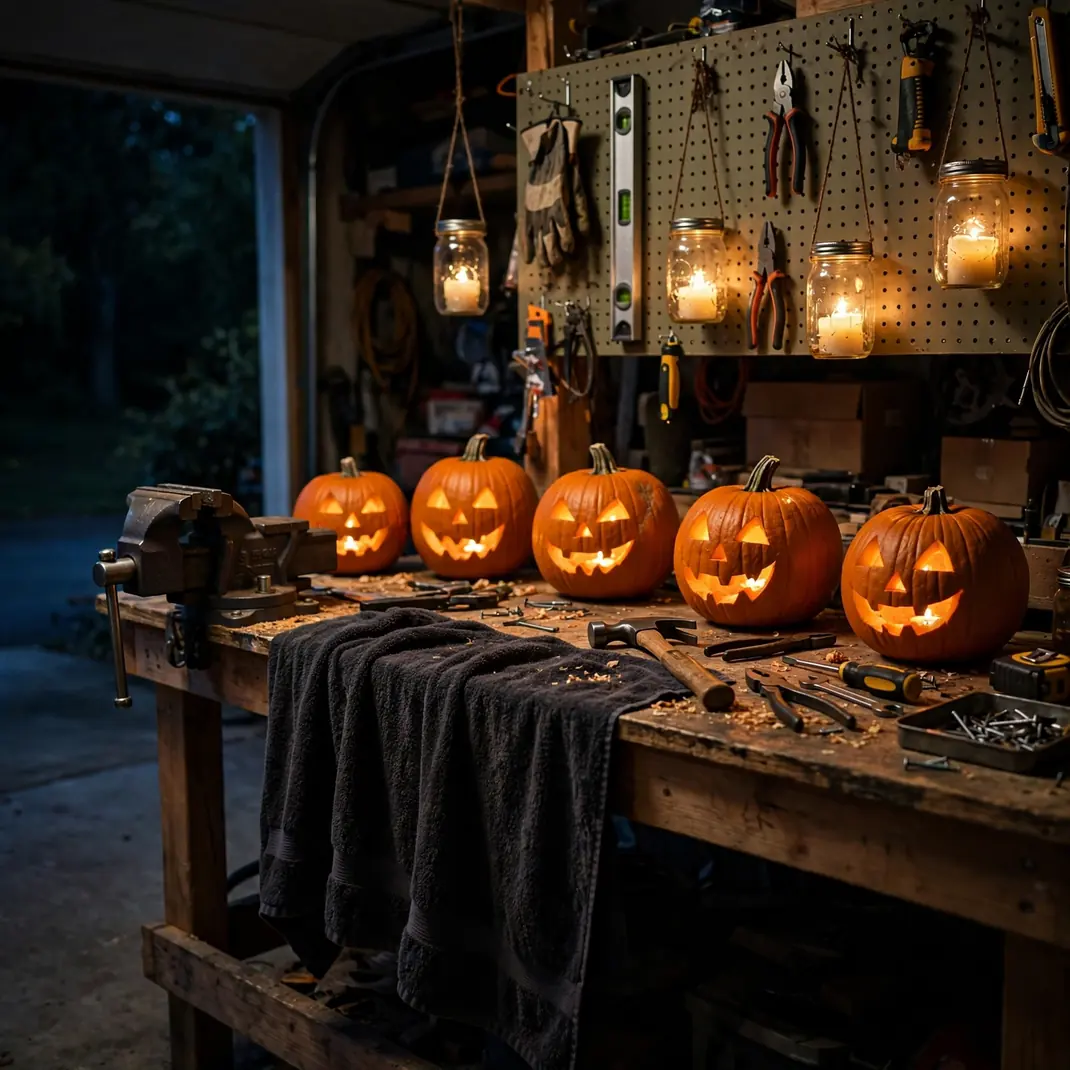
The workbench is the garage’s mantel — treat it like one. Line its back edge with jack-o’-lanterns in descending heights, hang two mason-jar lanterns from the pegboard above, and let the bench’s own clutter (vise, toolbox, coiled extension cord) stay exactly where it is. The contrast of a working bench glowing with carved faces is what makes it work; it looks discovered rather than decorated. A dark towel draped over the bench front hides the clutter underneath and gives the pumpkins a clean stage.
How to Style It — Use battery tea lights in every lantern so there’s no open flame near sawdust or solvents; hang the mason jars from S-hooks on the pegboard at eye level so they frame the pumpkins. Keep a two-foot clear zone around any real candle — garages hold flammable fumes.
Why It Photographs Beautifully — The pegboard’s hole grid glows through the lantern light, creating a textured backdrop no mantel can offer.
Pro Tip — Rub the inside of carved pumpkins with petroleum jelly; it slows mold and keeps them glowing for a full week instead of three days.
Budget-Smart Swap — Foam carve-able pumpkins from the craft store last the whole season and never rot — one purchase, years of glowing bench.
12. Open a Cider-and-Donut Drive-Thru Stop

Set a slow cooker of hot cider and a tiered stand of donuts just inside the garage door, and hang a sign at the curb: “Free Cider — Pull Over.” Drivers roll down windows; walkers drift in. The garage’s shelter means rain can’t cancel it, and the smell of warm cider carries down the whole street. It’s hospitality as decoration — the house with the drive-thru is the one the neighborhood talks about the next day.
How to Style It — Keep the serving table three feet inside the door so the slow cooker stays dry and plugged in safely; stack cups with lids so walkers can carry them. A small trash can with a “Cups Here” sign keeps the driveway clean.
Why It Photographs Beautifully — Steam rising from the cider in the garage’s cool air, backlit by the interior lights, is one of the warmest food photos of the season.
Pro Tip — Run the cider through a coffee filter into the slow cooker each morning; it keeps the last-day cider from going cloudy and bitter.
Budget-Smart Swap — A $6 gallon of store cider and a box of bakery donuts is all this takes — the garage and the sign do the rest.
13. Dress the Door with Oversized Magnetic Horror Posters
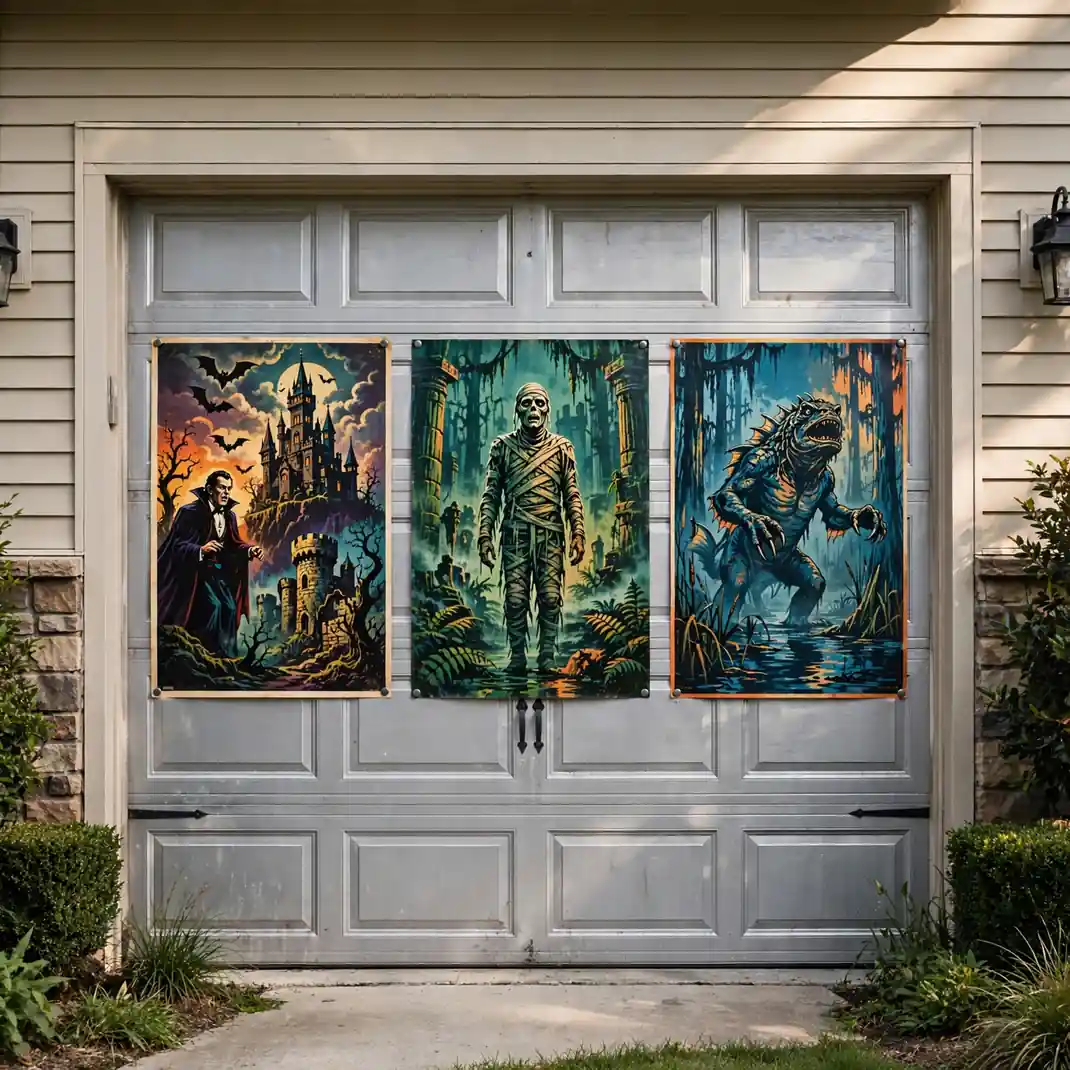
Steel garage doors accept magnets, which means the whole door becomes a gallery in minutes. Print vintage horror-poster art on magnetic sheets at a copy shop — two or three oversized posters across the door panels — and they’ll survive wind, rain, and curious hands without a single hole. Swap the lineup weekly: week one is classic monsters, week two is slashers, week three is a “closing night” double feature. The changing gallery gives repeat passersby a reason to look again.
How to Style It — Test your door with a fridge magnet first; some “steel” doors are aluminum-skinned or wood, in which case suction cups do the same job. Laminate the prints so October rain beads off instead of bleeding the ink.
Why It Photographs Beautifully — The poster’s saturated colors against the door’s flat metal give photos a gallery-wall crispness; shoot straight-on at midday when the colors are truest.
Pro Tip — Add a small magnetic “Now Showing” strip above the posters and change the titles with letter magnets — the marquee detail gets photographed as often as the art.
Budget-Smart Swap — Print black-and-white poster art on regular paper and slip it into magnetic document sleeves; the monochrome look is arguably cooler.
14. Line Tombstones Against the Garage for a Graveyard Backdrop
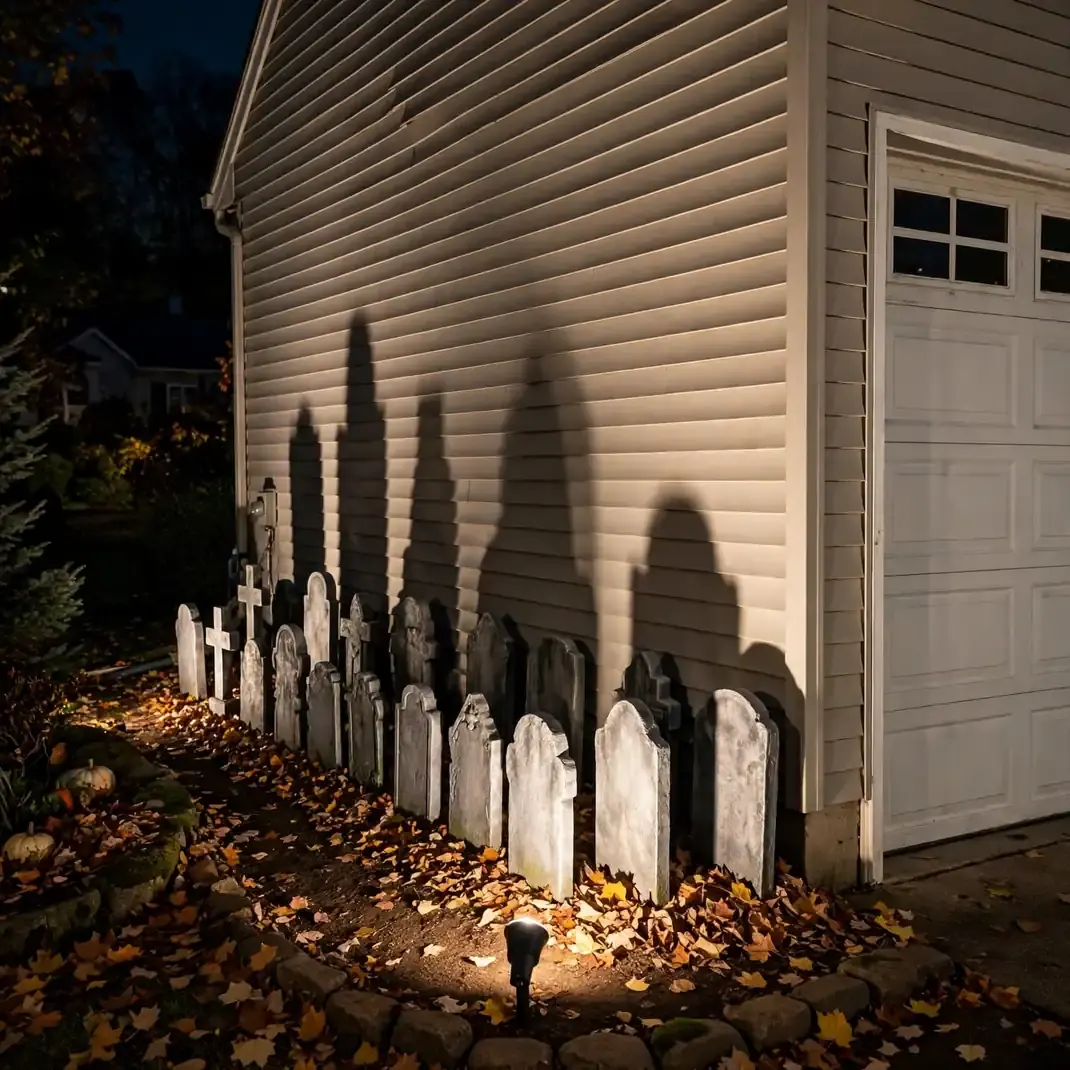
A row of foam tombstones staked along the garage’s side wall turns the plainest part of the house into a graveyard panorama. The trick is depth: stagger them in two rows, short ones in front and tall ones behind, and rake a bed of dead leaves across the whole strip. Backlight the row with one ground spotlight aimed up the wall so each stone throws a tall shadow. From the street, the flat garage wall reads as the edge of a cemetery.
How to Style It — Stake each tombstone with two garden stakes driven at an angle, not one — foam stones spin in wind on a single stake. Dry-brush the stones with gray and moss-green paint before setting them out; flat gray foam reads as plastic from ten feet away.
Why It Photographs Beautifully — The upward shadows stretch the stones to double their height in photos, and the leaf bed hides every stake and cord.
Pro Tip — Write funny epitaphs with a paint pen — “I Told You I Was Sick” gets photographed more than any decoration you own.
Budget-Smart Swap — Cardboard boxes painted gray and cut into stone shapes, staked the same way, last the whole month for the cost of paint.
15. Give the Parked Car Glowing Eyes
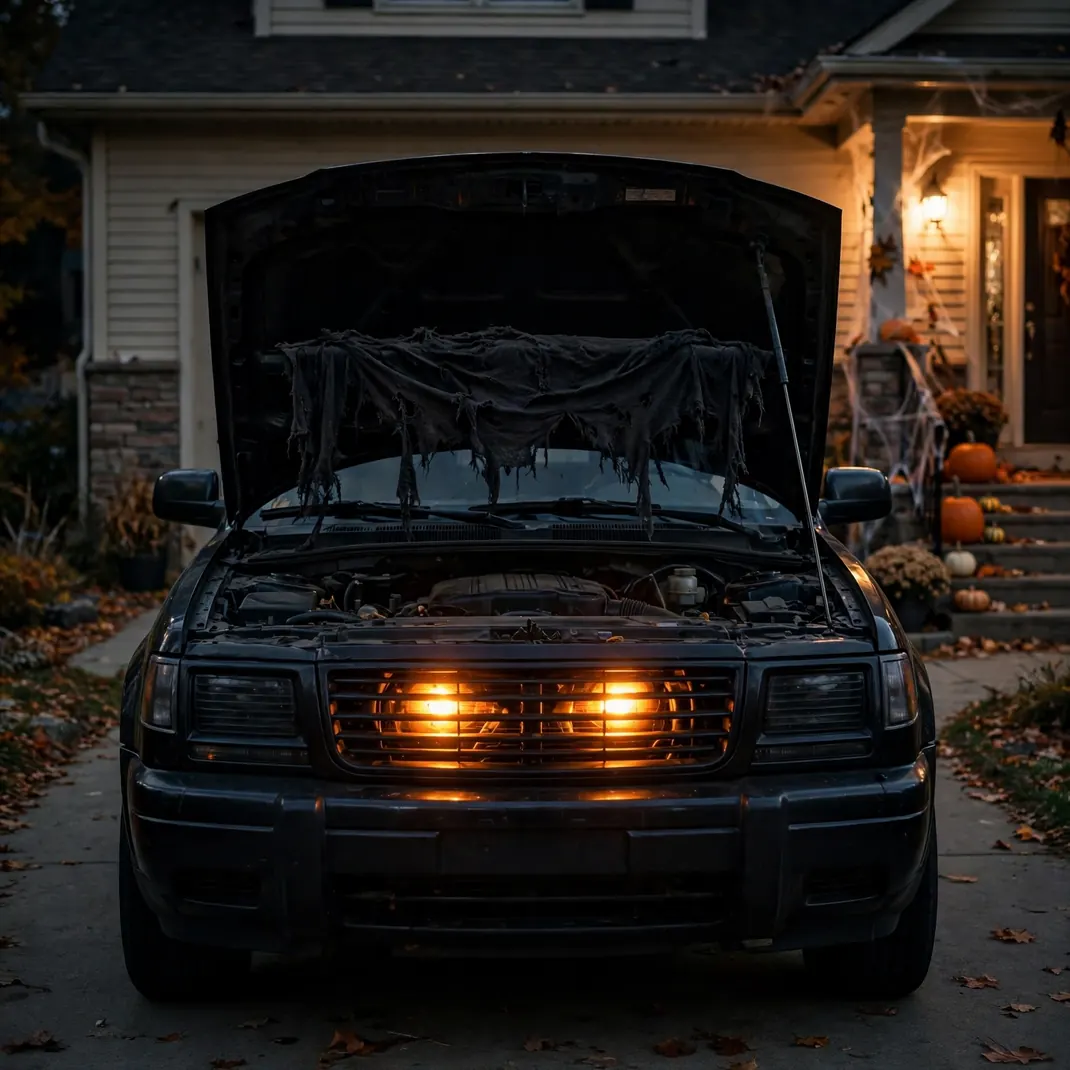
Park the car in the driveway, pop the hood, and set two amber LED work lights inside the engine bay aimed outward through the grille — the car gets glowing eyes after dark. Drape a tattered black cloth over the windshield as a “brow,” and the whole front end reads as a watching face. Kids point at it from the sidewalk; adults photograph it. It’s the simplest special effect on this list and one of the most photographed, because a car with eyes is a character, not a decoration.
How to Style It — Use battery work lights, not the car’s own electrics — draining the battery is a real risk if you run headlights for hours. Angle the lights slightly downward so they glow through the grille without blinding the street. Unplug the hood light if your car has one.
Why It Photographs Beautifully — The eyes glow brightest in full dark; shoot with the streetlights behind you so the car’s face pops against the blacked-out body.
Pro Tip — Red lenses read as angry, amber as watchful — pick the personality and commit, mixing colors just looks like hazard lights.
Budget-Smart Swap — Two battery tea lights behind red cellophane in the grille slots give the same glowing-eye read from the sidewalk.
16. Stack Tires into Glowing Pumpkin Monsters
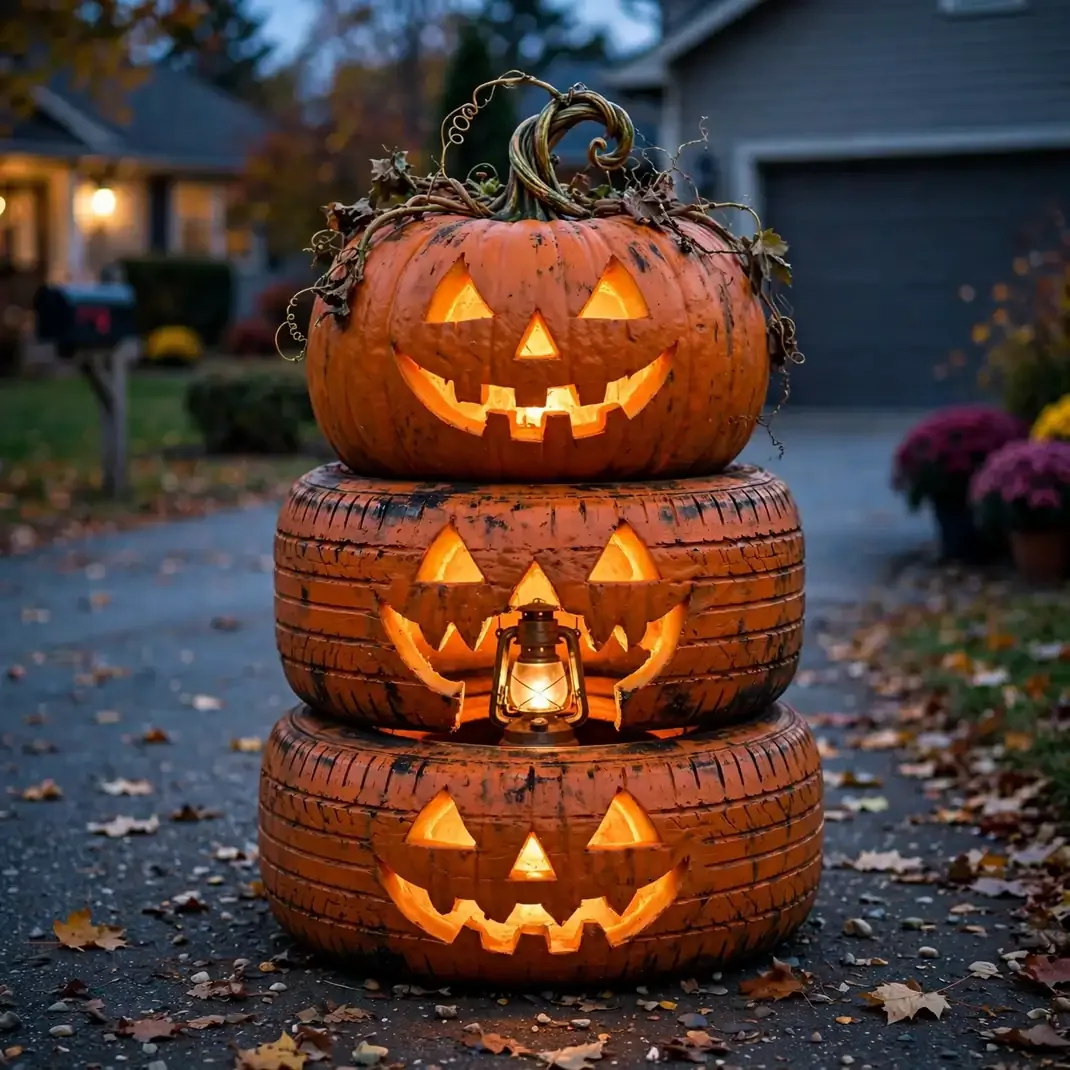
Three stacked tires are a pumpkin’s body waiting to happen. Paint a stack orange, carve-style the top tire’s “face” with black paint, and set a battery lantern inside the hollow center so the face glows from within. Top it with a twisted vine stem from the garden. Tire stacks are garage furniture already — painting them turns storage into sculpture, and the hollow center makes the internal glow trick automatic.
How to Style It — Scrub the tires with dish soap first; paint won’t stick to road grime. Use exterior latex so rain can’t wash it off, and bolt the stack together with a threaded rod through the center so it can’t topple. The lantern sits on a brick inside the bottom tire.
Why It Photographs Beautifully — The tire tread texture catches the internal glow in ridges and valleys, giving the “pumpkin” a realism no foam prop can match.
Pro Tip — Paint the faces with jagged, asymmetric features; perfect symmetry reads as manufactured, crooked faces read as hand-carved.
Budget-Smart Swap — Wrap the stack in orange fabric instead of painting; it pulls off after the season and the tires go back to normal.
17. Turn the Ceiling into a Bat Cave
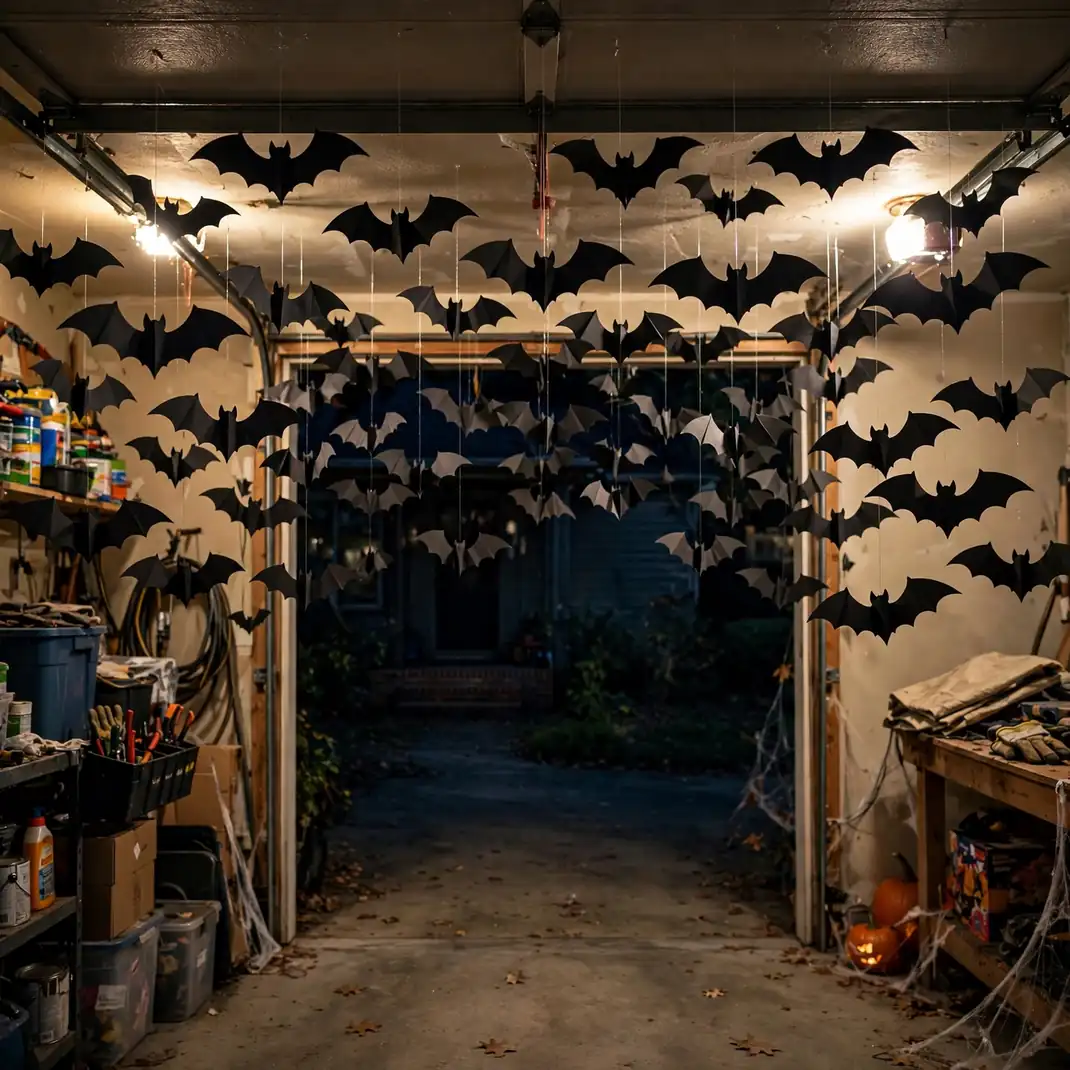
Cut forty or fifty bat silhouettes from black cardstock and hang them from the garage ceiling at varying lengths on fishing line, dense over the doorway and thinning toward the back. Add one slow-turning fan and the whole colony sways and flutters like it’s alive. Walking under a shifting cloud of bats in a dark garage is a genuinely creepy sensation — and from the street, the doorway framed in fluttering black wings is irresistible.
How to Style It — Hang bats with two different line lengths in alternating rows so they don’t tangle; fold each bat’s wings slightly along the body line so they catch air and twist. Thumbtacks into drywall ceiling or magnetic hooks on metal — match the hanger to the ceiling.
Why It Photographs Beautifully — Shoot upward from the driveway with the garage lights on; the layered black shapes against the lit ceiling give photos a dizzying, Escher-like depth.
Pro Tip — Put the fan on its lowest setting; too much air turns the colony into a tangled knot by morning.
Budget-Smart Swap — Black garbage bags cut into bat shapes and hung on yarn move even better than cardstock in a light breeze.
18. Seat a Skeleton at the Wheel of a Riding Mower
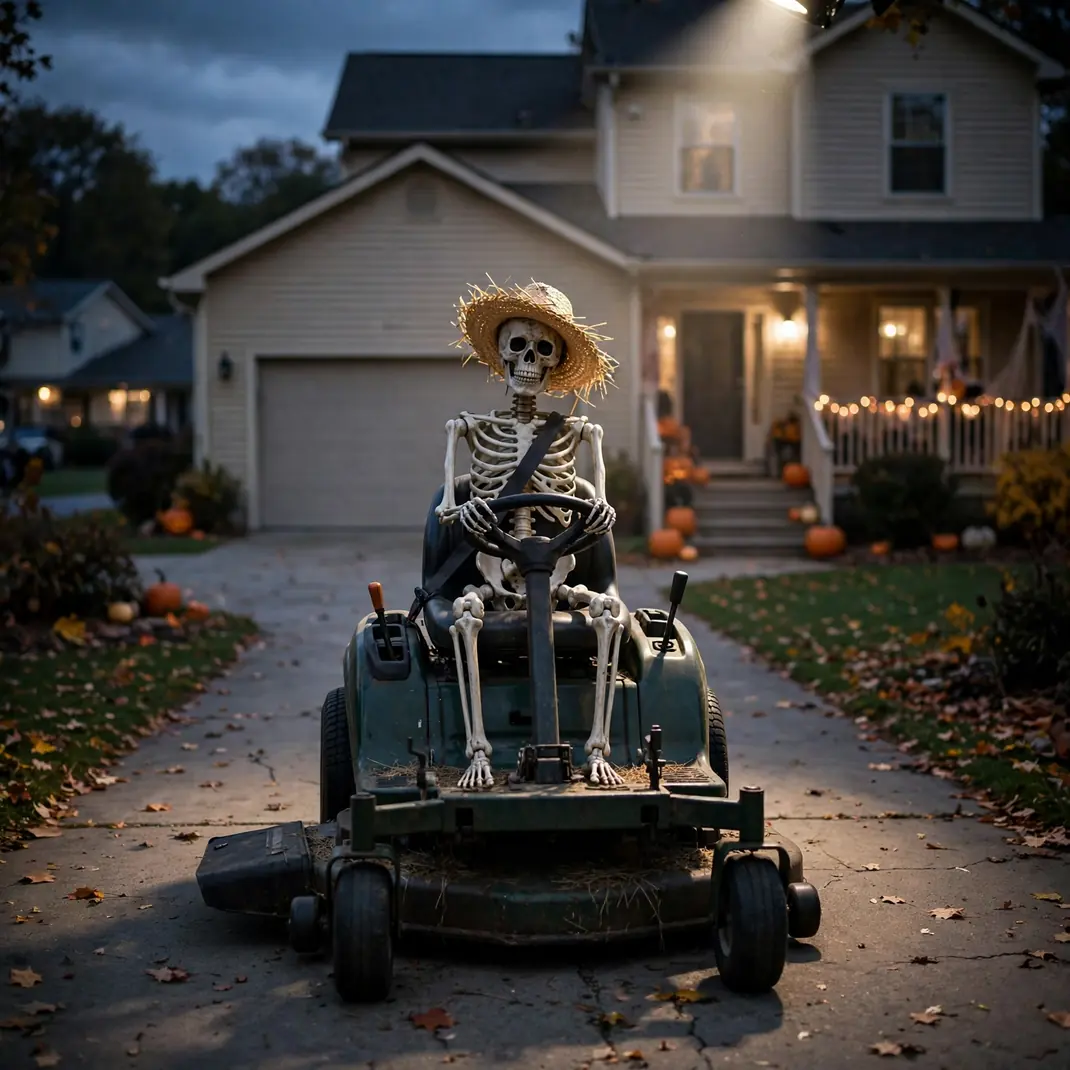
Wheel the riding mower out of the garage, strap a skeleton into the seat with its hands on the wheel, and park it at the end of the driveway like it’s about to mow the lawn of the dead. Add a straw hat tipped low over the skull and a pair of work gloves. It’s funny in daylight and eerie at night with a single spotlight on it — the rare decoration that works both shifts. The mower is the punchline: this skeleton has chores.
How to Style It — Remove the mower key and disconnect the battery so it can’t be started as a prank; belt the skeleton to the seat with a cargo strap around the waist. Angle the front wheels slightly so it looks parked mid-task, not staged.
Why It Photographs Beautifully — The machine’s hard lines against the skeleton’s curves make a great silhouette; side-light it at dusk for long dramatic shadows.
Pro Tip — Scatter a trail of fake grass clippings (green paper shreds) behind the mower; the detail completes the joke for anyone who looks twice.
Budget-Smart Swap — A push mower with a skeleton leaning on the handles sells the same gag in a smaller footprint.
19. Build a Trick-or-Treat Photo Booth Inside the Garage
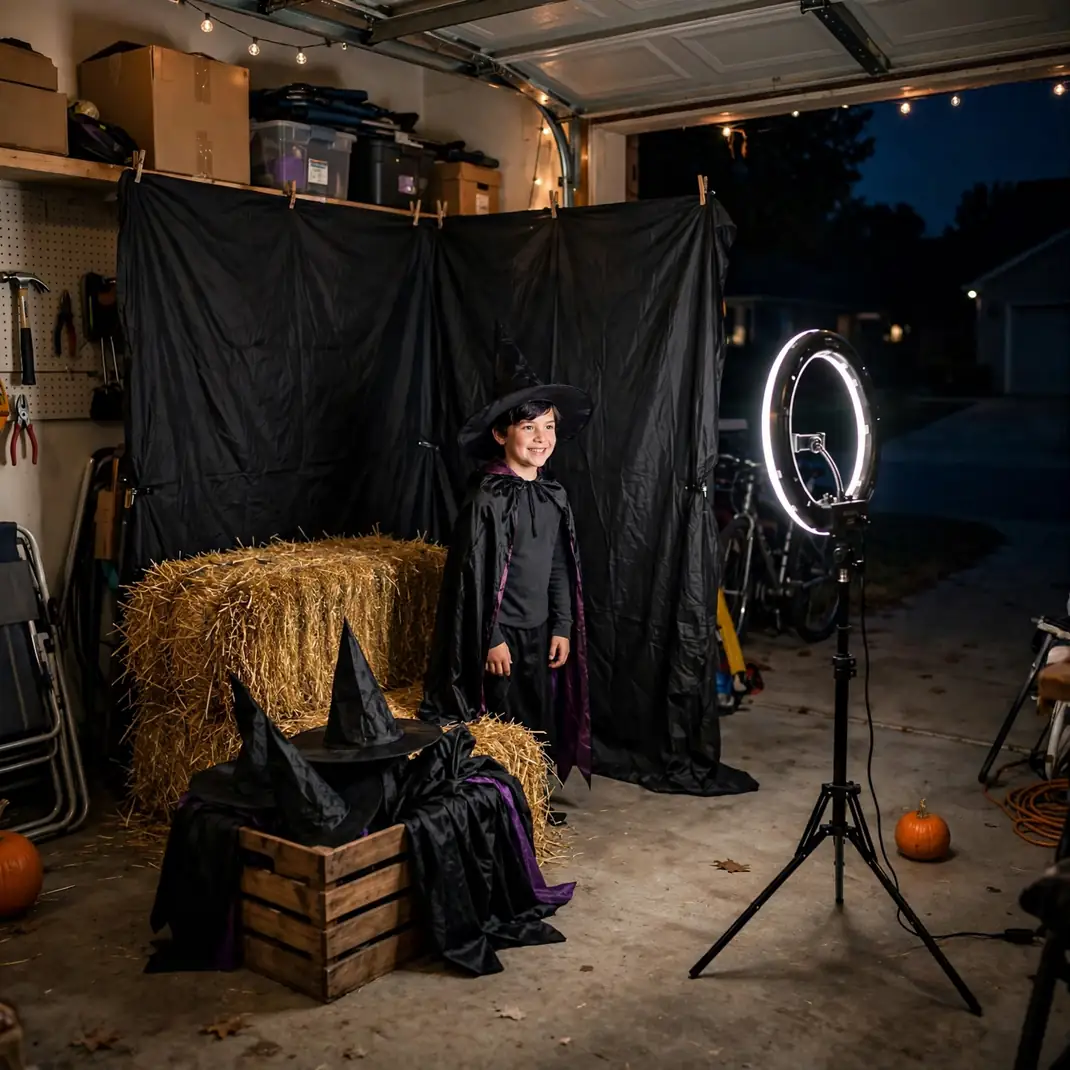
Dedicate one garage corner to a photo backdrop: a black sheet on the wall, a hay bale to sit on, a crate of costume props (witch hats, capes, oversized glasses), and a ring light on a tripod. Add a small sign: “Take Your Photo — Tag Us!” Costumed kids get a portrait station; parents get the night’s best photo. The garage’s controlled lighting beats the porch’s harsh single bulb, and the booth keeps foot traffic flowing through your candy lane instead of bunching at the door.
How to Style It — Hang the sheet with spring clamps on a tension rod so it stays wrinkle-smooth; set the ring light at face height about six feet back for flattering, shadow-free portraits. Tether the props to the crate with short cords so the good hats don’t walk off.
Why It Photographs Beautifully — That’s literally the point: the ring light and black backdrop give every visitor a studio-quality costume portrait they’ll share.
Pro Tip — Tape a phone-sized “stand here” marker on the floor at the backdrop’s sweet spot; it keeps every photo framed right without a photographer.
Budget-Smart Swap — A black plastic tablecloth backdrop and a clip-on phone light get you 90% of the studio look for under $15.
20. Chalk a Crime-Scene Maze on the Driveway
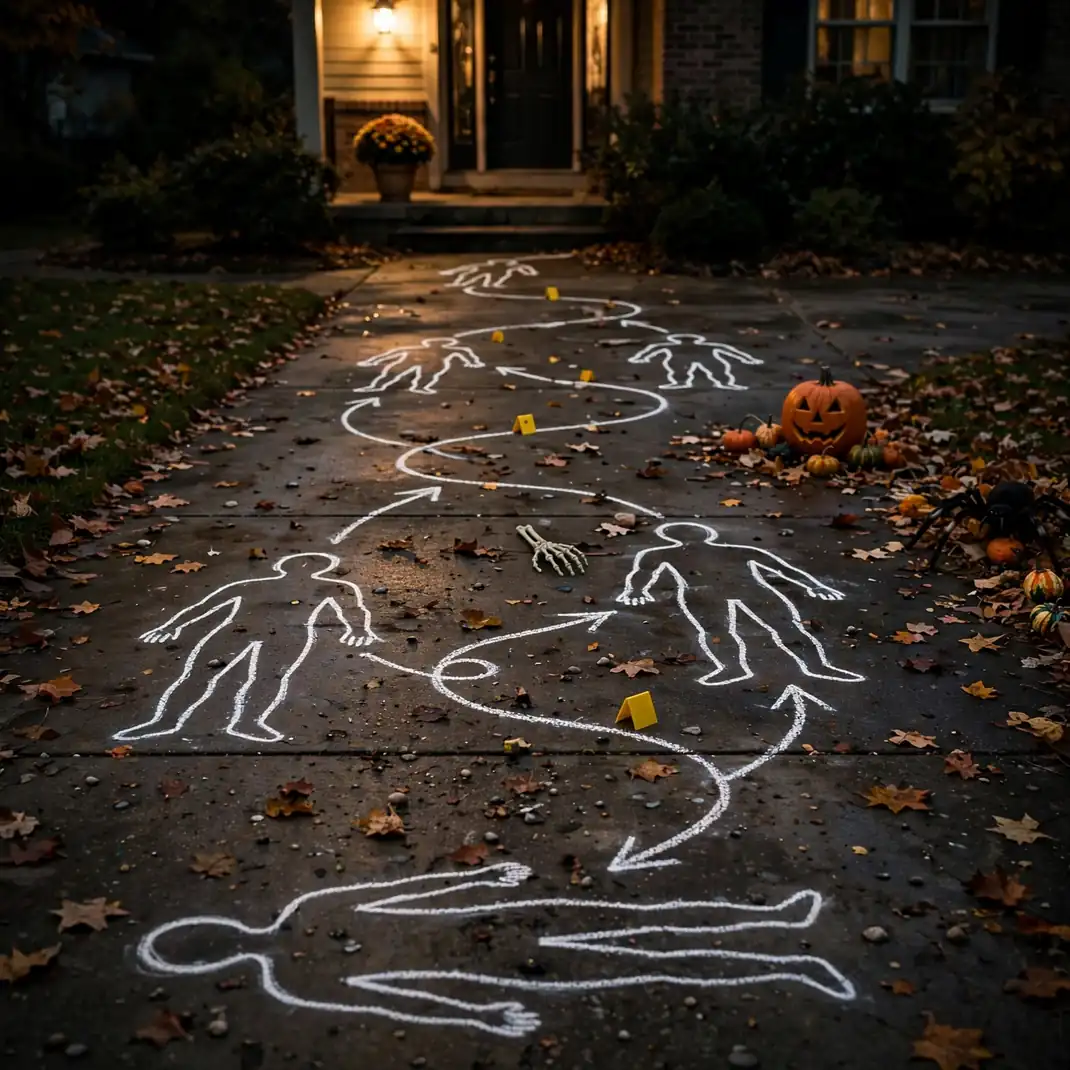
Outline body shapes in white sidewalk chalk across the driveway — classic crime-scene style — and connect them with chalk arrows into a winding path kids follow to the candy. Number each “victim” with a chalk tag like an evidence marker. It’s macabre, it’s funny, and it costs almost nothing. The chalk washes off with the first rain, so there’s zero teardown, and the path doubles as crowd control, steering foot traffic exactly where you want it.
How to Style It — Have a friend lie down as the model for each outline; traced-around-a-real-person shapes read instantly as bodies. Use thick jumbo chalk — thin sticks snap on rough concrete. Refresh the lines on Halloween morning; foot traffic fades them by nightfall.
Why It Photographs Beautifully — The white lines glow under a porch light against dark concrete; an overhead shot from a second-floor window shows the whole maze at once.
Pro Tip — Add red chalk “splatter” dots sparingly near the hands; a little goes a long way, and too much tips it from funny to grim.
Budget-Smart Swap — White painter’s tape outlines survive rain and foot traffic for the whole week — same effect, more durable.
21. End the Night with a Motion-Sensor Garage Greeter
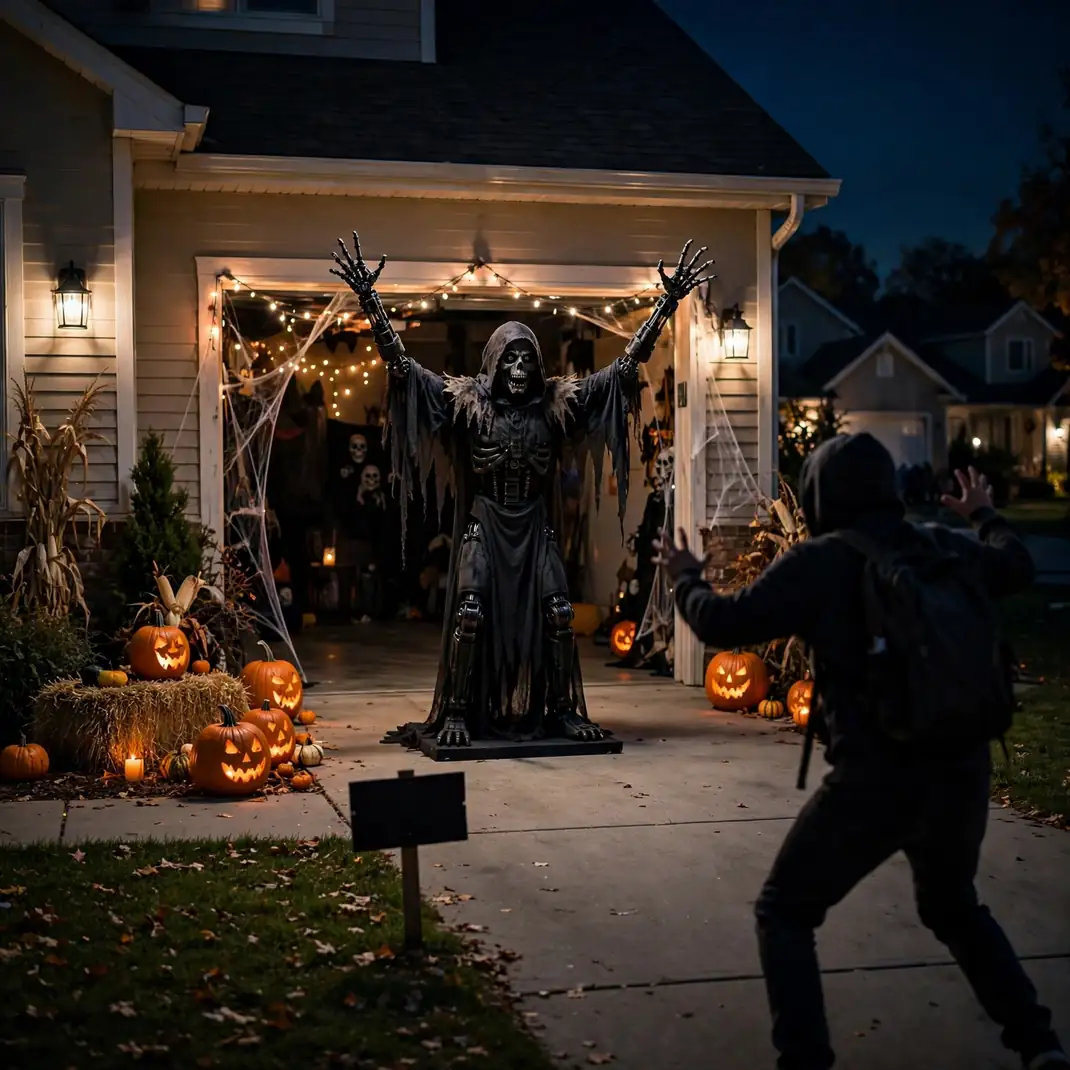
Mount a motion-sensor animatronic — a lunging witch, a rising reaper — just inside the open garage door, aimed at the walkway. It sleeps silently all evening, then erupts when someone crosses the beam. The placement is everything: visitors have already relaxed past the pumpkins and the candy lane, so the scare lands at peak comfort. Set it to activate only after dark (most have a light sensor mode) so daytime visitors just see a still figure.
How to Style It — Aim the sensor across the walkway, not along it, so it triggers as people pass rather than from fifty feet away; a too-early trigger wastes the scare. Stake the base or sandbag it — lunging props tip forward hard. Keep the volume at conversation level; louder reads as aggression, not fun.
Why It Photographs Beautifully — You won’t photograph the scare, but you will photograph the reactions — station a friend with a camera across the street and capture the jumps.
Pro Tip — Add a small “You Have Been Warned” sign at the walkway entrance; it builds anticipation and keeps the scare consensual for nervous kids.
Budget-Smart Swap — A hidden Bluetooth speaker playing a sudden cackle, triggered by a $10 motion sensor, startles just as well as a $100 prop.
The garage wins Halloween because it has what no other room offers: scale, shelter, and a stage door that opens onto the street. Pick the five ideas that fit your setup, layer them from curb to back wall, and let the whole street do the rest.