The best Halloween bedrooms do more than scatter pumpkins across the dresser. They use light, scale, texture, and a clear point of view to create a room that feels atmospheric after dark yet still comfortable enough to sleep in. Whether your taste runs gothic, playful, cottage-inspired, or quietly modern, these ideas offer a distinct decorating direction—and the practical details that make each one work.
Choose one concept as the room’s visual anchor, then let the quieter surfaces support it. A single dramatic wall, a carefully lit corner, or one beautifully dressed bed will usually look more intentional than Halloween accents placed on every available surface.
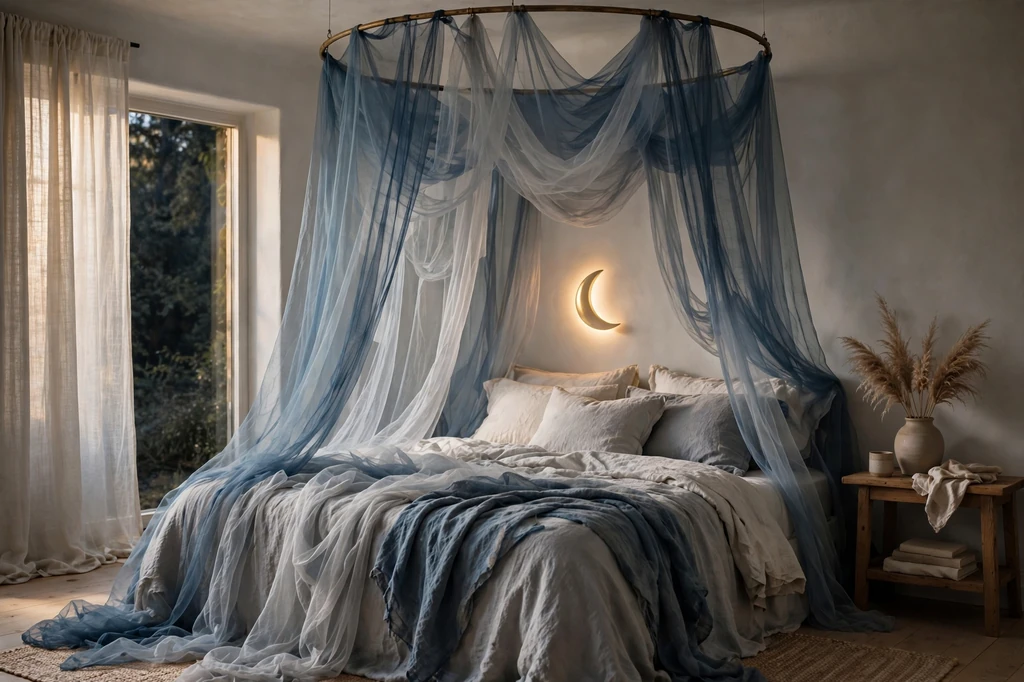
1. Build a Moonlit Gauze Canopy
Layers of smoky blue and soft gray gauze turn an ordinary bed into a misty midnight retreat. A crescent-shaped pool of light above the pillows gives the canopy a dreamy focal point, while pale bedding keeps the scene ethereal rather than heavy.
The Setup:Suspend two lightweight curtain panels from a ceiling hoop or removable canopy hooks, keeping the fabric clear of lamps and outlets. Dress the bed in washed linen in fog gray, faded indigo, and ivory, then aim a small crescent projector or moon-shaped wall light above the headboard.Why It Photographs Well:The translucent fabric catches light at different depths, creating visible layers instead of one flat dark surface. Photograph from a front corner so the canopy frames the bed and the crescent sits slightly off-center.Pro Tip:Gather the gauze loosely rather than pulling it taut; irregular folds make the light look like drifting clouds.
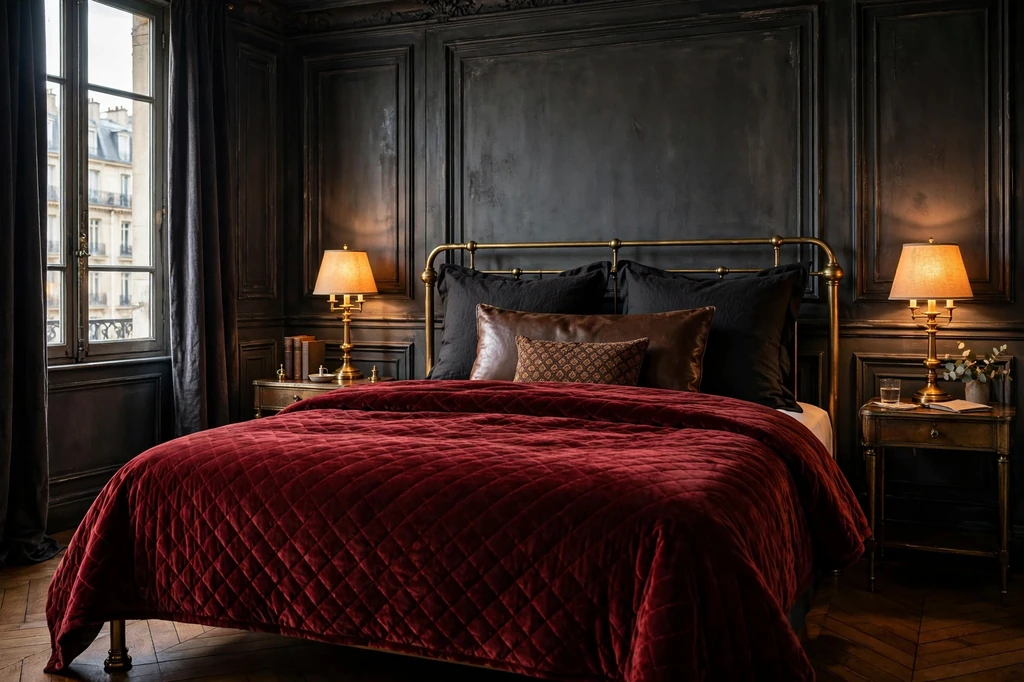
2. Style an Oxblood Gothic Hotel Bed
This look borrows the drama of an old European hotel: an oxblood velvet coverlet, charcoal walls or bedding, and warm brass lighting. The effect is polished and seductive, with Halloween atmosphere coming from color and material rather than novelty pieces.
The Setup:Center a deep red velvet quilt on the lower two-thirds of the bed and build the pillows in black linen, tobacco leather, and one small patterned lumbar. Add matching brass bedside lamps with low-watt amber bulbs; renters can create the backdrop with a charcoal fabric panel instead of paint.Why It Photographs Well:Velvet absorbs and reflects light simultaneously, giving the bed rich tonal variation. The symmetrical lamps create a strong editorial composition, while the oxblood center draws the eye immediately.Pro Tip:Keep the red to one large field and one tiny repeat; spreading it around the room weakens the luxurious, controlled effect.
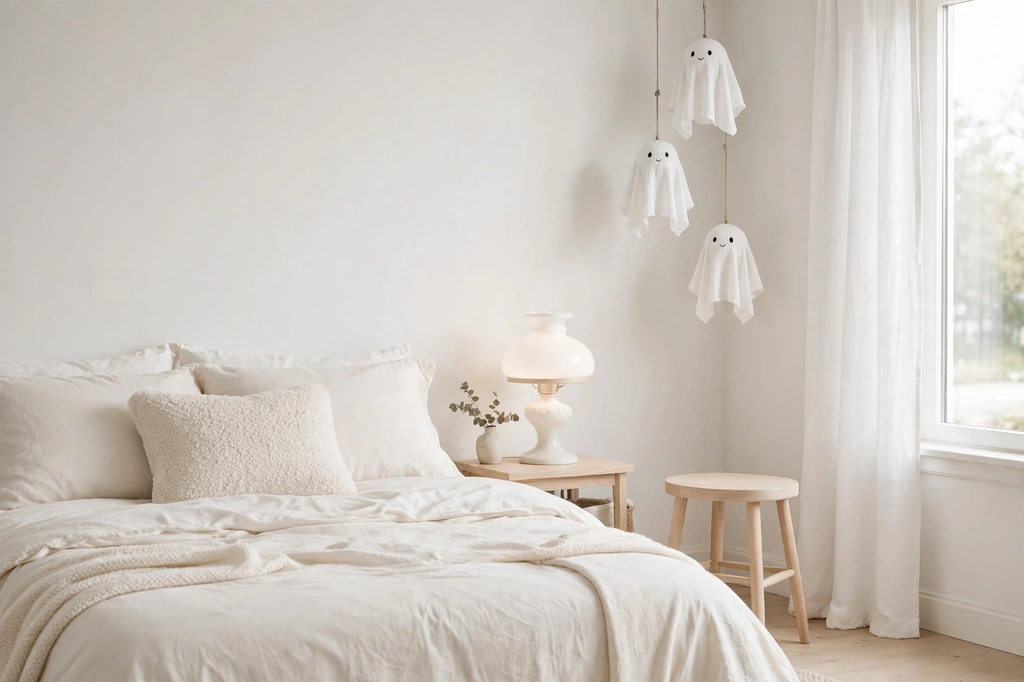
3. Create a Soft-White Ghost Room
A nearly monochrome bedroom can feel wonderfully ghostly without becoming gloomy. Ivory sheets, chalk-white paper forms, and a few floating fabric silhouettes create gentle movement, making this especially suited to Scandinavian rooms, children’s spaces, or anyone who prefers subtle seasonal decor.
The Setup:Use cream bedding and add three small ghosts made from white muslin draped over lightweight foam balls, hung at staggered heights in one corner. Repeat their rounded shapes with a bouclé cushion and a milk-glass lamp, then ground the palette with one pale oak stool.Why It Photographs Well:Soft whites reveal texture beautifully in side light, and the suspended ghosts create negative space without visual clutter. Shoot during the brightest part of the day so each layer remains distinct.Pro Tip:Give each ghost a different hemline and hanging height; identical figures read like party supplies, while variation feels handmade and expressive.
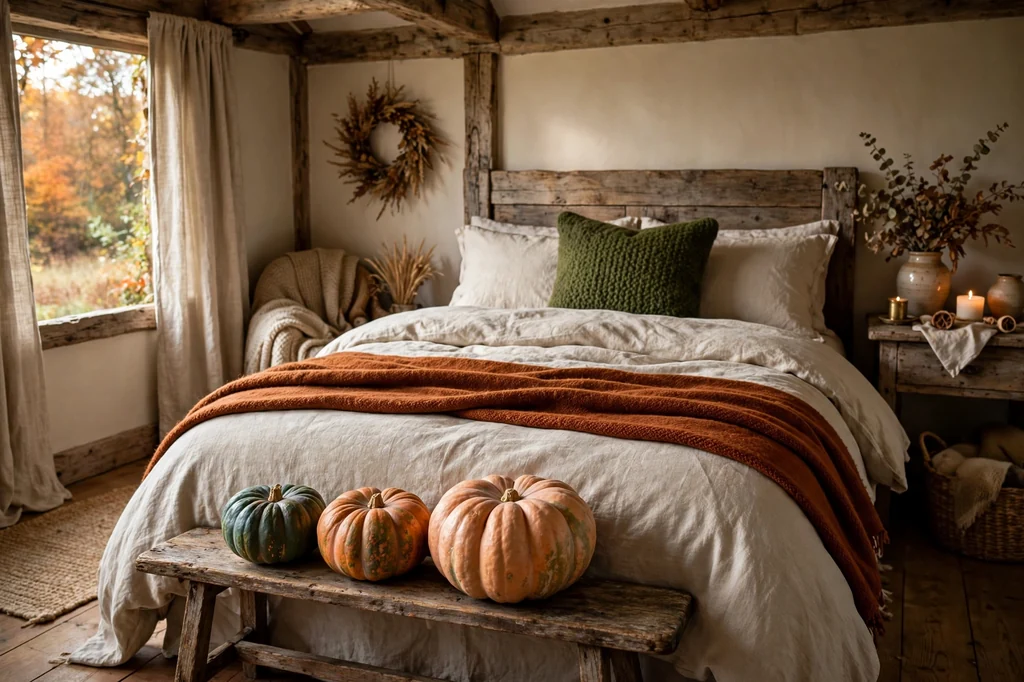
4. Warm the Room with Pumpkin Cottage Layers
Russet linen, mossy green wool, and weathered wood capture Halloween through an autumn-cottage lens. Small heirloom-shaped pumpkins tucked into the composition feel gathered from a farm stand, not placed for a theme party.
The Setup:Layer an oatmeal duvet with a rust throw folded across the foot and a moss green cushion against the headboard. Arrange three pumpkins of different sizes on a wooden bench or lidded trunk, leaving the nightstand clear; use realistic faux pumpkins if heat or storage makes fresh ones impractical.Why It Photographs Well:The earthy palette remains cohesive while linen, wool, wood, and ridged pumpkin skins add enough contrast for close-up shots. The low cluster at the foot of the bed creates a foreground layer that gives the room depth.Pro Tip:Turn every pumpkin slightly away from the camera so no two stems point in the same direction; the grouping will look naturally collected.
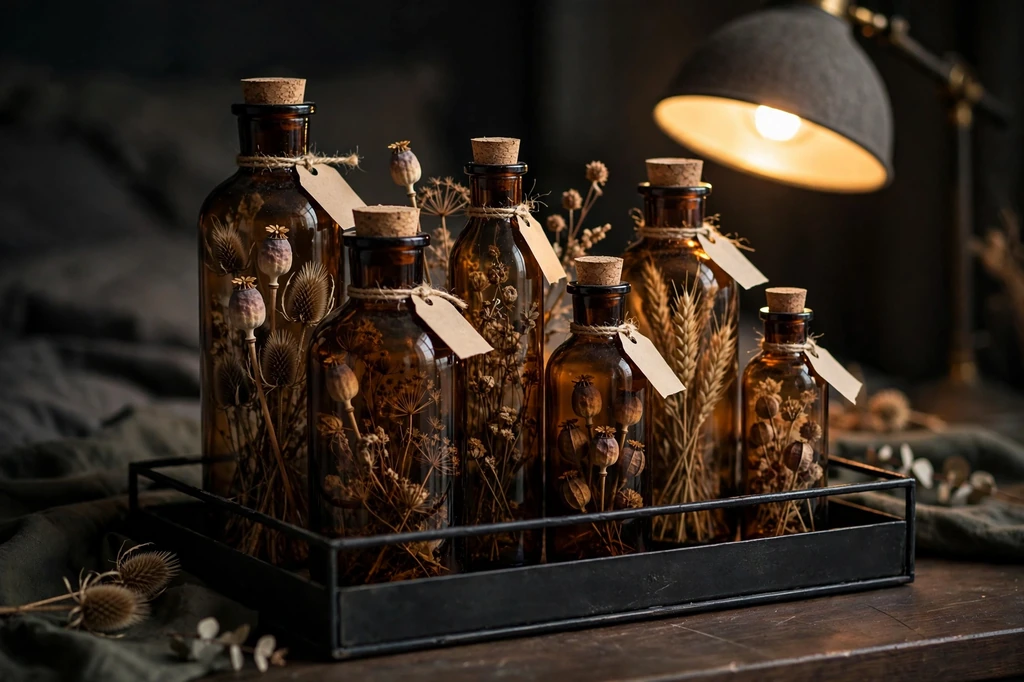
5. Turn a Nightstand into an Apothecary Cabinet
An apothecary-inspired bedside arrangement rewards a closer look: amber bottles, tiny botanical specimens, and aged labels gathered on one dark tray. It brings story and detail to a small footprint, making it an excellent option for apartments or rooms where the bed must stay visually calm.
The Setup:Corral five to seven clean amber bottles on a black metal tray, mixing slim vials with one broad jar. Fill only a few with water, dried seed heads, or colored bath salts, add handwritten paper labels, and place a shaded task lamp behind the display rather than among it.Why It Photographs Well:Backlighting makes the amber glass glow and reveals the liquid levels, while the tray creates a clear frame around many small objects. A close crop captures the labels and reflections without making the rest of the room compete.Pro Tip:Vary bottle height in a gentle triangle—tallest at the back, shortest toward the lamp-side front—so every silhouette remains visible.
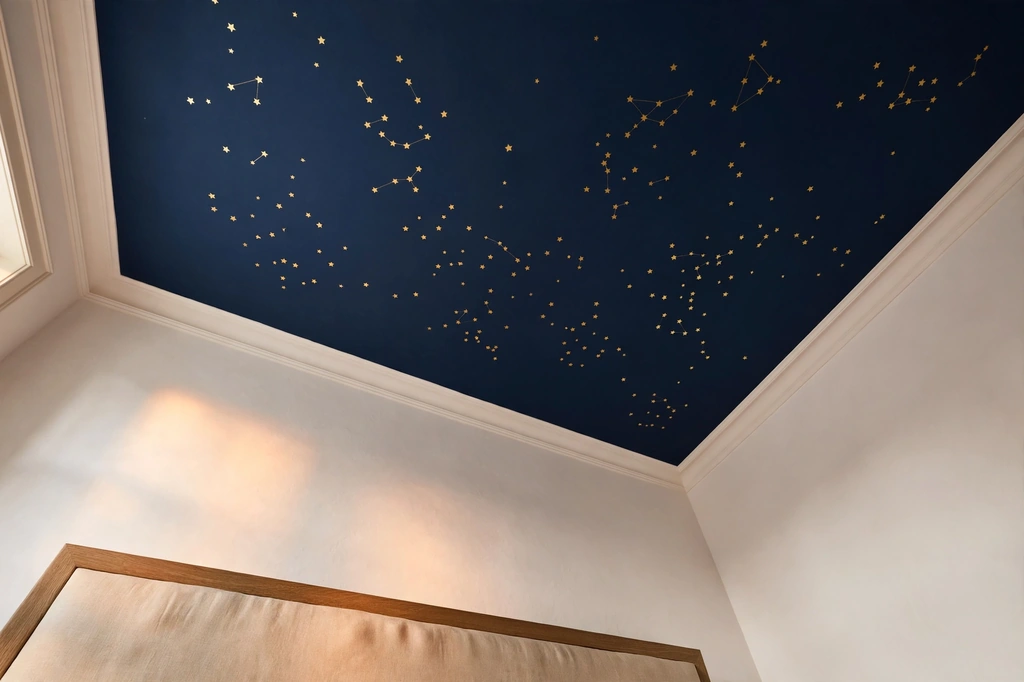
6. Map a Midnight Constellation Across the Ceiling
A deep navy ceiling scattered with restrained gold stars makes the room feel larger, as though the roof has opened to a Halloween-night sky. Unlike a wall mural, this design reveals itself most dramatically from the bed, giving the person in the room the best view.
The Setup:Paint the ceiling ink blue or cover a removable overhead panel in navy paper, then place matte gold star decals in loose constellations rather than an even grid. Keep the walls warm white and repeat the gold once in a slim picture frame or lamp base.Why It Photographs Well:An upward angle captures an unexpected surface and gives the stars strong contrast against the saturated blue. Including the top edge of the headboard anchors the image and communicates scale.Pro Tip:Cluster more stars above one bed corner and taper them outward; a deliberate “drift” looks sophisticated, while equal spacing can resemble a nursery print.
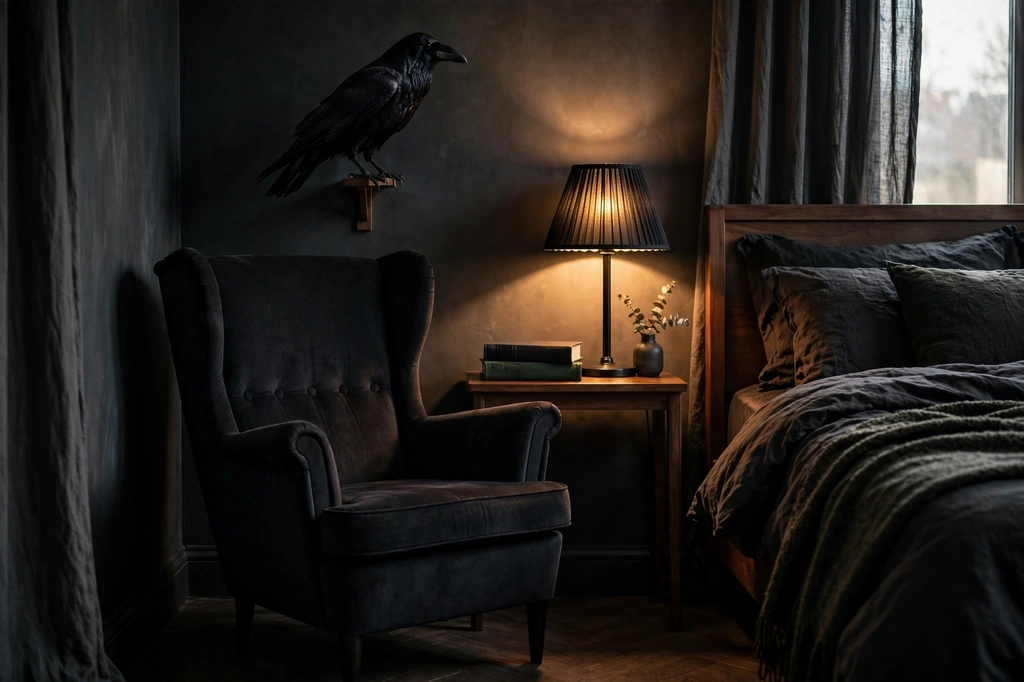
7. Design a Raven Reading Corner
A solitary raven perched above a shadowy reading chair creates a narrative moment without taking over the bedroom. Inky feathers, walnut wood, and a pool of focused light turn an unused corner into the sort of moody scene that feels lifted from a mystery novel.
The Setup:Angle a compact wingback or cane chair toward the bed, place a narrow walnut table beside it, and mount one realistic faux raven on a removable wall perch roughly 12 inches above eye level. Add a pleated black reading lamp and two clothbound books; keep the floor around the chair open.Why It Photographs Well:The lamp creates a contained circle of light, and the raven supplies a crisp silhouette above it. Photographing diagonally across the chair preserves the empty darkness around the bird, which is where the suspense lives.Pro Tip:Choose one raven, not a flock; the restraint makes it feel like a character rather than a decorative motif.
8. Seat a Skeleton Like an Unexpected Guest
A life-size skeleton becomes surprisingly chic when treated like a fashion editorial prop instead of a gag. Seated casually on a bench with a tailored accessory, it adds humor and scale while leaving the bed itself comfortable and usable.
The Setup:Pose an articulated skeleton on a bench or sturdy accent chair with one ankle crossed and one arm resting naturally. Add a black satin bow tie, silk scarf, or vintage hat—never all three—and place it against a plain wall so the outline stays readable.Why It Photographs Well:The human scale creates instant visual surprise, while the composed posture gives the image wit. A slightly low camera angle makes the pose feel intentional and prevents the nearby furniture from dwarfing it.Pro Tip:Bend every major joint a little—including wrists and fingers; locked limbs are what make inexpensive skeletons look stiff and artificial.
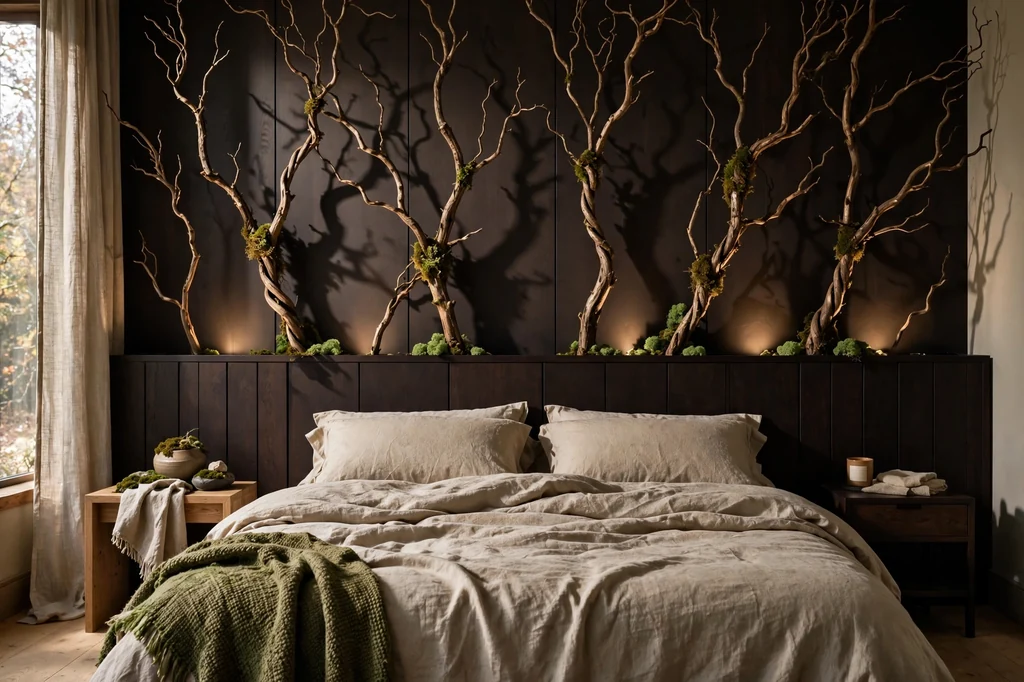
9. Frame the Bed with a Haunted Forest Headboard
Twisted branches rising above the mattress create the impression that the bed sits at the edge of an enchanted forest. The palette stays natural—bark brown, lichen green, and black—so the installation feels sculptural rather than like a themed backdrop.
The Setup:Secure clean, fully dried branches to a freestanding plywood panel behind the bed; do not attach heavy wood directly above sleeping heads. Weave small amounts of preserved moss around the lower joints, dress the bed in plain flax linen, and hide two battery uplights behind the nightstands.Why It Photographs Well:Uplighting throws branching shadows across the wall, doubling the visual impact of the installation. The quiet bedding gives the complex silhouette enough breathing room to remain legible in a full-room image.Pro Tip:Stop the branches just inside the width of the nightstands; containing the wild form within the bed zone keeps it architectural.
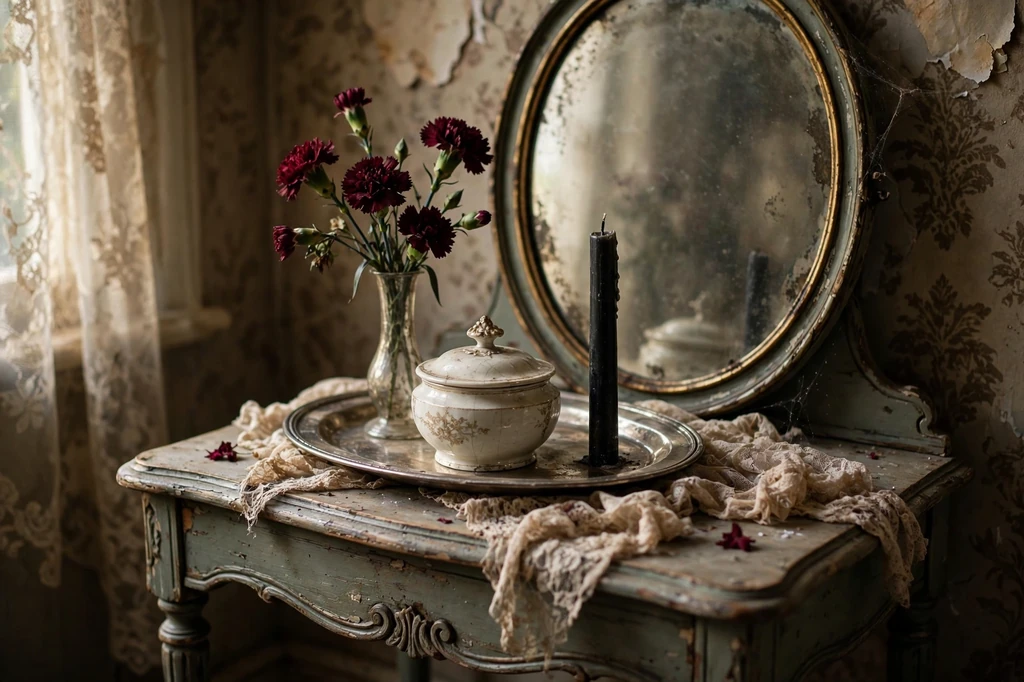
10. Stage a Victorian Séance Vanity
A vintage mirror, dark flowers, and tarnished silver turn a dressing table into an elegant Victorian séance scene. This concept is intimate and reflective, balancing delicate objects with just enough unease to feel distinctly Halloween.
The Setup:Center an aged oval mirror over a small vanity, then arrange a silver tray with a lidded powder jar, one unlit black taper, and a narrow vase of burgundy carnations. Pool a short length of tea-stained lace beneath the tray and leave at least one-third of the tabletop bare.Why It Photographs Well:The mirror repeats candlelight and flowers while adding depth beyond the wall. Shooting from a slight side angle avoids a camera reflection and lets the curved frame, metallic tray, and lace form distinct layers.Pro Tip:Soften a too-new mirror by rubbing a tiny amount of dark wax into the frame’s recesses—not onto the glass—then buffing the raised edges clean.
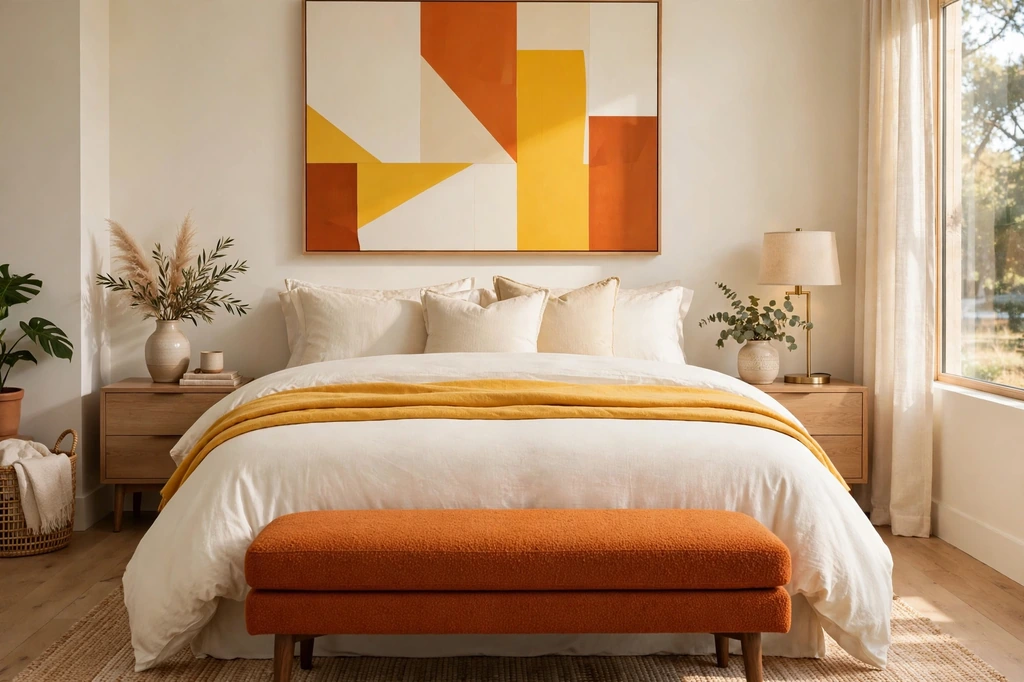
11. Try a Modern Candy-Corn Color Block
Cream, saffron, and burnt orange can reference candy corn without a single printed sweet. Arranged in broad geometric bands, the familiar Halloween palette feels graphic, cheerful, and completely at home in a modern bedroom.
The Setup:Start with an ivory duvet, fold a saffron blanket across its middle third, and place a burnt-orange bench or floor cushion at the foot. Repeat the three colors in one abstract print with large shapes; for a lower budget, paint the shapes on heavy paper and use a simple poster frame.Why It Photographs Well:Large bands remain crisp in both wide shots and phone-screen crops. The eye reads the bright-to-deep color progression immediately, while the absence of small motifs gives the image a clean magazine quality.Pro Tip:Use uneven proportions—about 50 percent cream, 30 percent saffron, and 20 percent orange—so the palette feels designed rather than striped.
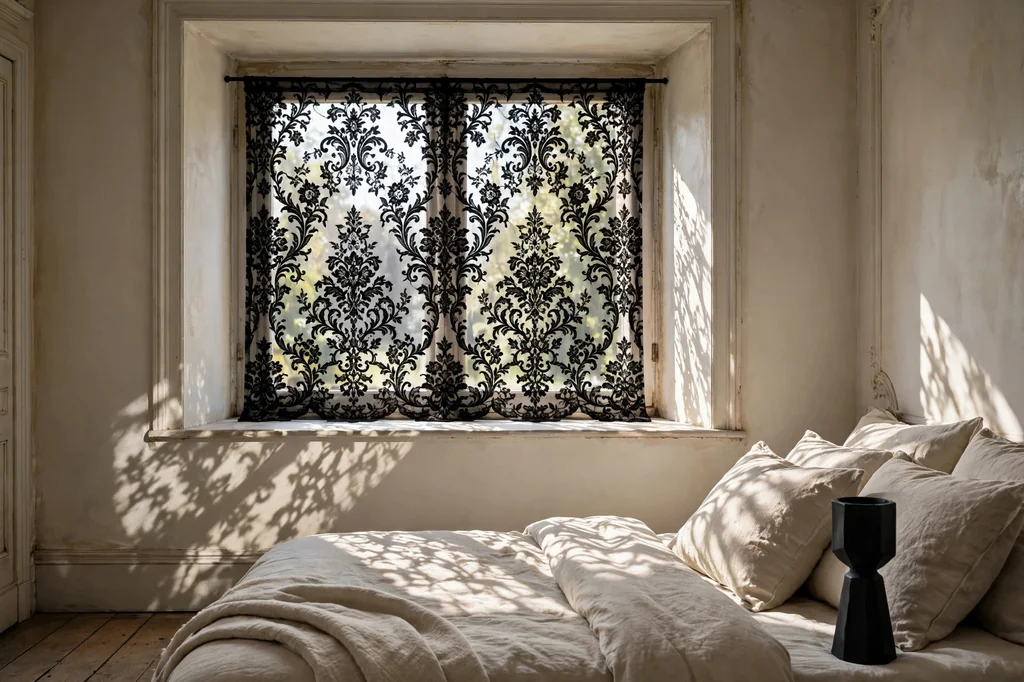
12. Hang a Black-Lace Window Veil
A single panel of black lace turns daylight into a patterned shadow show and gives the room a romantic haunted-house edge. It is one of the most effective renter-friendly changes because the window supplies the drama while the rest of the room can remain simple.
The Setup:Mount floral or baroque lace inside the window recess using a tension rod, allowing the panel to hover just above the sill. Pair it with oatmeal or pale gray bedding and one matte-black object nearby; retain a functional blind behind it for privacy and sleep.Why It Photographs Well:Backlight turns every lace detail into a high-contrast silhouette and casts soft pattern onto adjacent surfaces. Expose the photograph for the bright window so the room falls into a beautifully moody midtone.Pro Tip:Choose a lace pattern large enough to read from across the room; tiny repeats become visual noise in photographs.
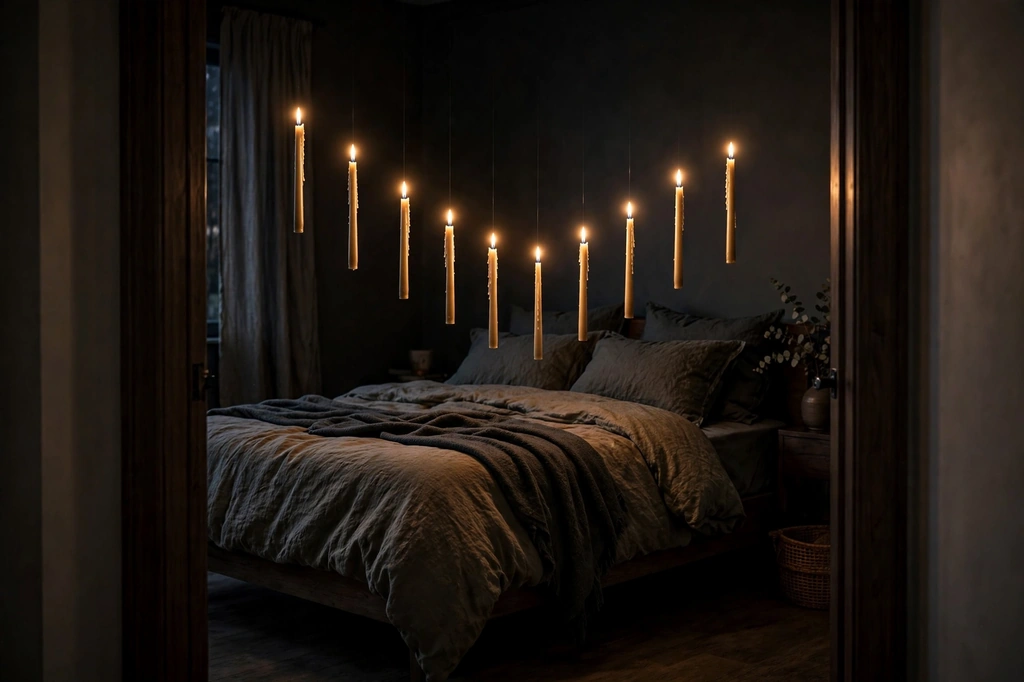
13. Float a Cluster of Candlelight Above the Footboard
A small cloud of suspended candles brings unmistakable Halloween magic to the room while preserving valuable tabletop space. Concentrating the lights over the foot of the bed creates spectacle without placing anything directly above the pillows.
The Setup:Hang seven to eleven lightweight battery-operated taper candles from clear removable ceiling hooks with transparent line, staggering them at least six inches apart. Use models with warm flickering LEDs and remote controls; keep the lowest candle well above standing head height and away from ceiling fans.Why It Photographs Well:The scattered points of light create depth because some flames sit closer to the camera than others. A darkened room and a centered view from the doorway make the glowing cluster appear to hover over the bed.Pro Tip:Avoid perfectly level rows; arrange the candle heights in a shallow wave so the installation feels buoyant rather than gridded.
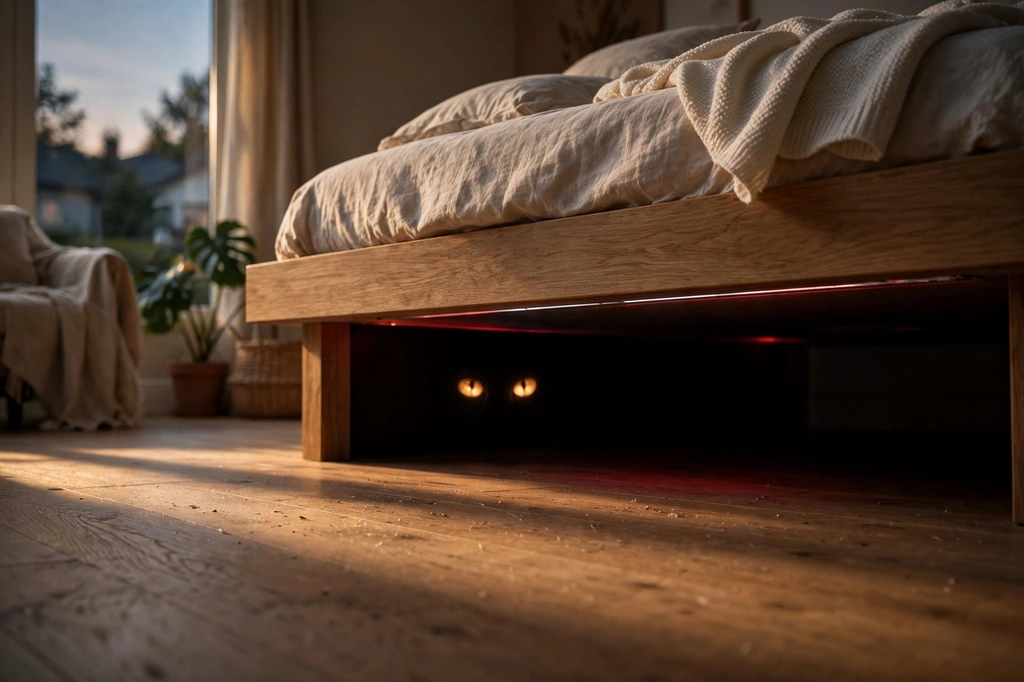
14. Suggest a Monster Beneath the Bed
This playful illusion uses shadow and hidden light rather than a literal creature. A pair of softly glowing eyes beneath the bed adds a cinematic wink, especially in a teen room or guest room where a full horror scheme would feel excessive.
The Setup:Place a dimmable red or acid-green LED strip along the back underside of a raised bed frame, hiding the diodes from direct view. Cut two eye shapes from opaque black card and mount them in front of a small battery light; keep cables secured and the floor path clear.Why It Photographs Well:Low light rakes across the floor and creates an unusual focal point below the normal sightline. A camera placed near floor height catches the eyes and bed silhouette while preserving mystery in the dark gap.Pro Tip:Keep the glow faint; if it lights the whole floor, the hidden-source illusion disappears and starts to resemble ordinary strip lighting.
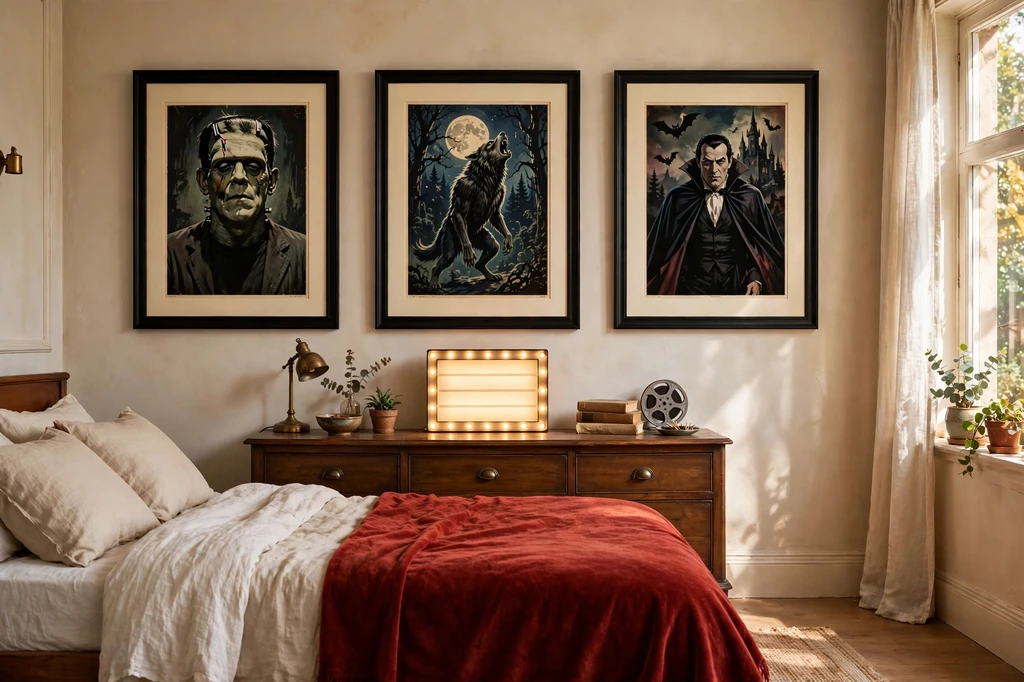
15. Curate a Retro Horror Cinema Wall
Vintage-style monster posters, a compact marquee, and deep cherry accents give the bedroom the energy of an old neighborhood movie house. The key is treating the posters as a tight collection rather than filling every wall with memorabilia.
The Setup:Hang three coordinated poster reproductions in identical black frames above a low dresser, aligning their top edges. Set a small changeable-letter light box below them and echo one poster color with a cherry red throw; add a mini projector only if you have a blank opposing wall.Why It Photographs Well:Repeated frame sizes create a clean rhythm, while the illuminated marquee acts as a bright visual underline. A straight-on photograph preserves the poster typography and makes the wall read like a deliberate cinema display.Pro Tip:Match the poster mats rather than the frame artwork; a shared cream border unifies different illustrations without erasing their character.
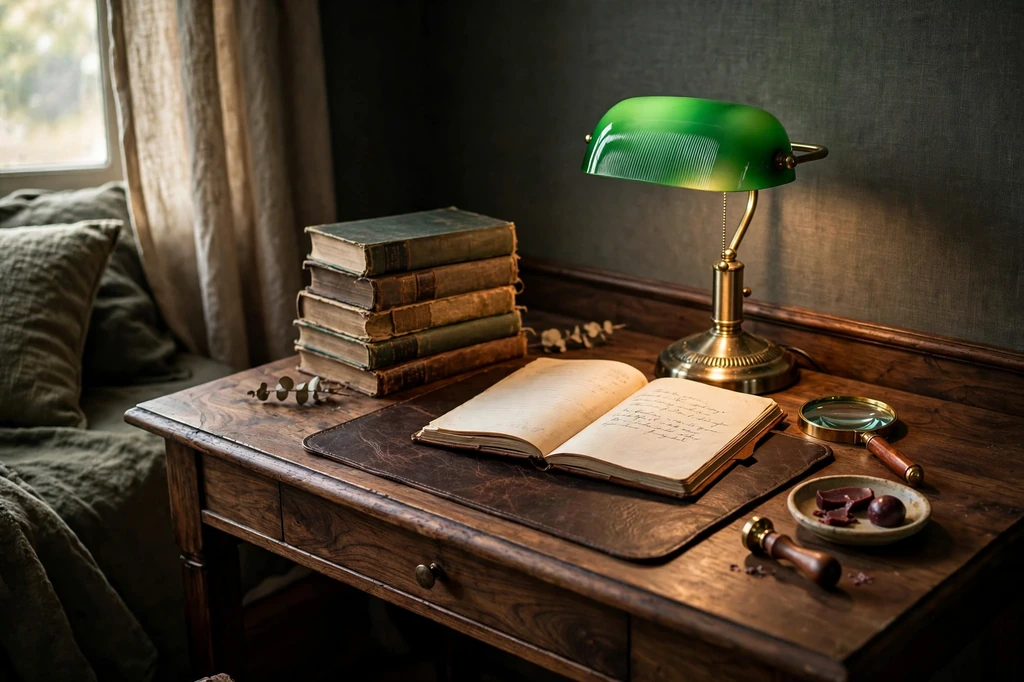
16. Build a Dark-Academia Writing Desk
A compact writing desk layered with old paper, leather, and an emerald banker’s lamp creates a studious Halloween mood. It feels believable because every object suggests an activity—reading, sketching, or recording a mysterious observation—rather than existing as decoration alone.
The Setup:Place a leather blotter at the center of a dark wood desk, stack two aged-looking books to one side, and angle a green glass lamp over an open notebook. Add a magnifying glass and a shallow dish for sealing-wax pieces, but leave enough clear surface for the desk to function.Why It Photographs Well:The lamp produces a concentrated green-and-gold glow that separates the desktop from a darker background. An overhead three-quarter view captures the tools, handwritten page, and leather texture as a complete story.Pro Tip:Write only a few legible lines and let the rest fade into sketches or ink marks; a restrained page feels intriguing, while a fully staged “spell” can look forced.
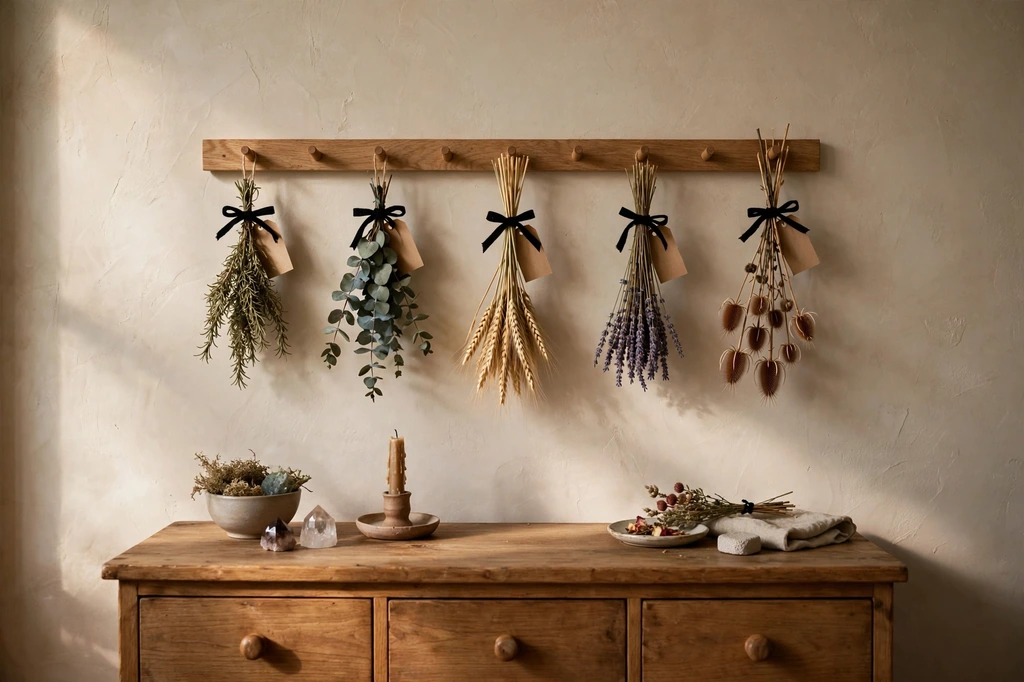
17. Install a Witch’s Herbarium Rail
Dried herbs and seed pods hung in orderly bundles bring an earthy, botanical kind of witchcraft to the bedroom. The horizontal display works beautifully above a dresser, where its fine stems soften the hard edge of the furniture below.
The Setup:Mount a slim wood peg rail or removable brass rod, then tie five small bundles of fully dried rosemary, eucalyptus, wheat, lavender, or seed heads with black cotton ribbon. Space them evenly, add simple kraft-paper names, and keep the arrangement away from open flame, moisture, and pillows.Why It Photographs Well:Fine leaves cast delicate shadows, and the repeated bundles create a calm visual cadence. Side lighting emphasizes their brittle textures, while the labels add detail that rewards a closer crop.Pro Tip:Trim the stems to descending lengths toward both ends of the rail; the subtle arc makes the display feel composed without losing its organic quality.
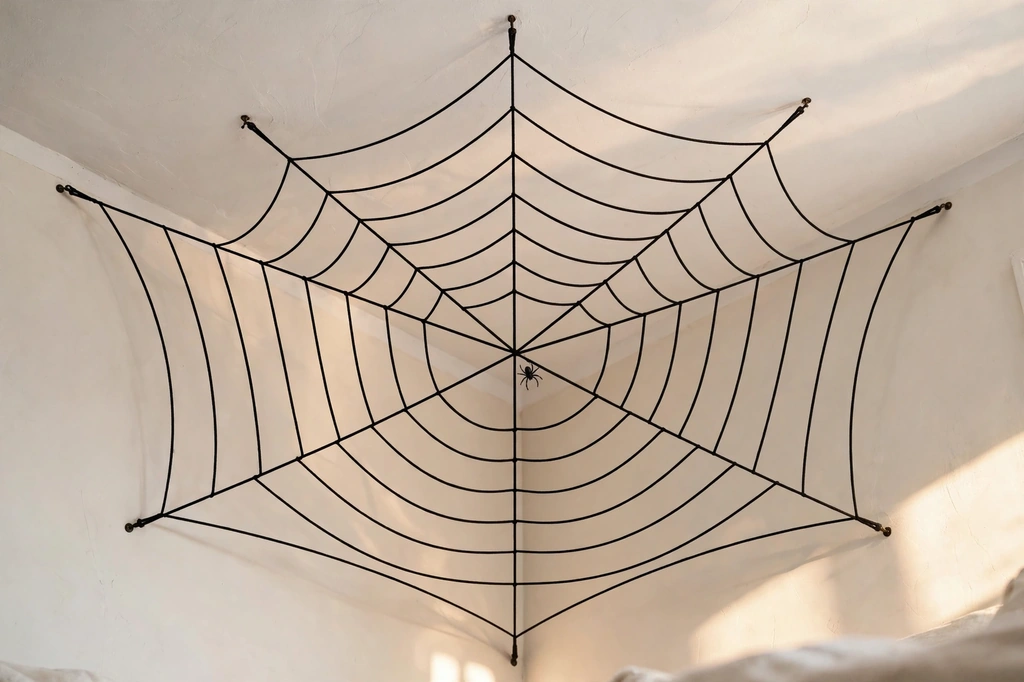
18. Draw a Graphic Spiderweb with Black Cord
A taut, oversized web stretched across one ceiling corner feels architectural and crisp—nothing like wispy packaged cobweb. Black cord gives the motif enough weight to read from the doorway, especially against a light wall and ceiling.
The Setup:Use removable clear hooks to create six radial lines from a high corner, then knot curved cross-lines between them with thin black cotton cord. Limit the web to roughly a three-foot span, and place one small matte spider near its center rather than scattering several around the room.Why It Photographs Well:The bold lines produce strong geometry and direct the eye toward the room’s upper corner. A low diagonal angle makes the web appear larger and catches the shadow line just behind the cord.Pro Tip:Allow each curved cross-line to bow slightly toward the center; perfectly straight connectors make the pattern look like a wheel instead of a web.
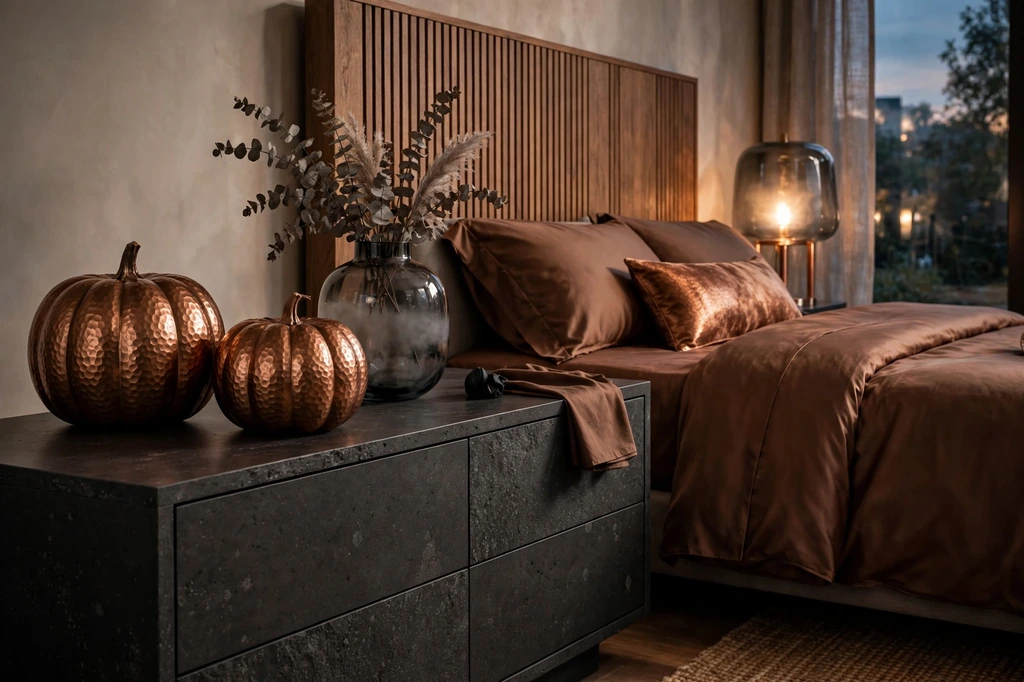
19. Go Glamorous with Copper and Smoked Glass
Copper pumpkins, smoked glass, and espresso-brown textiles create Halloween atmosphere with a sophisticated metallic glow. This is a strong direction for contemporary bedrooms because it relies on sheen and tonal depth instead of spooky characters.
The Setup:Place two hammered-copper pumpkins and one smoke-gray glass vase on a mirrored or dark stone dresser. Dress the bed in cocoa sateen with a narrow copper-colored lumbar, and swap the usual lamp shade for a translucent smoky one to carry the finish upward.Why It Photographs Well:Metal, glass, satin, and stone reflect light in different ways, producing a rich image even within a limited palette. Photograph at dusk with one lamp on so highlights stay warm and the smoked glass retains its gray transparency.Pro Tip:Mix hammered, brushed, and aged copper finishes; three identical shiny objects look retail-ready, while varied patina gives the scene depth.
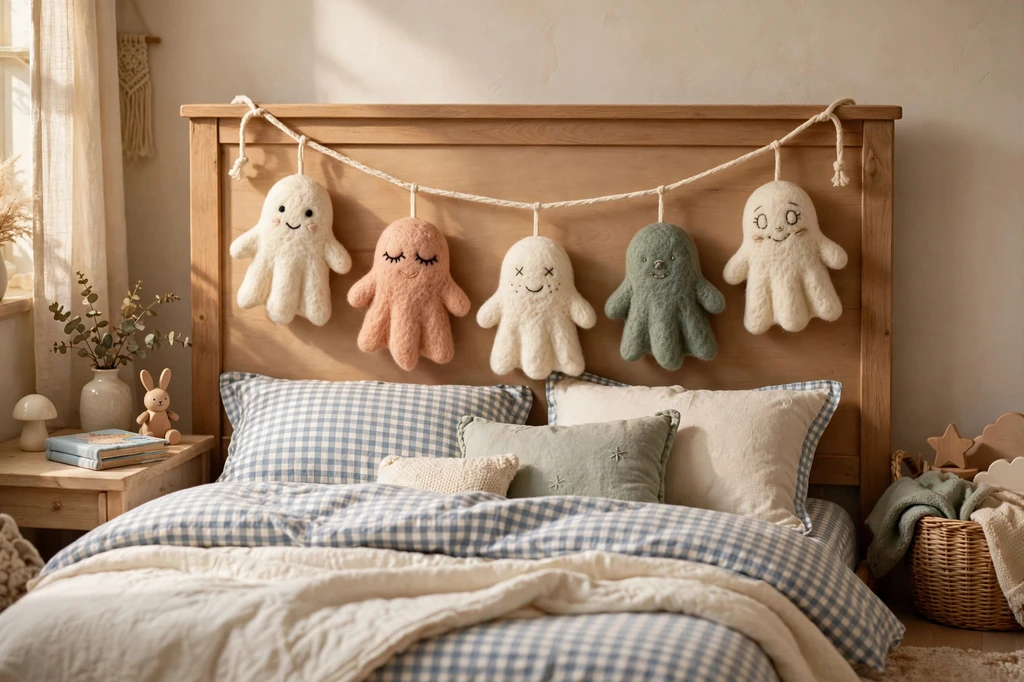
20. Make a Storybook Ghost Garland
Soft felt ghosts traveling across the headboard bring friendly Halloween character to a child’s room, guest room, or lighthearted cottage bedroom. Rounded shapes and stitched faces keep the mood sweet, while a limited palette prevents the garland from feeling like disposable party decor.
The Setup:String five to seven wool-felt ghosts on cream cotton cord, alternating plain ivory figures with two in muted peach or sage. Drape the strand in one shallow curve across a solid headboard or along a picture ledge, and pair it with tiny gingham sheets rather than more Halloween prints.Why It Photographs Well:The repeated figures form an easy-to-read line above the bed, and felt absorbs light without glare. A straight-on view captures the charming expressions while the gingham provides quiet scale beneath them.Pro Tip:Stitch each face slightly differently; tiny changes in eye spacing and mouth shape give the ghosts personality without adding visual clutter.
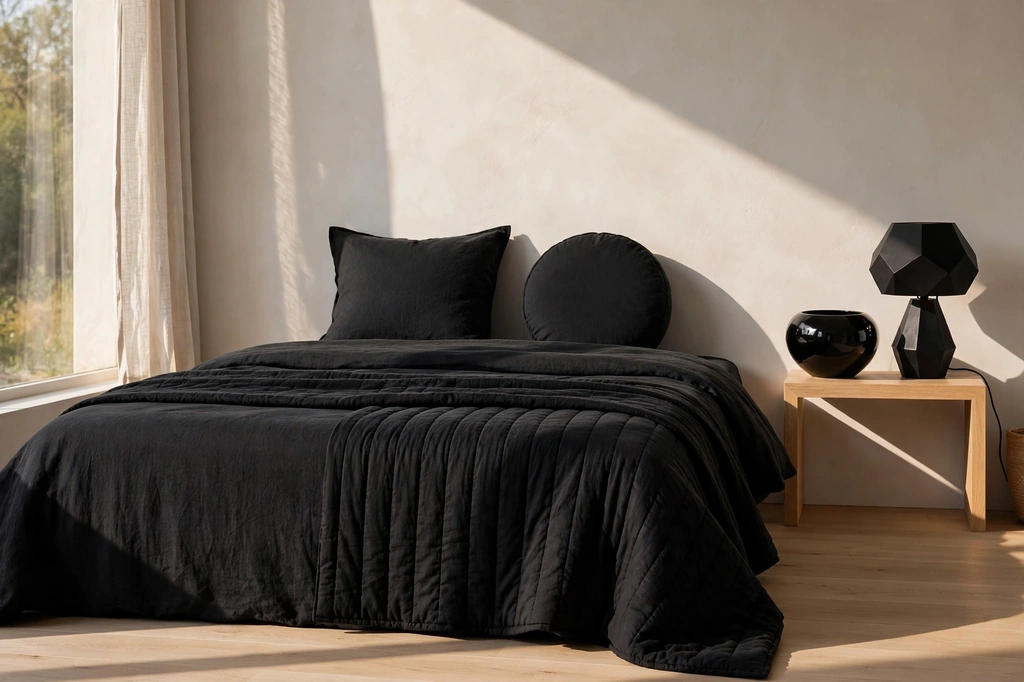
21. Sculpt a Monochrome Black Bedscape
An all-black scheme becomes compelling when silhouette and finish replace color: a pleated cover, spherical cushion, ridged vessel, and angular lamp. The result is minimalist but unmistakably Halloween, with every object chosen for the shadow it creates.
The Setup:Cover the bed in matte black linen, add one channel-stitched throw and two cushions in distinctly different shapes, then place a glossy black ceramic vessel beside a faceted lamp. Keep the walls and floor lighter so the bed reads as one dramatic mass rather than disappearing.Why It Photographs Well:Raking side light catches pleats, seams, curves, and glazed surfaces, revealing detail within the single color. A close three-quarter crop emphasizes form and makes the smallest highlight feel intentional.Pro Tip:Test the arrangement in grayscale on your phone; if two adjacent objects merge into one shape, change their height or finish before adding anything else.
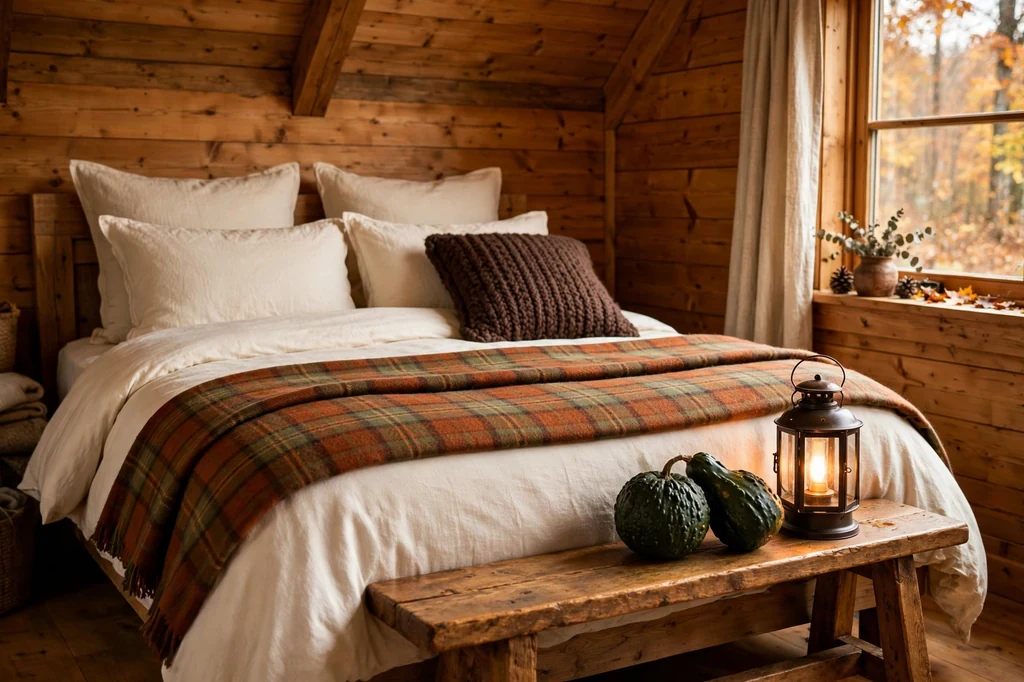
22. Layer a Harvest Plaid Cabin Bed
Warm tartan, nubby wool, and honey-toned timber give the bedroom a cozy October-cabin character. The Halloween note is quiet—a pair of deep green gourds and a storm-lantern form—so the room can stay in place well beyond the holiday.
The Setup:Fold one rust-and-olive tartan blanket across crisp cream bedding, then add a chocolate wool cushion and a wood bench. Place two dark green decorative gourds beside a battery lantern on the bench, keeping all three pieces grouped at one end instead of evenly spaced.Why It Photographs Well:Plaid supplies clear pattern while wool and wood soften its geometry. The warm lantern creates a visual bridge between the rust stripe in the blanket and the amber timber, making the whole frame feel cohesive.Pro Tip:Keep every other textile solid; one confident plaid looks collected, while multiple checks compete and flatten the bed.
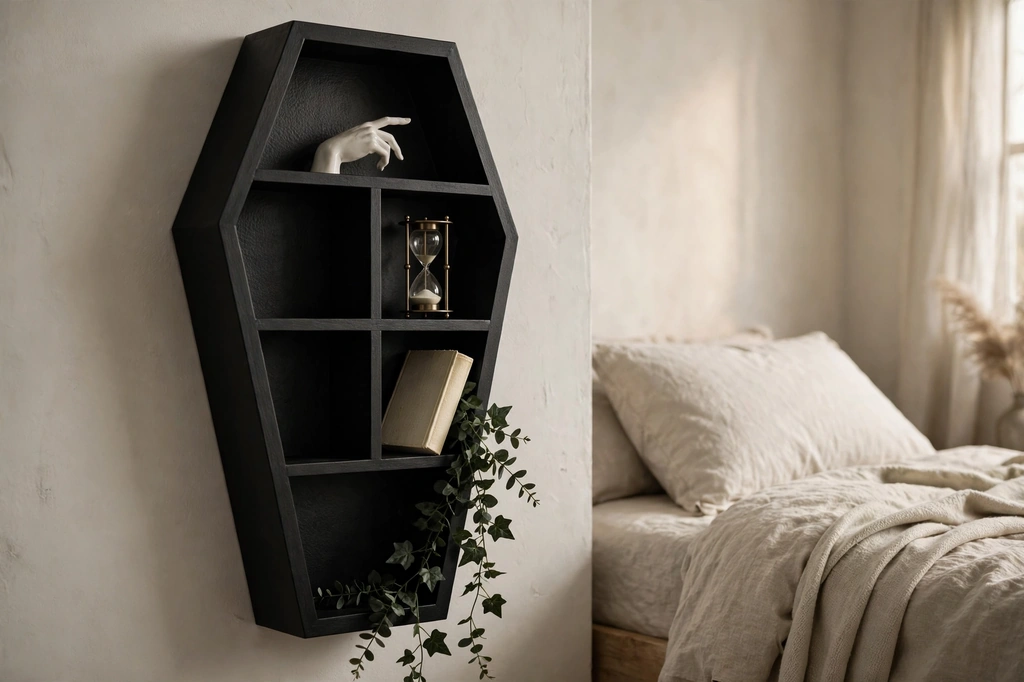
23. Mount a Coffin-Shaped Curiosity Shelf
A coffin-shaped shelf gives a blank wall one unmistakable Halloween focal point while offering room for a tightly edited collection. Styled with pale ceramics and one trailing form, it can read more like graphic furniture than a haunted-house prop.
The Setup:Mount a shallow black coffin shelf into appropriate wall anchors beside the bed or above a dresser, never over the pillow zone. Fill alternate compartments with a white ceramic hand, a small hourglass, a closed book, and a faux trailing vine, leaving at least two cubbies empty.Why It Photographs Well:The angular outer frame makes a bold silhouette, and the pale objects register clearly within the dark compartments. Negative space keeps the shelf from becoming a jumble in a vertical Pinterest crop.Pro Tip:Repeat the coffin’s longest diagonal with one leaning object inside; that small alignment makes the styling feel connected to the shelf itself.
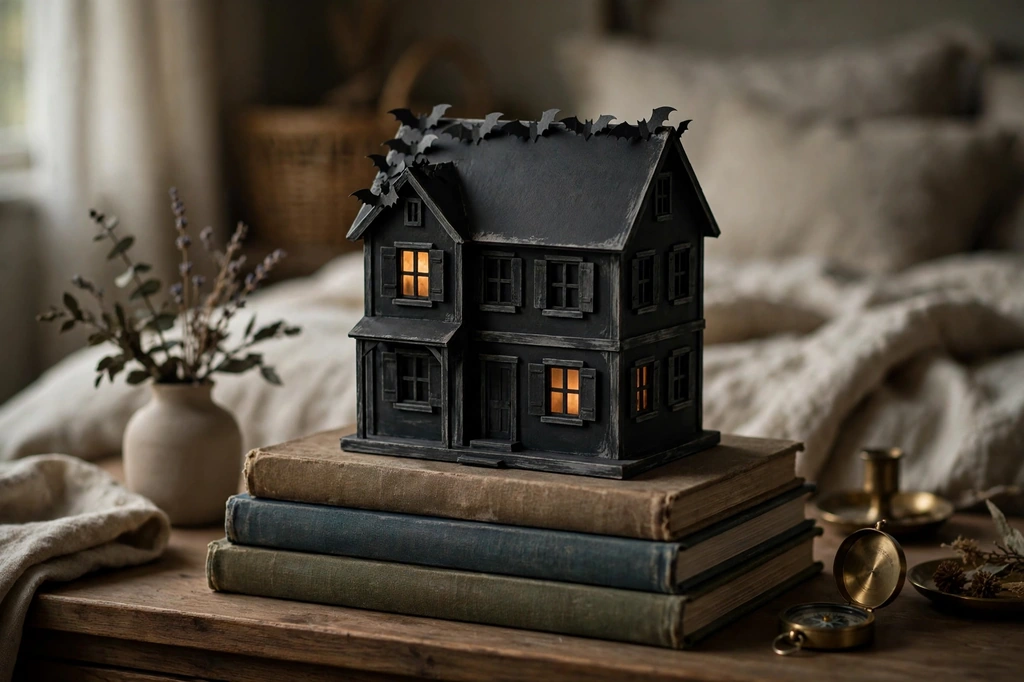
24. Turn a Dollhouse into a Haunted Miniature
A tiny haunted house on the dresser creates an entire Halloween world within the bedroom. Painted in soot black with dimly lit windows, it offers intricate storytelling without requiring any permanent change to the room.
The Setup:Paint an unfinished wood dollhouse matte charcoal, dry-brush the edges gray, and line selected windows with amber vellum. Place a battery tea-light strand inside, add miniature paper bats to one roofline, and set the house on a stack of wide books so it sits above nearby objects.Why It Photographs Well:The glowing windows create multiple points of focus, while the miniature scale invites close-up photography. Keeping the dresser background plain lets the roofline and tiny architectural details read sharply.Pro Tip:Light only some rooms; uneven illumination suggests an inhabited house and feels far more mysterious than every window glowing equally.
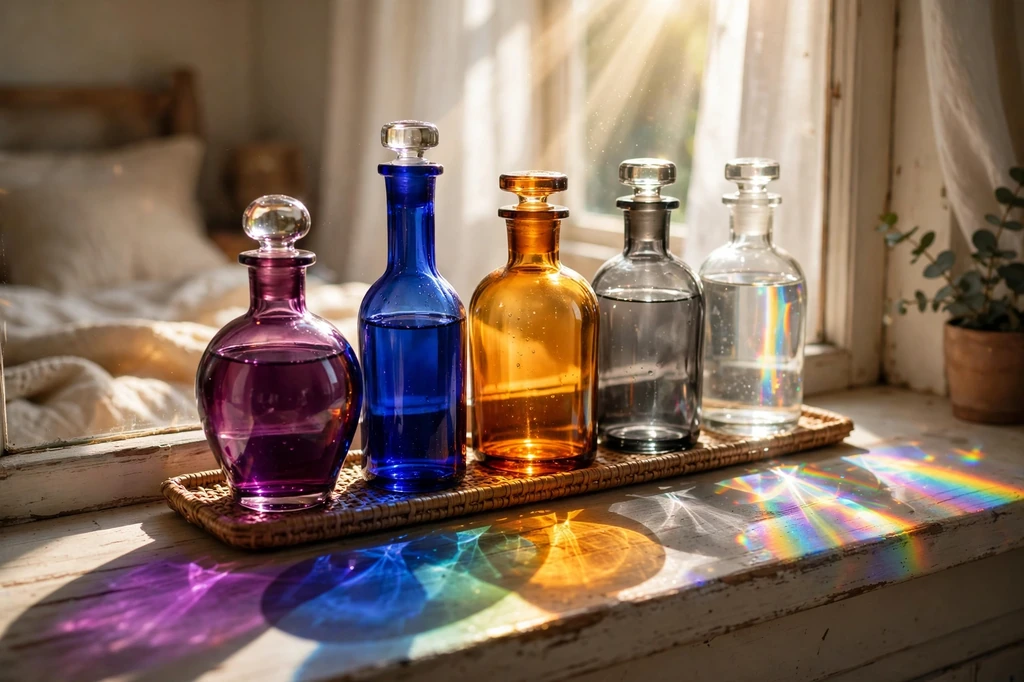
25. Make a Stained-Glass Potion Windowsill
Translucent bottles in jewel tones turn a sunny windowsill into a luminous potion display. The concept changes through the day—bright and colorful in the afternoon, shadowy at dusk—so it brings movement to a small area without adding bulky decor.
The Setup:Arrange five clean glass bottles in plum, cobalt, amber, and smoke gray on a narrow tray, keeping the tallest away from the window latch. Fill two with tinted water and leave the others empty; use museum putty beneath each base, and never place magnifying glass objects in direct sun.Why It Photographs Well:Sunlight projects overlapping pools of color onto the sill, creating a naturally vivid foreground. A side-on composition captures both the bottle silhouettes and their colored shadows without blowing out the entire window.Pro Tip:Limit repeated colors and include one nearly clear bottle; that visual pause makes the jewel tones appear richer.
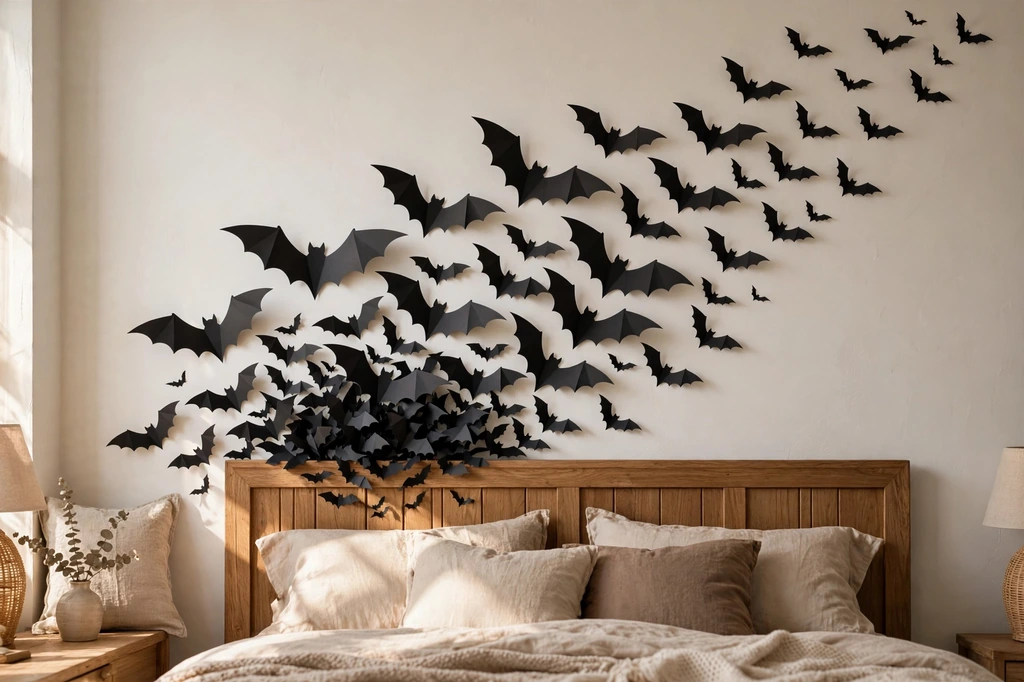
26. Send a Bat Swarm Across the Headboard Wall
A sweeping flight of black bats gives a plain wall motion, scale, and a little menace without using floor space. The design works best as one directional gesture, beginning densely near the headboard and dispersing toward the ceiling.
The Setup:Cut or buy matte paper bats in at least four sizes and attach them with removable tabs, folding the wings slightly away from the wall. Begin with the largest shapes near one outer edge of the headboard, then reduce both size and spacing density as the flock travels diagonally upward.Why It Photographs Well:The diagonal movement energizes a square room, and lifted wings cast small shadows that prevent the silhouettes from looking flat. A wide photograph that includes the entire trail shows the crucial shift from dense to sparse.Pro Tip:Turn a few bats against the main direction of travel; slight irregularity makes the flock feel alive while the overall diagonal stays clear.
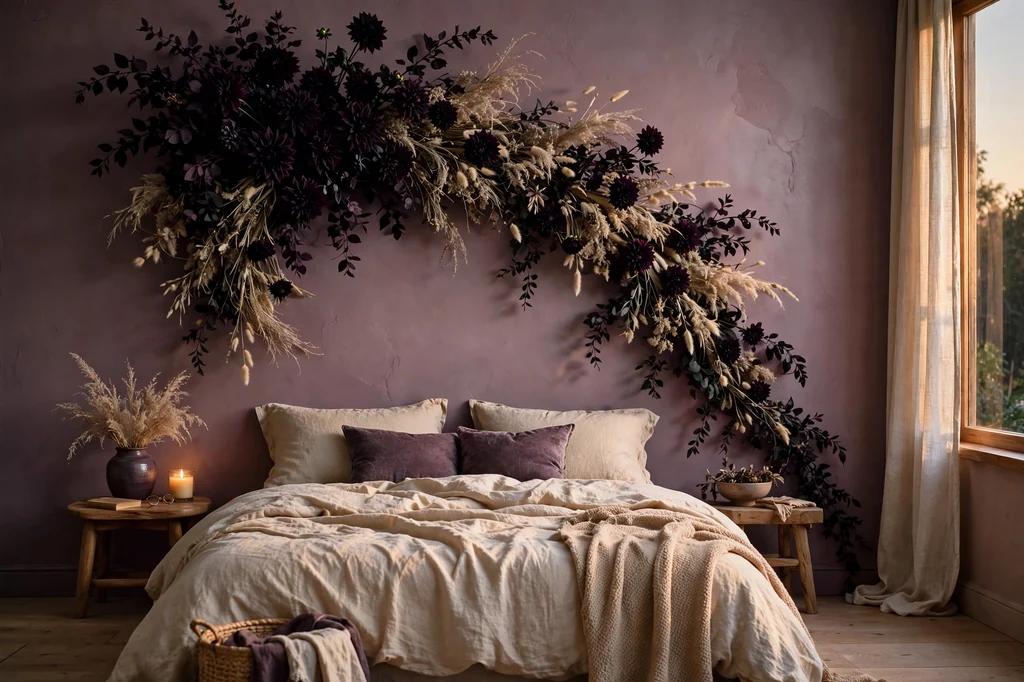
27. Build a Midnight Floral Arch
An asymmetrical sweep of plum foliage and near-black flowers makes the bed feel like an entrance to a midnight garden. It is romantic, dramatic, and distinctly different from traditional orange Halloween styling, especially against mauve, clay, or mushroom-colored walls.
The Setup:Attach a lightweight faux garland to a freestanding arch or securely mounted side supports behind the bed, concentrating flowers at one upper corner and trailing foliage down the opposite side. Mix black dahlias, dark plum leaves, and a few dried-look beige grasses; keep all stems away from lamps and faces.Why It Photographs Well:The arch frames the sleeper’s zone while its asymmetry creates a natural editorial crop. Dark petals hold rich detail in soft window light, and the pale grasses separate the arrangement from the wall.Pro Tip:Let the floral mass occupy only one-third of the arch; empty structure is what makes the arrangement feel airy rather than bridal.
A memorable Halloween bedroom needs one clear story, not twenty-seven ideas competing at once. Start with the concept that suits your existing room—its wall color, natural light, and available surfaces—then borrow only one supporting detail from another look if it truly belongs. Edit the room from the doorway, dim the lights, and remove the last object that feels unnecessary; the atmosphere will be stronger for it.
Bella Hart here, founder and senior editor of StyleGlowly.I love cozy homes on real budgets simple decor ideas, easy DIYs and seasonal touches that make a house feel like yours. I started this site to share the inspiration I always wanted to find. Practical, no fuss inspiration. Learn More!