24 Stunning Tray Ceiling Ideas That Instantly Elevate Any Room
A tray ceiling is one of those architectural details that changes the entire character of a room without changing a single piece of furniture. The recessed center panel — raised above the surrounding perimeter frame — creates depth overhead, draws the eye upward, and signals immediately that the room was designed with intention. The effect ranges from quietly sophisticated to dramatically grand depending on how the tray is treated: the color inside, the material on the step face, the lighting tucked within the recess, and how deeply or shallowly the tray sits. These 24 ideas cover the full range, each one a distinct direction with its own personality and finish.
Classic White-on-White Tray Ceiling
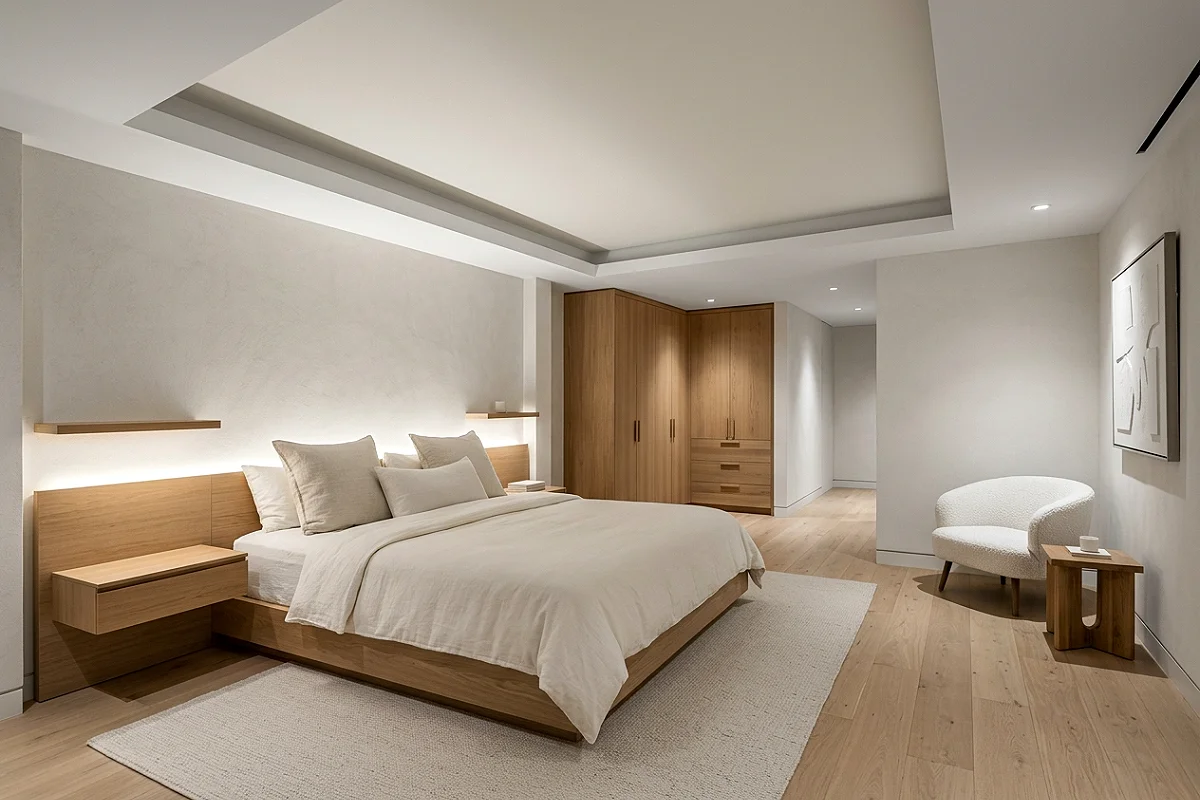
The simplest and most universally elegant tray ceiling treatment: the tray interior, the step face, and the surrounding perimeter ceiling all painted in the same warm white, with only the depth and shadow of the recess creating the visual interest. No color contrast, no material change — just the architecture itself doing the work. This approach reads as effortlessly refined in a bedroom or living room and never competes with the furniture or art in the space below it.
Pro Tip
Use an eggshell finish inside the tray recess and a flat finish on the surrounding ceiling — the slight sheen difference creates a subtle visual separation that makes the tray read as three-dimensional even in an all-white treatment.
Deep Navy Tray Interior with White Perimeter
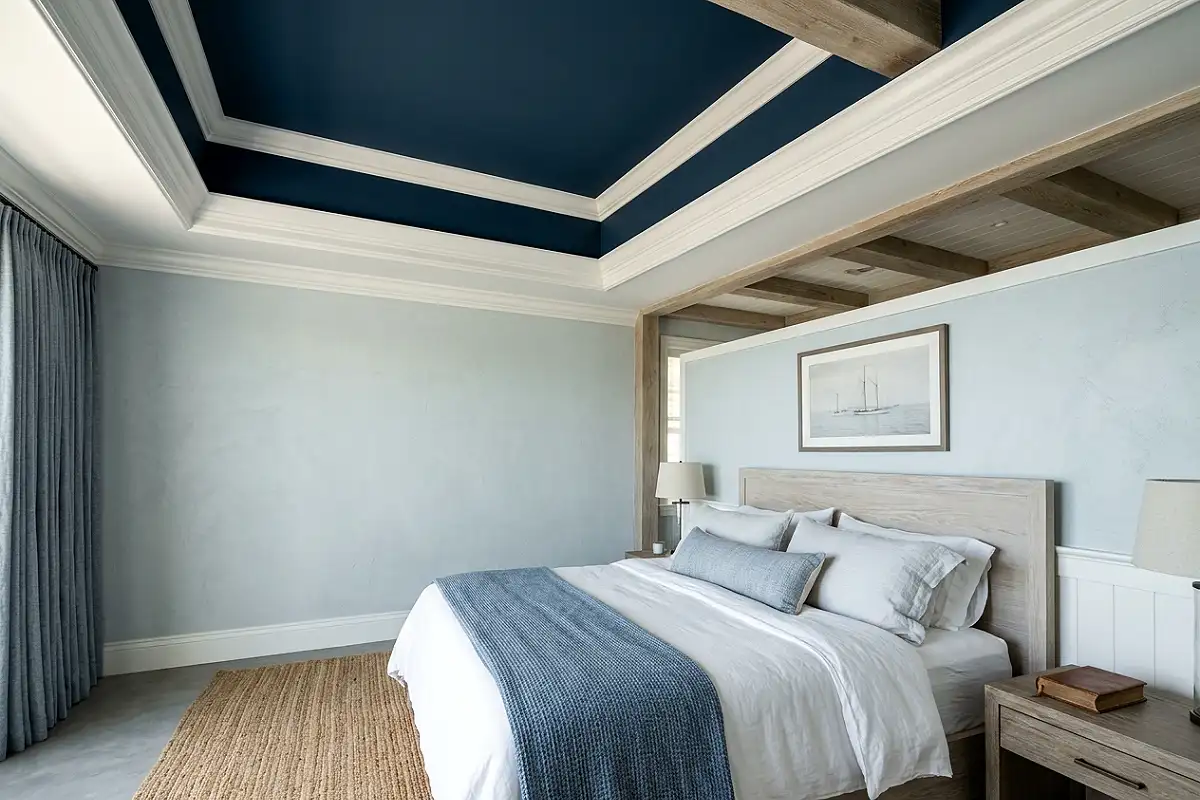
Painting the interior of the tray — the flat recessed panel only — in a deep, saturated navy while keeping the perimeter ceiling and step face in warm white creates a dramatic overhead focal point that reads as deeply intentional and confident. The navy recess appears to pull upward, creating an illusion of greater ceiling height than the room actually has. In a bedroom, this treatment turns the area directly above the bed into a visual anchor of genuine weight and character.
- Use navy with a warm undertone — Hale Navy from Benjamin Moore or Hague Blue from Farrow & Ball — rather than a cool, blue-toned navy that reads as cold against warm white trim.
- Add crown molding to the step face transition for a polished, formal finish that justifies the bold color contrast.
Pro Tip
Cut in the navy-to-white transition on the step face with a small angled brush rather than relying on painter’s tape alone — on inside corners of a ceiling tray, tape often lifts and bleeds. A steady hand with a quality angled brush produces a cleaner line.
Warm Gold Tray Ceiling with Cove Lighting
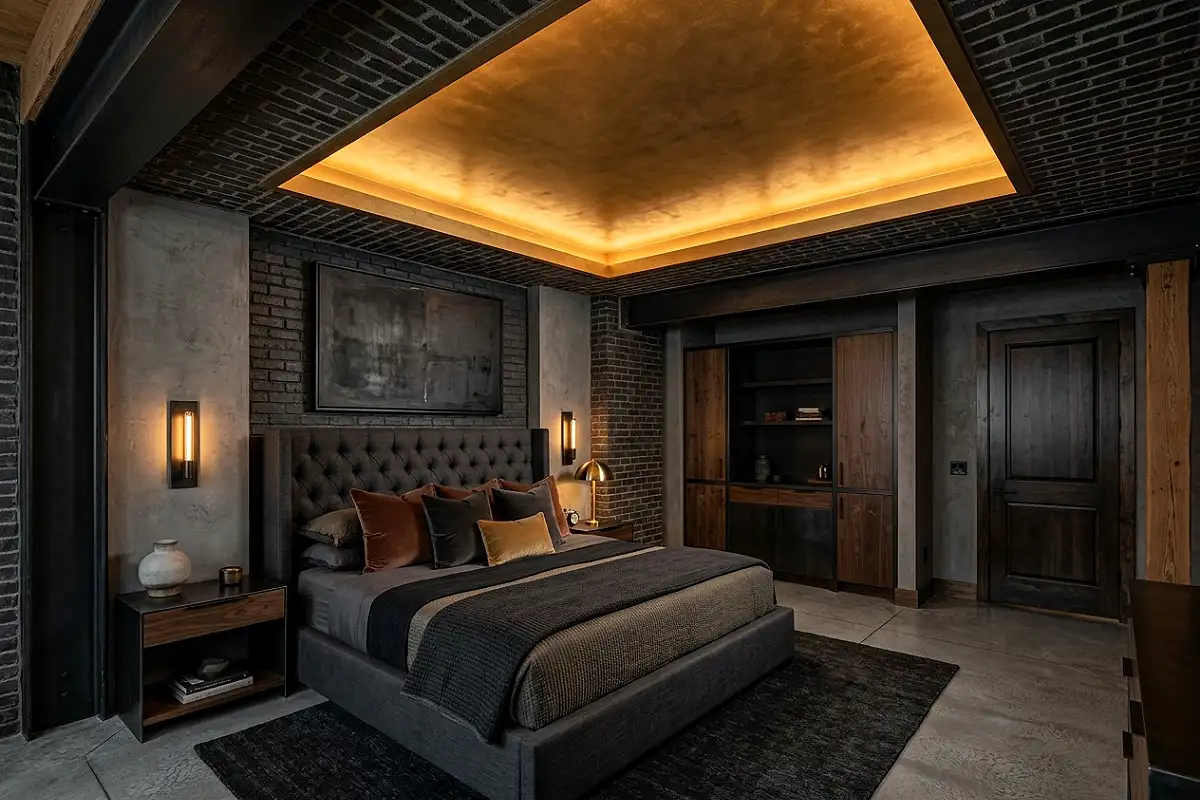
A tray interior finished in a warm antique gold or gilded tone — painted in a metallic gold wash over a deep amber base — combined with LED cove lighting tucked into the inner perimeter of the tray step creates a ceiling of extraordinary glamour and warmth. The gold surface reflects the cove light across the entire recess and sends a warm glow downward into the room, functioning as both a design feature and the room’s primary ambient light source. This is the tray ceiling treatment most commonly seen in luxury hotel suites and ballrooms, and it translates with equal beauty into a residential dining room or master bedroom.
Pro Tip
Use 2200K warm amber LED strip lights inside the tray cove — not 3000K or higher. The amber tone enriches the gold surface and fills the room below with a candlelight-quality glow; cooler LEDs make even a genuine gold surface read as harsh and commercial.
Tray Ceiling with Exposed Wood Planks Inside
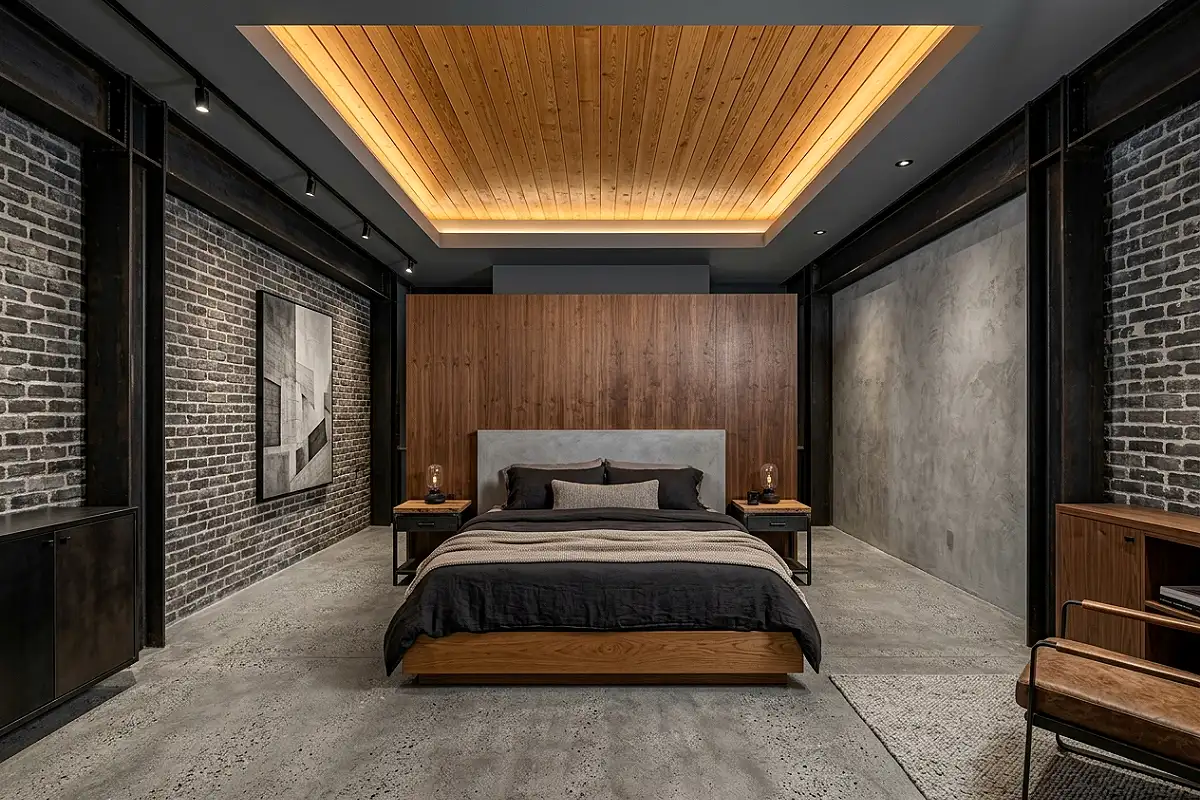
Installing tongue-and-groove pine or cedar planks inside the tray recess — on the flat panel only, with the step face and surrounding ceiling remaining painted — creates a ceiling feature of genuine material warmth and architectural character. The contrast between the natural wood inside the tray and the smooth painted perimeter frames the wood in a way that makes it read as an intentional material inset rather than a DIY addition. In a living room or bedroom, this treatment reads as craft-quality design that required real thought and execution.
- A honey oak or whitewashed finish on the planks works in almost any room palette — warm tones with ivory walls, whitewash with grey or blue-toned walls.
- Run the planks parallel to the room’s longest dimension for the most architecturally natural orientation.
- Seal with a matte water-based finish to preserve the grain character without adding any yellowing over time.
Pro Tip
Add LED strip lighting to the inner tray perimeter before installing the wood planks — once the planks are in, adding lighting requires disassembly. The warm glow across the plank surface overhead is one of the most beautiful lighting effects a bedroom can have.
Double-Step Tray Ceiling with Contrasting Tones
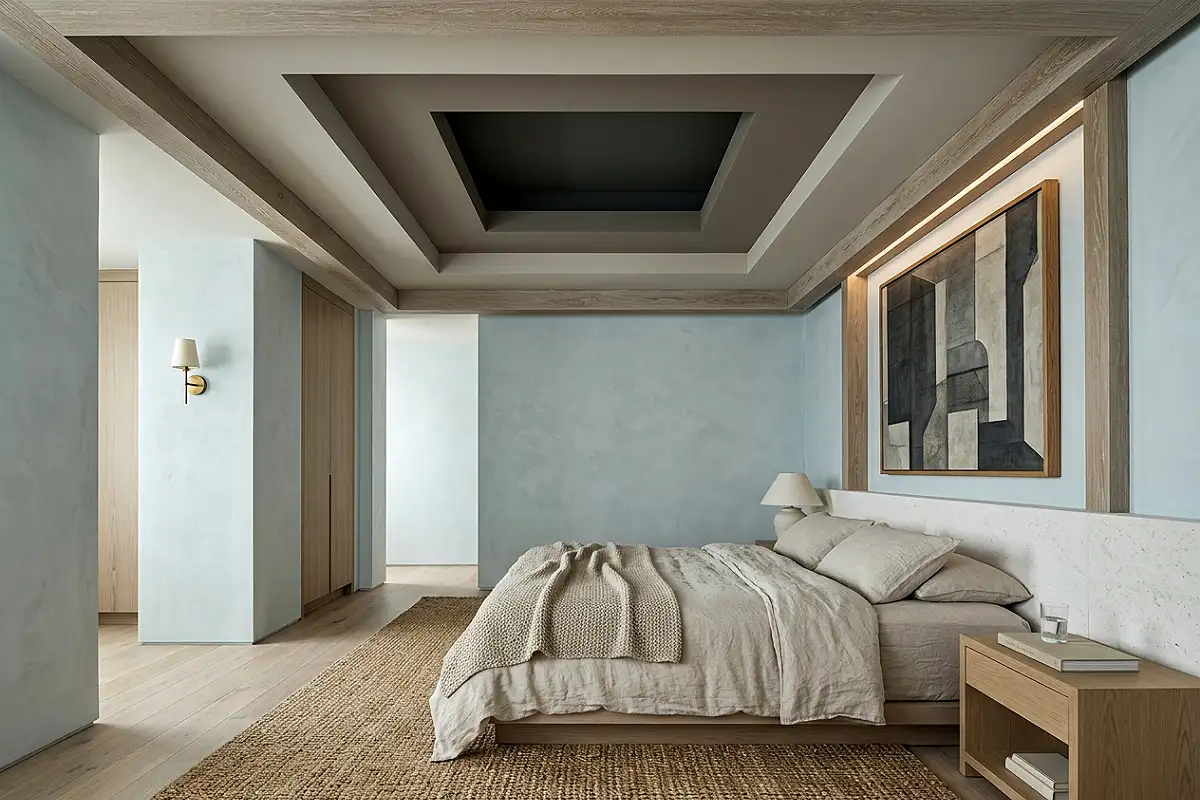
A double-step tray — two concentric rectangular recesses stepping up from the perimeter ceiling to the central panel — painted in three progressively deeper tones of the same color creates a ceiling with extraordinary visual depth and a sense of architectural grandeur that reads as genuinely historic. Each step carries a slightly darker value of the same hue: the perimeter ceiling in a pale greige, the first step in a warm medium grey, and the central panel in a deep charcoal or warm navy. The layered tonal progression makes the ceiling appear to recede upward in stages, adding perceived height in a room that may not have exceptional headroom.
Pro Tip
Keep all three tones within the same paint family — order three shades from the same paint strip, not three independently chosen colors. Colors from the same strip share an undertone that guarantees harmony; independently chosen colors that appear similar on chips can clash noticeably when placed on adjacent surfaces.
Tray Ceiling with Wallpaper Interior Panel
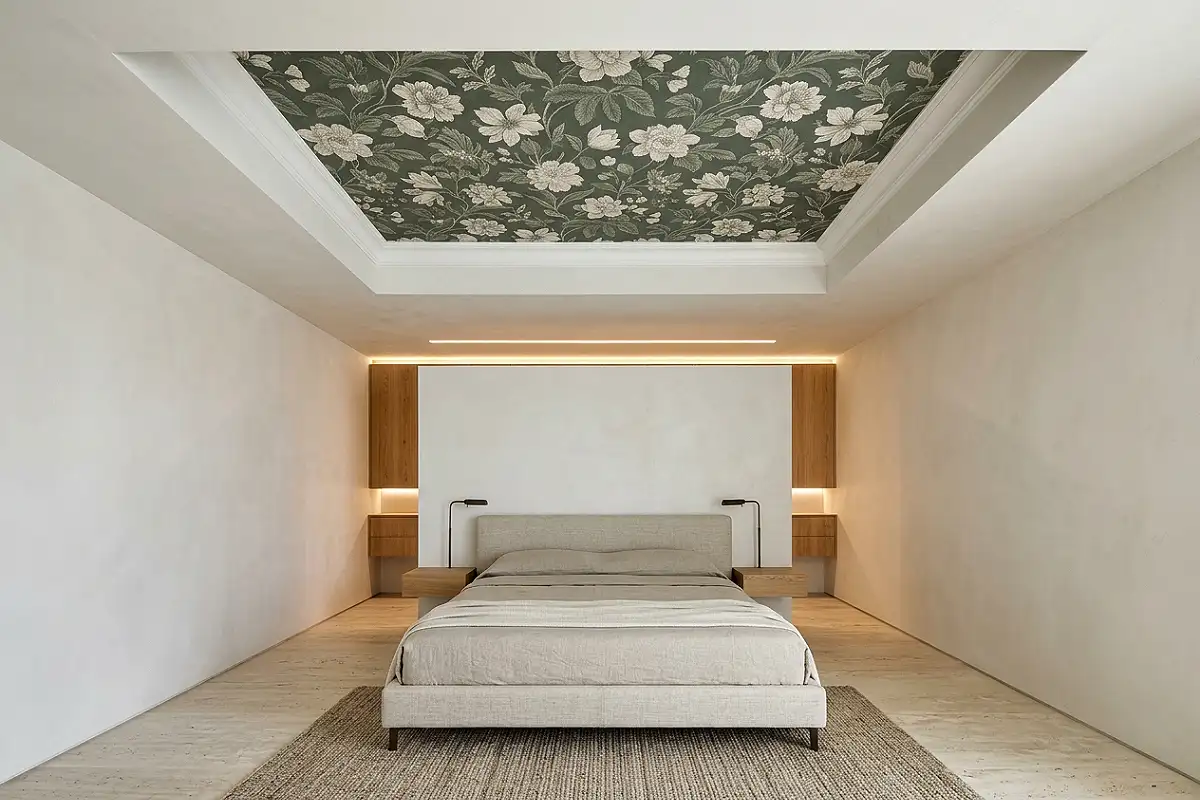
Applying a bold, large-scale wallpaper to the interior of a tray ceiling — inside the recessed panel only — creates a room-defining overhead focal point of extraordinary visual drama. The tray frame contains and frames the pattern perfectly, preventing it from overwhelming the room while ensuring it reads as a full design statement. A rich botanical print in deep green and ivory, a geometric repeat in charcoal and brass, or a large-scale damask in dusty rose and warm cream all work beautifully as tray ceiling wallpaper applications.
- Use pre-pasted or paste-the-wall wallpaper for ceiling applications — traditional paste-the-paper products are significantly heavier when wet and more difficult to position overhead.
- Apply the wallpaper before any crown molding is installed on the tray frame — the molding covers the edges and eliminates the need for precision trimming at the border.
- A mirrored or metallic-ground wallpaper inside a tray ceiling reflects cove lighting in a particularly striking way.
Pro Tip
Use heavy-duty ceiling paste rather than standard wallpaper adhesive — the additional grab prevents the paper from sagging during the critical first hour after application while the adhesive sets on a horizontal surface.
Tray Ceiling with Coffered Grid Inside
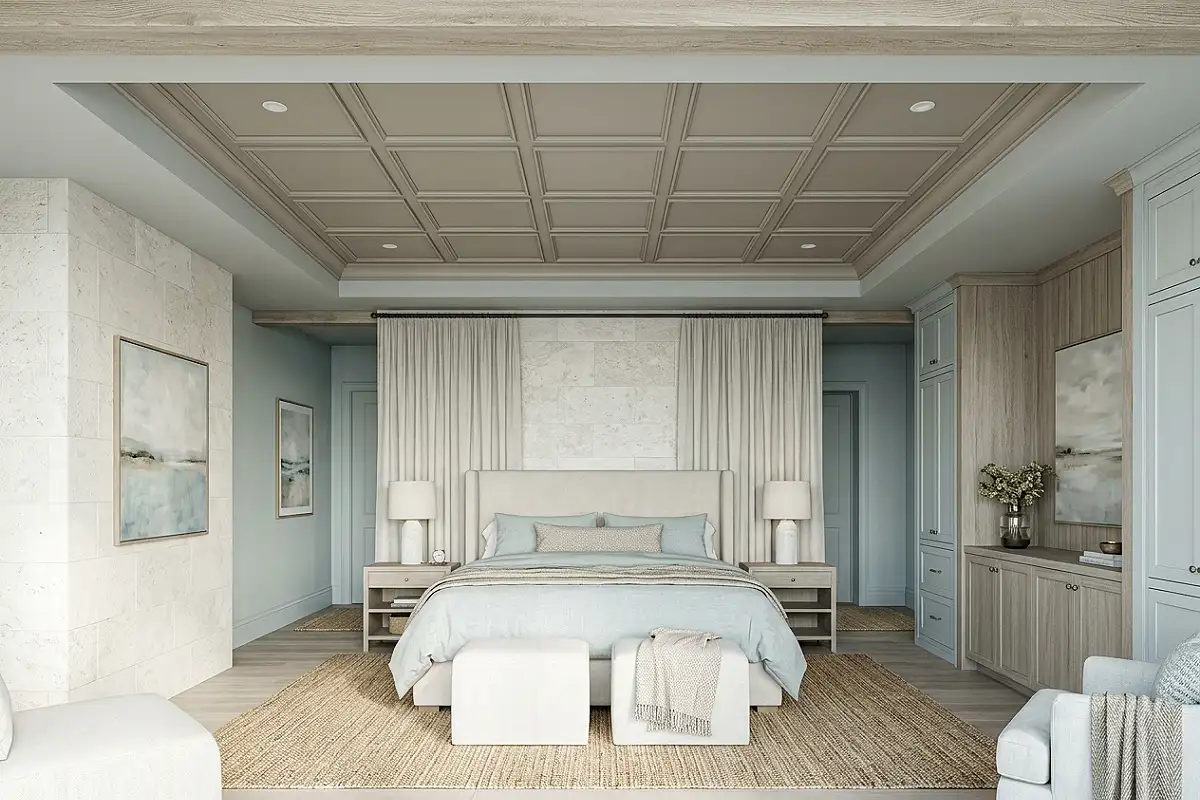
Building a coffered grid inside the tray recess — a pattern of smaller rectangular frames within the larger tray perimeter — creates a ceiling of museum-quality architectural complexity that reads as the work of a master carpenter. The inner coffered grid is constructed from thin MDF molding profiles applied to the flat tray panel, painted in the same tone as the tray or in a contrasting accent color. The result is a ceiling that references the great plaster ceilings of Georgian and Neoclassical interiors at a fraction of their cost.
Pro Tip
Plan the coffered grid divisions on graph paper first so every inner panel is equal in size — the symmetry of the grid is what reads as professional craftsmanship, and unequal panels at the perimeter immediately reveal a layout that wasn’t carefully pre-planned.
Sage Green Tray Interior with Warm White Perimeter
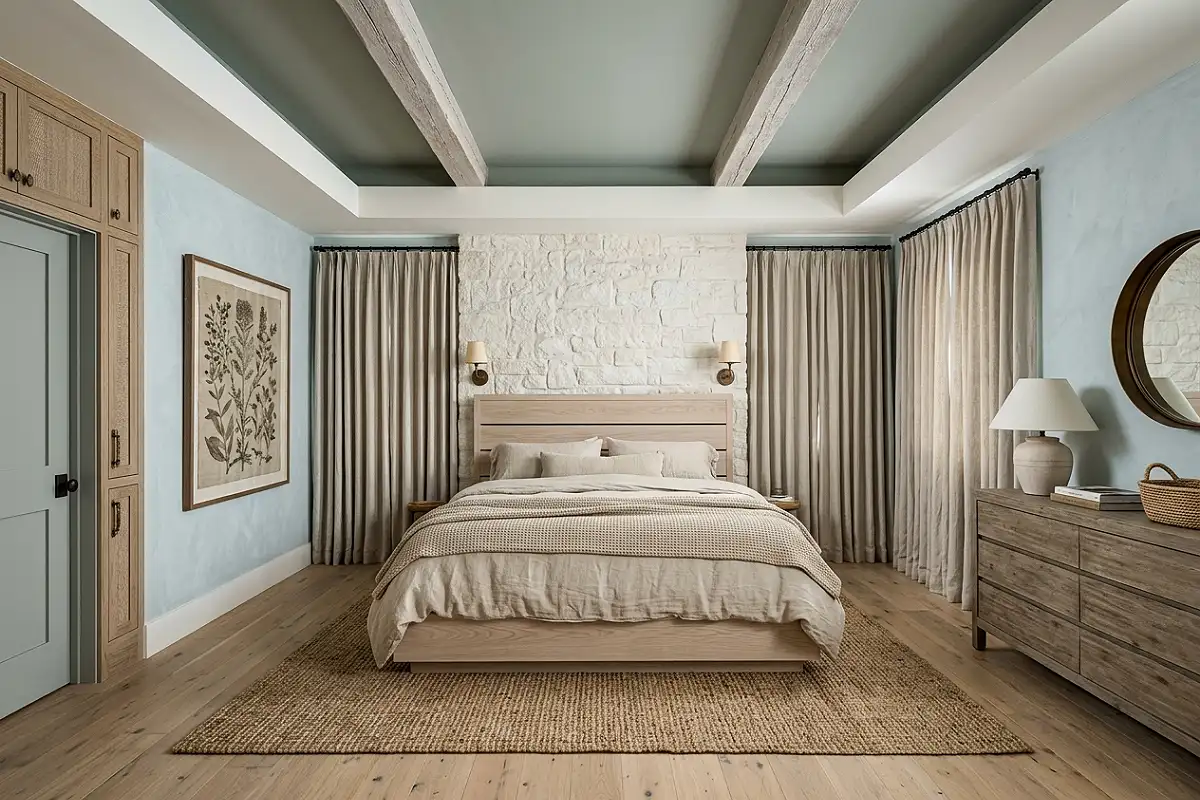
A soft sage green inside the tray recess against a warm white perimeter ceiling creates a bedroom or living room ceiling of understated botanical beauty — calm, specific, and quietly rich in a way that a neutral ceiling simply cannot achieve. The sage reads as a natural, grounded tone overhead rather than a bold color statement, and the white frame around it gives it the breathing room it needs to read as a considered choice rather than a painted ceiling. Paired with natural linen, warm oak furniture, and warm amber lighting, the sage tray ceiling reads as the defining architectural detail of a room that knows exactly what it is.
Pro Tip
Choose a sage with a grey undertone rather than a yellow-green one — grey-based sage reads as sophisticated and architectural overhead; yellow-green sage can read as avocado in warm lamplight, which is a difficult tone to live with daily.
Tray Ceiling with Crown Molding Detail
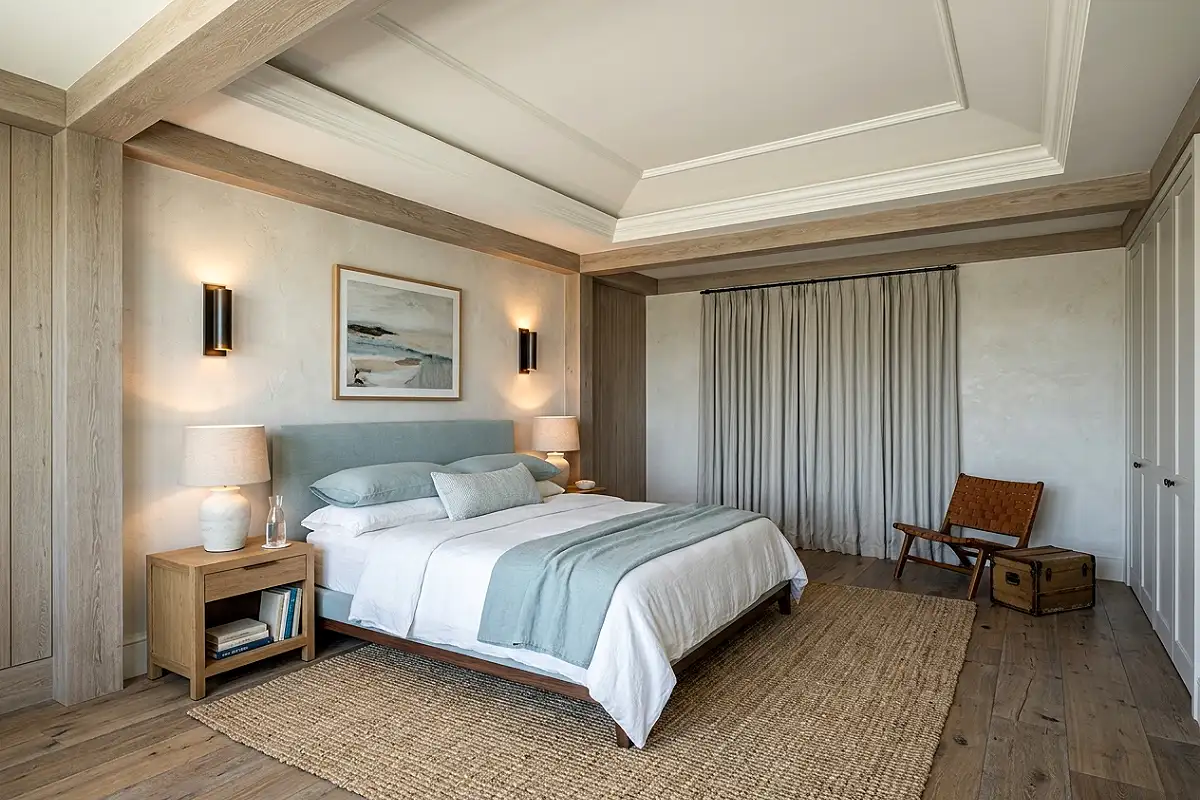
Adding a substantial crown molding profile to the inner step face of a tray ceiling — where the vertical step transitions to the recessed flat panel — elevates a simple builder-grade tray into a room-defining architectural feature. The molding creates a genuine shadow line between the perimeter ceiling and the tray interior, adds visual mass to the step, and signals craftsmanship in the way that a plain painted step face simply doesn’t. A two-piece molding combination — a bed molding below and a cove molding above — is the traditional treatment that reads as the most professionally resolved.
- Paint the crown molding the same tone as the perimeter ceiling for a seamless, architectural look.
- Paint the molding in a contrasting white when the step face is a color, to frame the tray interior cleanly.
- Use primed MDF crown molding rather than wood — it’s more dimensionally stable in climate-controlled interiors and takes paint more evenly than raw pine profiles.
Pro Tip
Caulk every joint and inside corner of crown molding before painting — unfilled joints read as amateur work regardless of the quality of the molding profile itself. Sand the caulk smooth after it dries and before the final paint coat for a seamless, professional-grade finish.
Tray Ceiling with LED Strip Cove Lighting
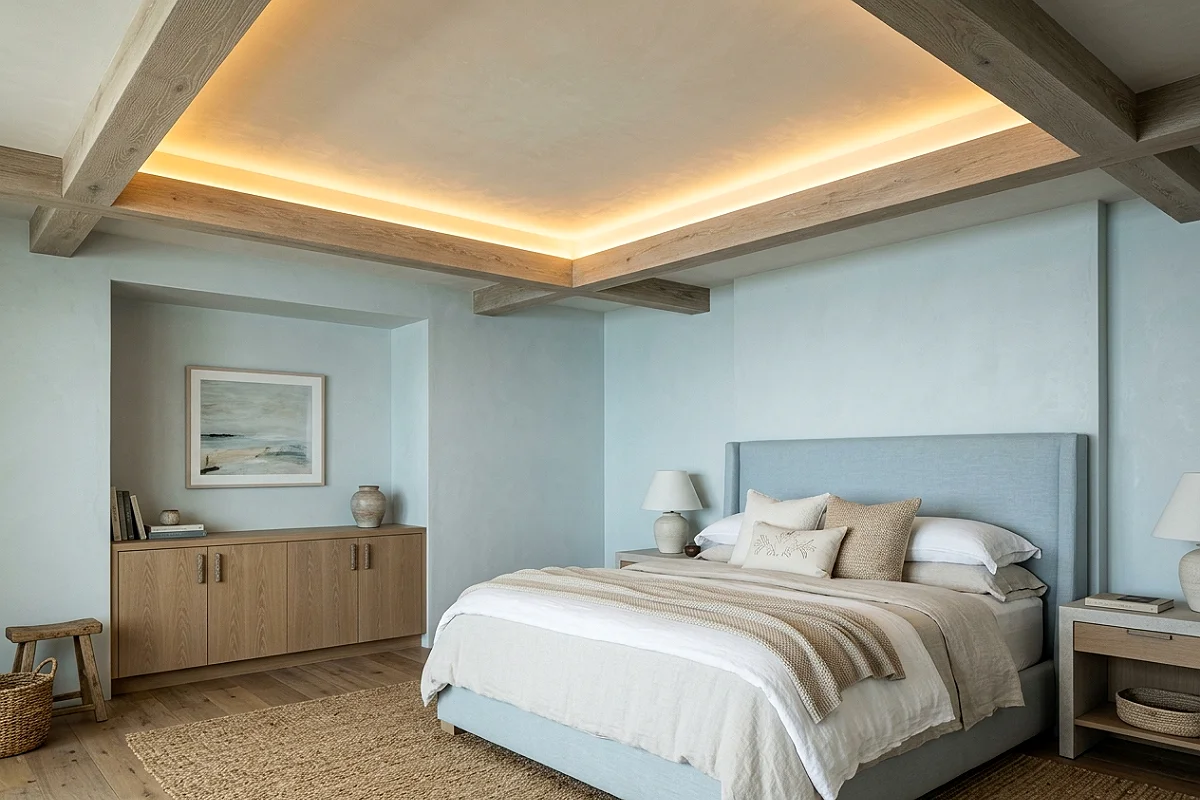
Concealed LED strip lighting tucked into a cove channel along the inner perimeter of the tray step — invisible from below but washing the interior panel with warm light — transforms a standard tray ceiling into a glowing architectural feature that functions as the room’s primary ambient light source in the evening. The cove channel is a simple 1×2 lumber ledge mounted to the inner tray wall, with the LED strip adhered to the back face so the light source is completely concealed while the glow fills the tray recess and spills softly into the room.
- Use 2200K to 2700K warm amber LED strip lights exclusively — cooler temperatures make the cove glow feel clinical in a bedroom or living room context.
- A dimmable LED driver connected to a wall switch allows the cove light level to be adjusted from bright ambient to near-candlelight without changing bulbs.
- The cove channel ledge should be at least 2.5 inches wide so the LED strip sits far enough back to avoid a visible bright line at the edge of the tray step.
Pro Tip
Install the LED strip on the horizontal ledge surface angled slightly inward toward the tray center rather than flat — this directs the light wash upward and across the tray interior rather than straight up, producing a more even and more beautiful illumination of the recessed panel.
Black Tray Ceiling in a Living Room
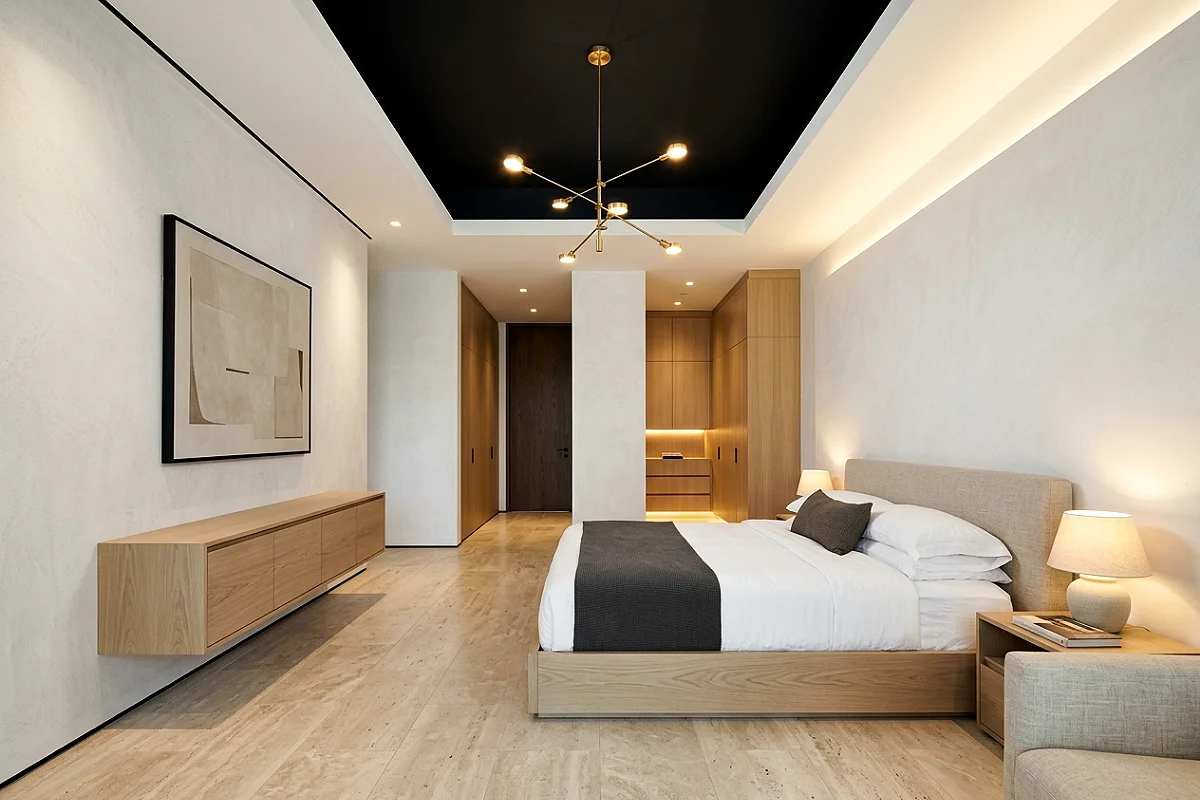
A tray interior painted in a deep, warm matte black — with the perimeter ceiling in warm white — creates a living room ceiling of theatrical, editorial boldness that is also genuinely functional: the dark recess makes any light fixture hanging from its center — a statement chandelier, a cluster of pendants, a sculptural woven piece — read with maximum visual impact against the dark background. The black tray frames the fixture the way a dark mat frames a piece of art, giving it presence and depth it wouldn’t have against a white ceiling.
Pro Tip
Choose a warm black — one with brown or green undertones like Farrow & Ball’s Off-Black or Railings — rather than a blue-black, which can read as cold and stark against warm white perimeter ceiling paint.
Tray Ceiling with Plaster Medallion Centerpiece
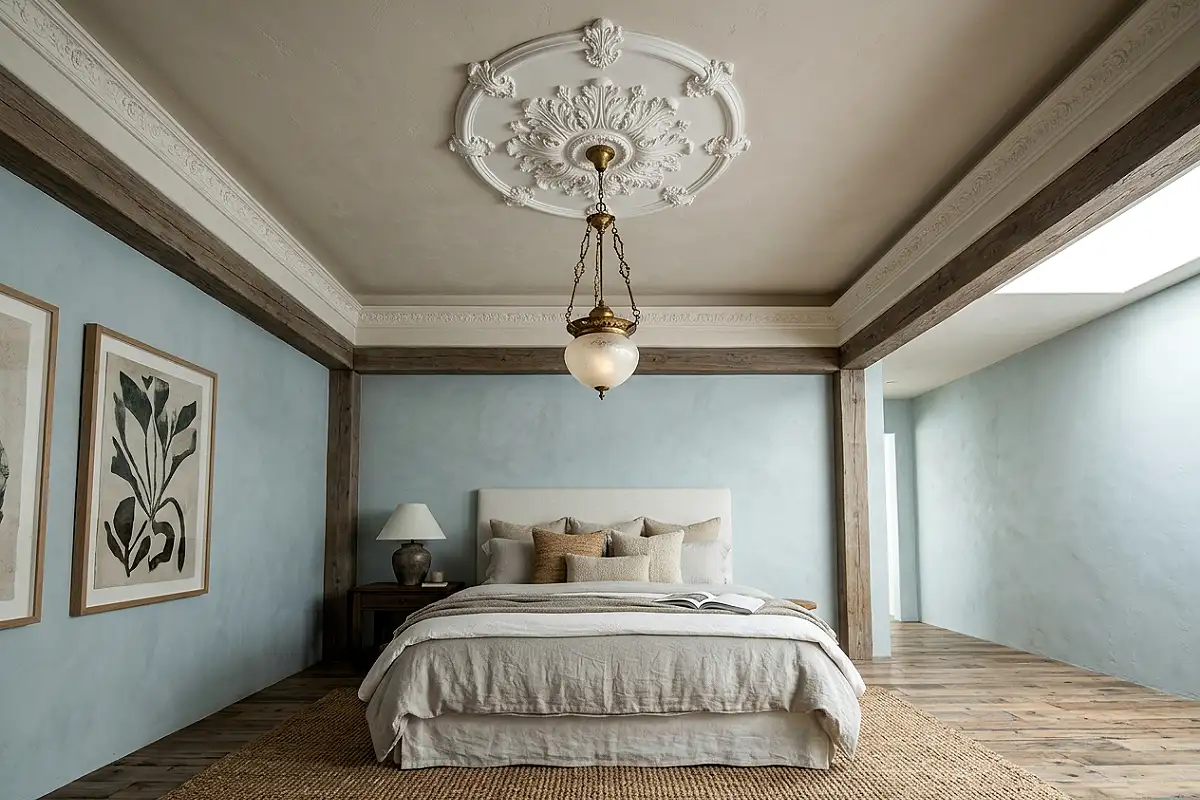
Installing a plaster or lightweight polyurethane ceiling medallion at the center of a tray interior — particularly one with ornate floral, acanthus leaf, or geometric detailing — adds a historical richness and decorative authority to a tray ceiling that paint and molding alone cannot achieve. The medallion is typically positioned to surround a central light fixture, transforming what would otherwise be a bare canopy plate into a genuine architectural ornament. Painted the same tone as the tray interior, it reads as integral to the ceiling; painted in a contrasting white or gilded tone, it reads as a deliberate decorative statement.
Pro Tip
Use construction adhesive and a few finish nails to secure a lightweight polyurethane medallion — never rely on adhesive alone on a ceiling application. The nails provide mechanical backup while the adhesive cures, preventing the medallion from dropping before the bond is fully established.
Tray Ceiling with Grasscloth Wallpaper Panel
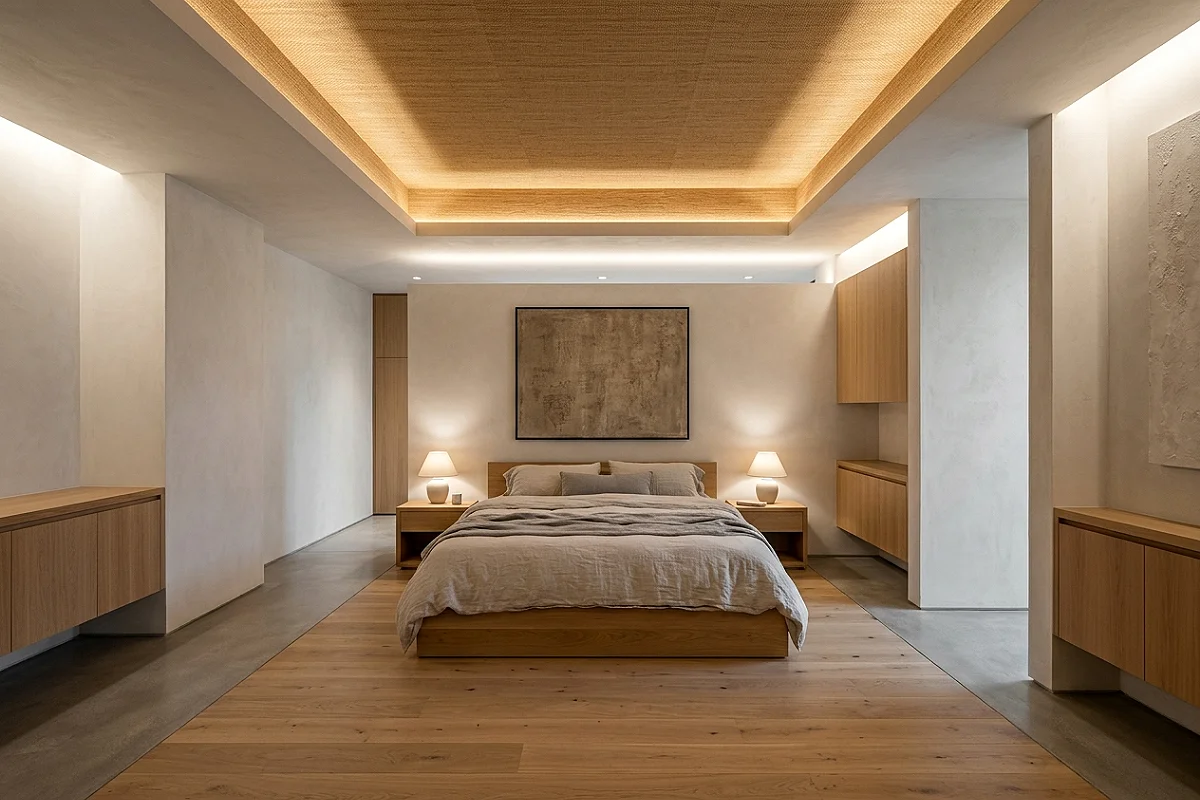
Grasscloth wallpaper — natural sisal or jute woven into a textile surface — applied inside a tray ceiling recess brings organic warmth and material depth to the fifth surface of a room in a way that painted or plain treatments cannot. The natural fiber weave catches overhead light and changes quality throughout the day as the light angle shifts, producing a subtle, living texture overhead that reads as genuinely artisanal. In a warm ivory or honey-toned grasscloth, the tray interior reads as a woven inset of natural material — unexpected, tactile, and quietly extraordinary.
- Choose a grasscloth in a warm, slightly golden tone — cool grey grasscloth overhead can feel heavy and cold without the visual warmth that natural fiber creates in lighter tones.
- Grasscloth seams on a ceiling are always visible — plan the layout so seams run parallel to the longest dimension for the most architecturally natural orientation.
Pro Tip
Apply grasscloth to a tray ceiling using a two-person team — one person applying adhesive and positioning the panel, one pressing and smoothing from below with a wide brush. Grasscloth on a ceiling is unforgiving of repositioning once it contacts the adhesive surface.
Tray Ceiling with Geometric Painted Pattern Inside
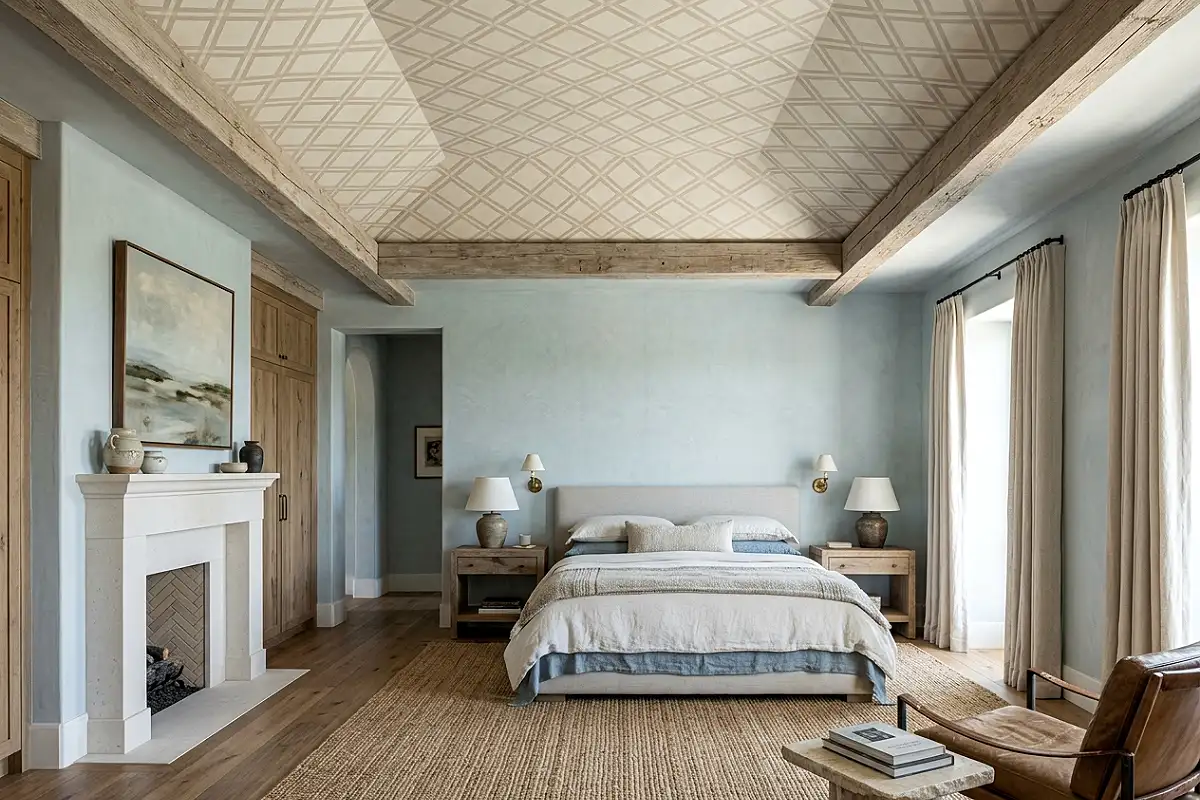
A geometric painted pattern applied inside the tray interior — a diamond grid, a chevron repeat, a sunburst radiating from the center, or a bold hexagonal tile pattern — turns the recessed ceiling panel into an artwork installation overhead. Contained within the tray frame, even a bold pattern reads as intentional rather than overwhelming — the frame does the same work as a picture frame, communicating that what’s inside it is a considered visual statement. The painting requires only tape, a level, and two paint tones, making it one of the most affordable tray ceiling upgrades available.
Pro Tip
Use a laser level for layout lines in a tray ceiling pattern — the slightly curved surface of a standard drywall ceiling makes long straight tape runs difficult to hold level by eye, and a misaligned geometric pattern on a ceiling is visible from every point in the room simultaneously.
Tray Ceiling with Mirrored Interior Panel
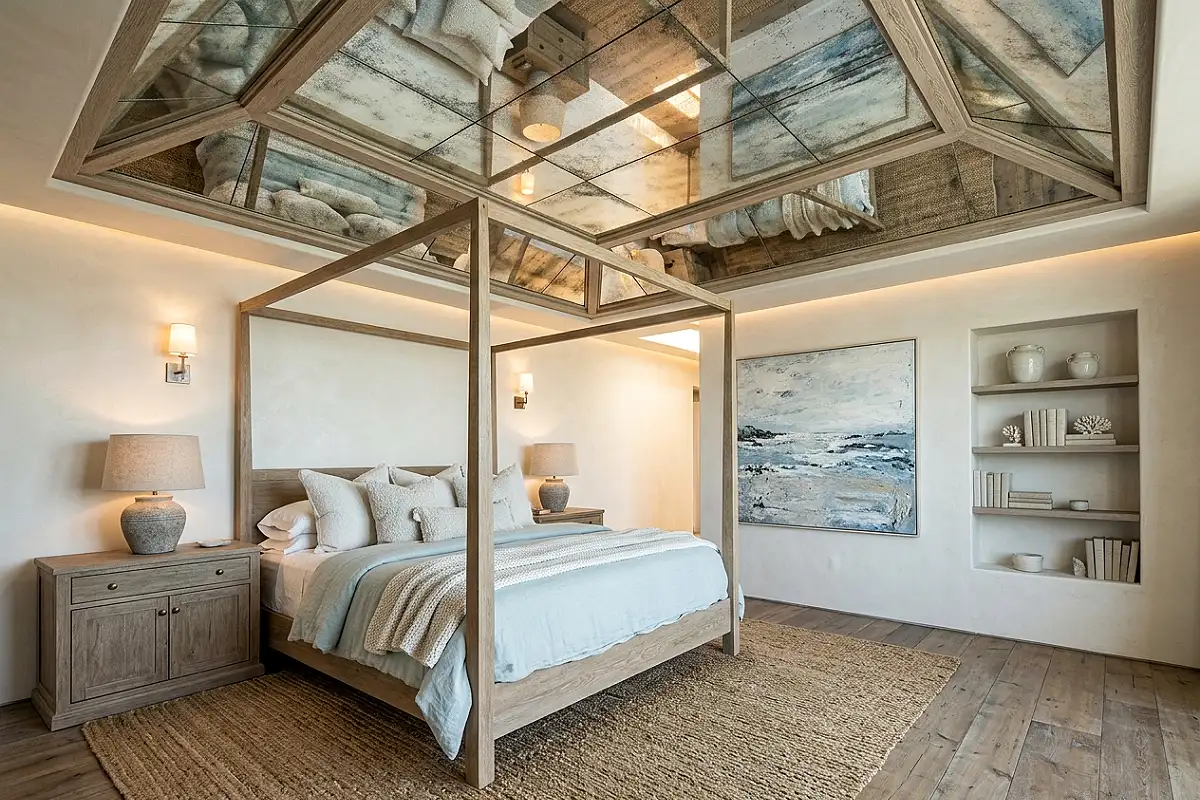
Installing an acrylic mirror panel or a mirrored ceiling tile grid inside a tray recess creates a bedroom or dining room ceiling feature of remarkable glamour — the reflected surface appears to open the ceiling into infinite depth while reflecting every light source in the room upward and back, effectively doubling the perceived brightness of the space. An antique or smoked mirror finish rather than standard clear glass reads as sophisticated and designed; standard clear mirror on a ceiling can tip into dated territory if not handled carefully.
Pro Tip
Use mirror-safe panel adhesive specifically — standard construction adhesive chemically attacks the reflective backing of mirror panels over time, causing the silver layer to delaminate and develop permanent black edge corrosion within months of installation.
Tray Ceiling with Beadboard Interior
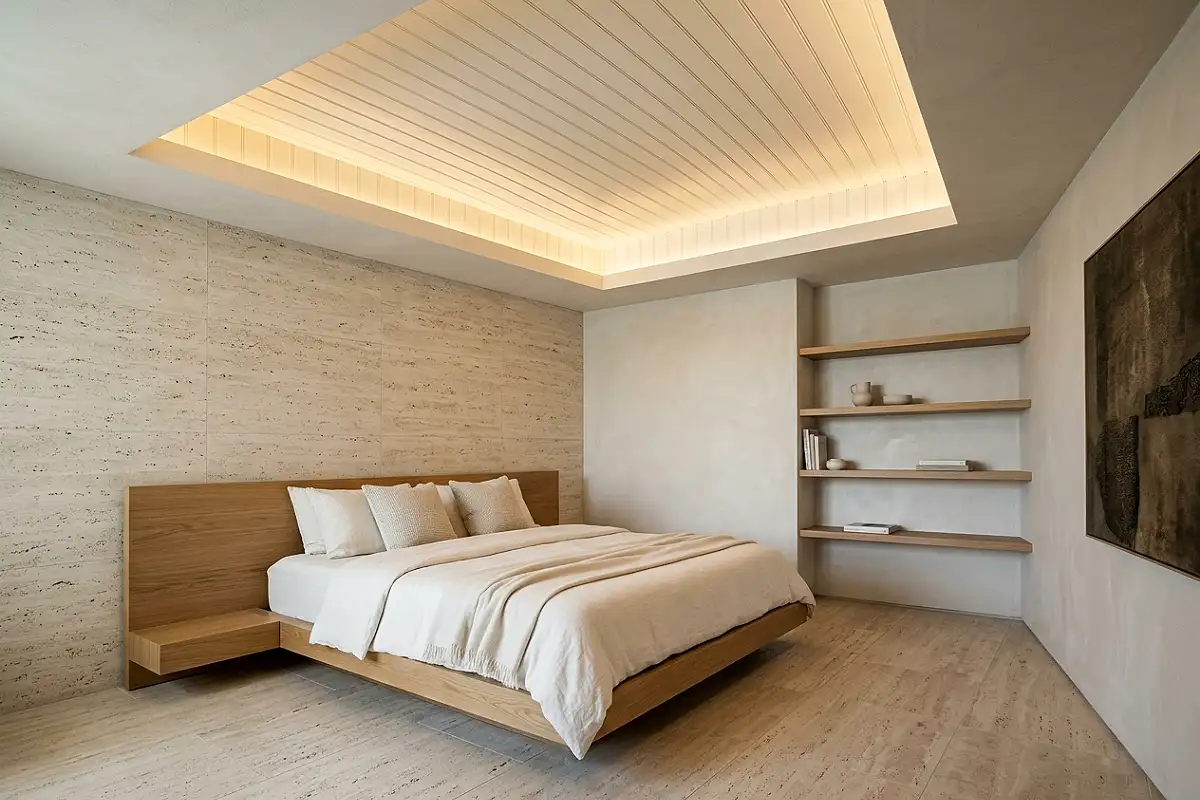
Applying beadboard paneling — the classic tongue-and-groove board with a raised bead profile between each plank — to the interior of a tray ceiling creates a ceiling feature that reads as quintessentially cottage, farmhouse, or coastal depending on the finish applied. Painted in a clean warm white, beadboard in a tray recess adds tactile texture and historical character overhead without any complexity in the surrounding room decor. The thin shadow lines of the bead profiles create movement across the ceiling surface that a flat panel can never replicate.
- Use 1/4-inch MDF beadboard panels rather than individual tongue-and-groove boards for a ceiling application — the panel format installs far more quickly overhead and produces a more consistent result.
- Paint before installation and touch up the nail holes after — painting individual overhead panels in place is exhausting and produces less even results than painting flat on sawhorses.
Pro Tip
Orient beadboard planks perpendicular to the room’s longest dimension inside the tray — this makes the beadboard pattern read as expanding outward across the ceiling rather than running away from the viewer, which is the orientation that makes the ceiling feel most open and architectural.
Tray Ceiling in a Dining Room with Statement Chandelier
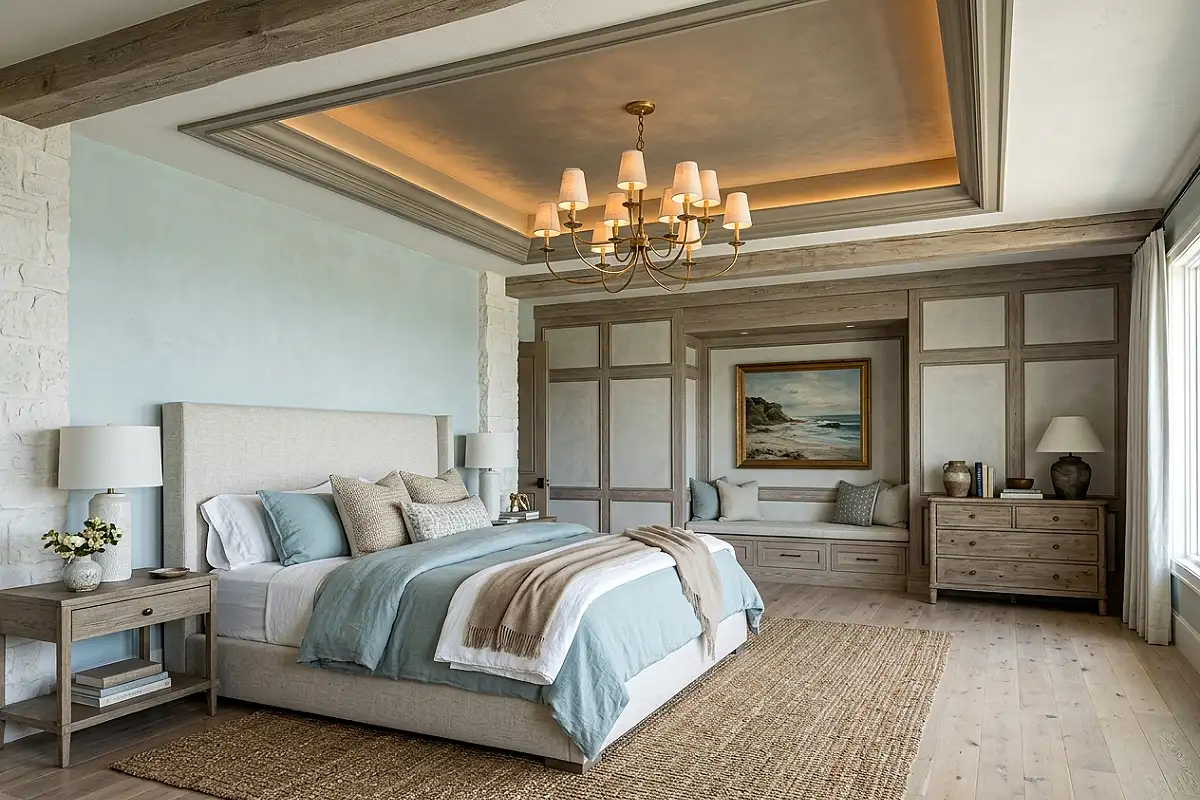
A dining room tray ceiling exists for one primary purpose: to frame a statement chandelier in the most dramatically beautiful way possible. The tray creates a visual stage for the fixture — defining exactly where the eye should go when it looks up — and the depth of the recess adds presence to even a modest fixture by setting it against shadow and depth rather than flat ceiling. The color inside the tray should always be at least two values deeper than the perimeter ceiling to maximize the sense of depth the recess creates and to make the chandelier silhouette read as clearly as possible from below.
Pro Tip
Size the chandelier so its diameter is approximately one-third to one-half the tray width — a fixture that’s too small looks lost in a large tray; one that nearly fills the tray looks crowded. The ideal chandelier appears to float comfortably within the frame, with visible space on all sides.
Tray Ceiling with Shiplap Step Face
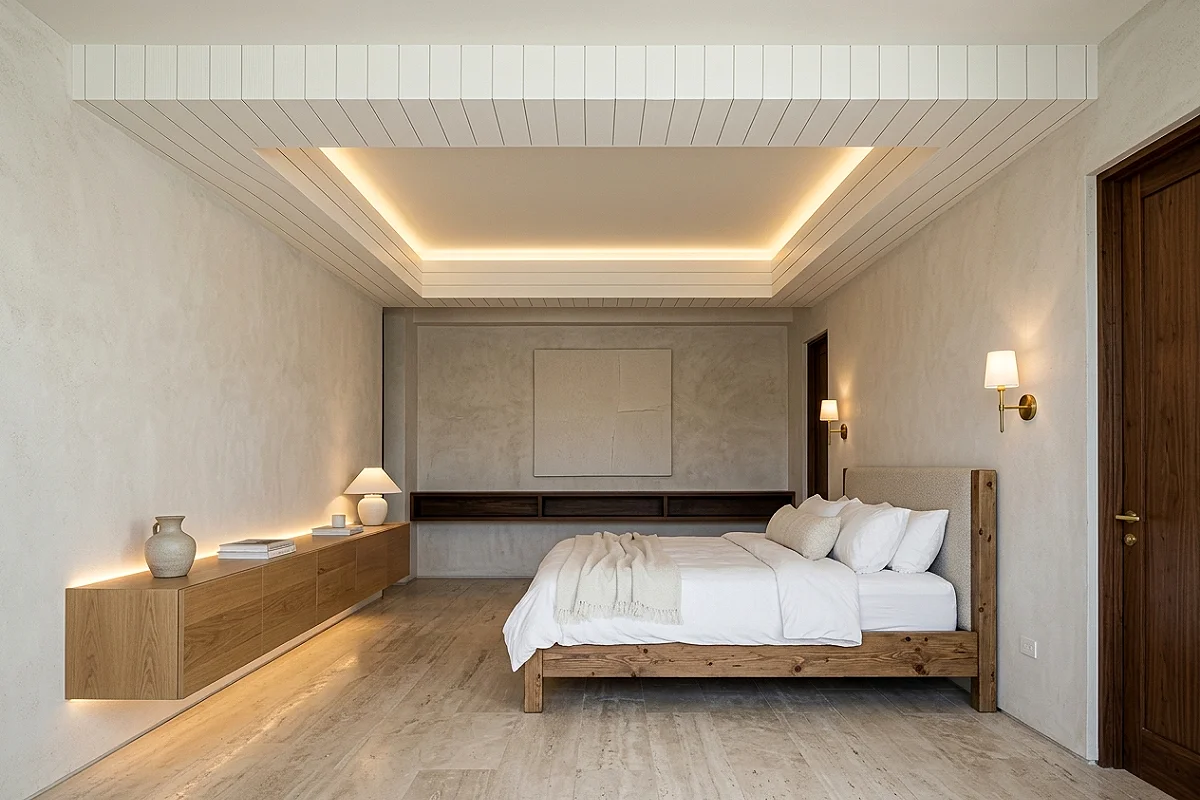
Applying horizontal shiplap boards to the vertical step face of a tray ceiling — the angled or vertical surface between the perimeter ceiling and the recessed interior panel — rather than leaving it as a plain painted surface adds a farmhouse texture detail that makes the tray ceiling read as a genuine architectural feature rather than a drywall construction. The shiplap step in a warm white or natural grey-stained finish pairs beautifully with a wood-planked or painted tray interior and an exposed-beam living room or bedroom aesthetic.
Pro Tip
Use thin 1/4-inch shiplap boards on the tray step face rather than full 3/4-inch boards — the step face is a shallow surface and thick boards eat into the visible depth of the tray, reducing the shadow and dimension effect that makes the tray so visually effective.
Tray Ceiling with Stenciled Medallion Interior
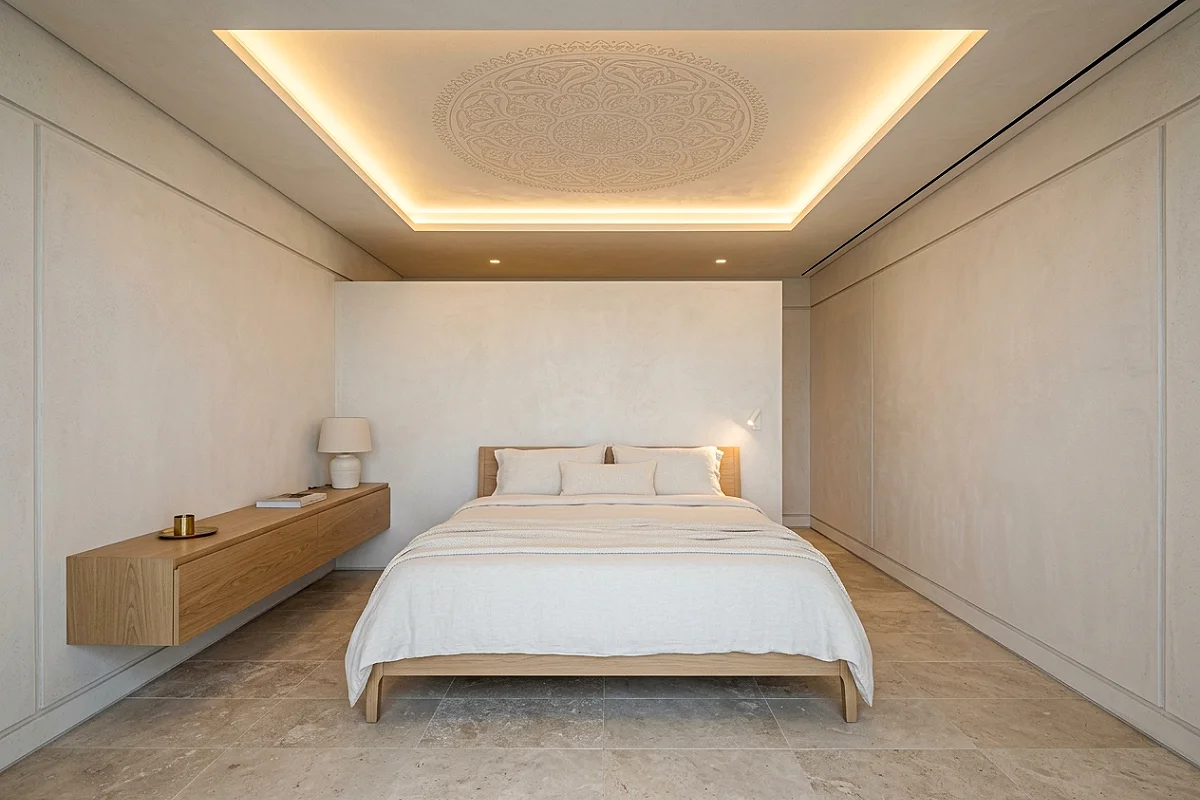
A large stenciled medallion — applied in a tone-on-tone combination at the center of the tray interior, radiating outward in a circular or octagonal pattern — creates the impression of plaster relief detailing for the cost of a $25 stencil and a quart of paint. The scale of the stencil should be proportional to the tray — a medallion that fills approximately 60 percent of the tray interior reads as confidently intentional; one that fills 30 percent or less reads as an afterthought. Keep the tone contrast subtle — one step in value, not two — and the result reads as carved plaster rather than painted pattern.
Pro Tip
Find the true center of the tray interior before positioning the medallion stencil — measure and mark the center point from all four sides, not just two, as tray ceilings are rarely perfectly square despite appearing so. A medallion centered on two measurements but off on two others is noticeable from across the room.
Tray Ceiling in Deep Charcoal with Gold Crown Molding
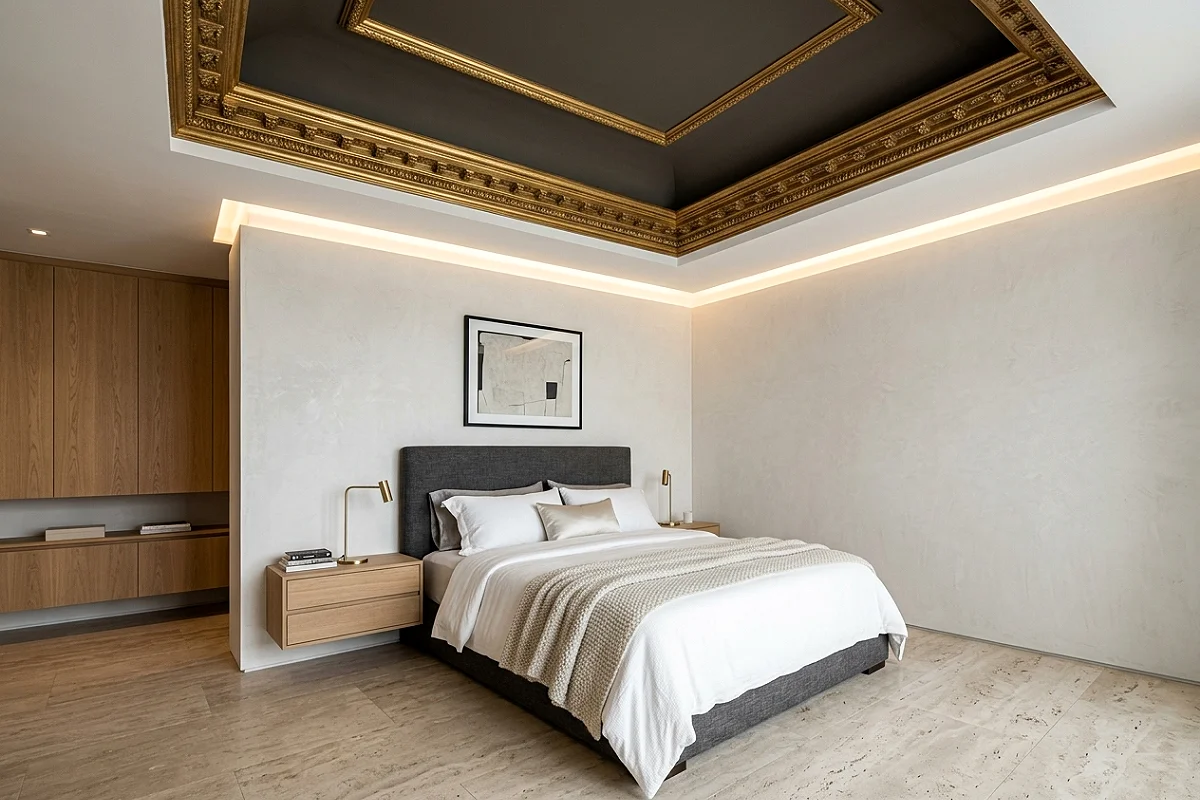
A tray interior in a deep, warm charcoal — paired with a step face finished in gilded or antique gold crown molding and a white perimeter ceiling — creates a bedroom or living room ceiling of extraordinary old-world drama. The charcoal recess creates depth; the gold molding at the transition provides a luminous frame; and the white ceiling outside keeps the composition from feeling oppressive. This is the tray ceiling treatment most closely associated with the great houses of the Regency and Empire periods, and it lands with the same authority in a contemporary room when the proportions are handled correctly.
Pro Tip
Apply gold paint to crown molding in two thin coats with a soft synthetic brush — thick single coats obscure the molding’s crisp profile detail. The finest gilding effects always come from building up thin layers rather than one heavy application.
Tray Ceiling with Metallic Venetian Plaster Interior
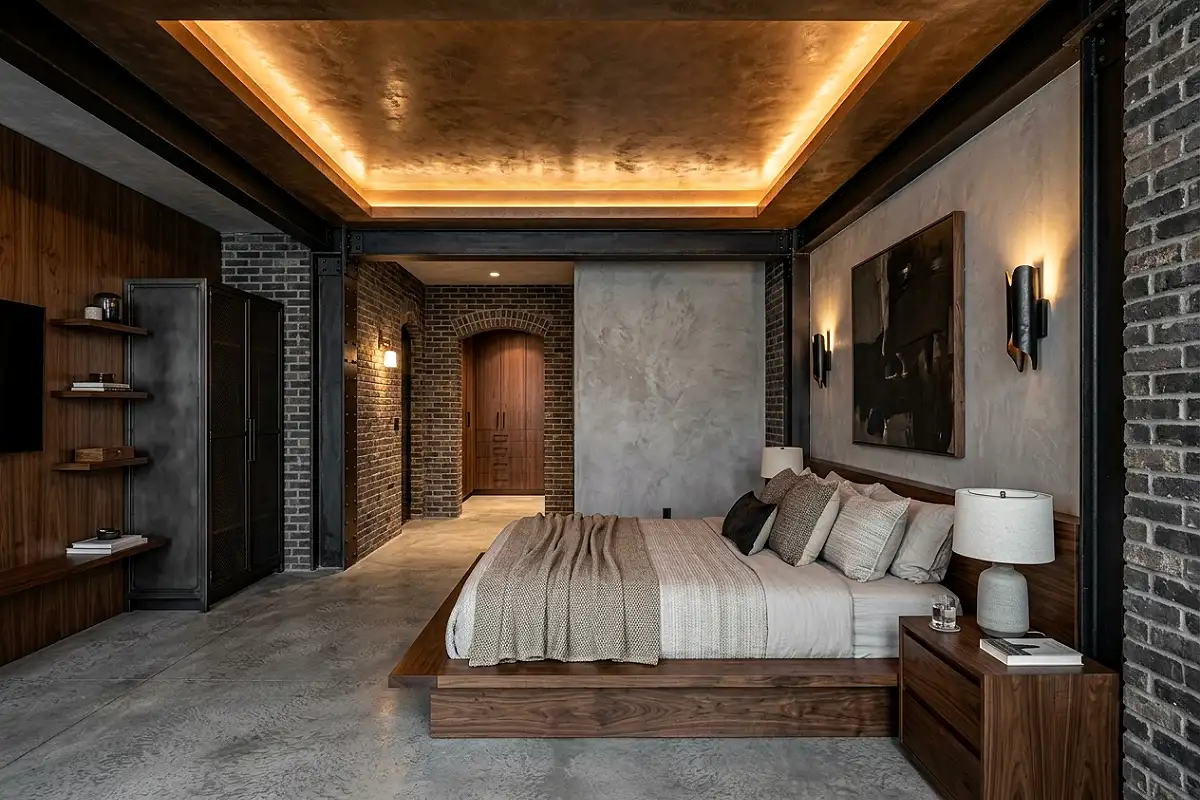
A Venetian plaster finish in a metallic tone — silver, gold, bronze, or copper — applied inside the tray recess creates a ceiling surface of shifting, luminous beauty that is impossible to replicate with standard paint. The multiple thin plaster coats are burnished with a steel trowel, compressing the surface to a high sheen that reflects light differently at every viewing angle. When cove lighting is added to the tray perimeter, the metallic plaster surface becomes entirely alive — glowing, shifting, and casting warm reflections downward into the room below.
Pro Tip
Allow each coat of Venetian plaster to dry completely before applying the next — rushing the process produces plaster that pulls away from the layer beneath it during burnishing. True Venetian plaster requires patience between coats; the burnished finish that results from correctly cured layers is genuinely impossible to achieve any other way.
Tray Ceiling with Recessed Panel Art Installation
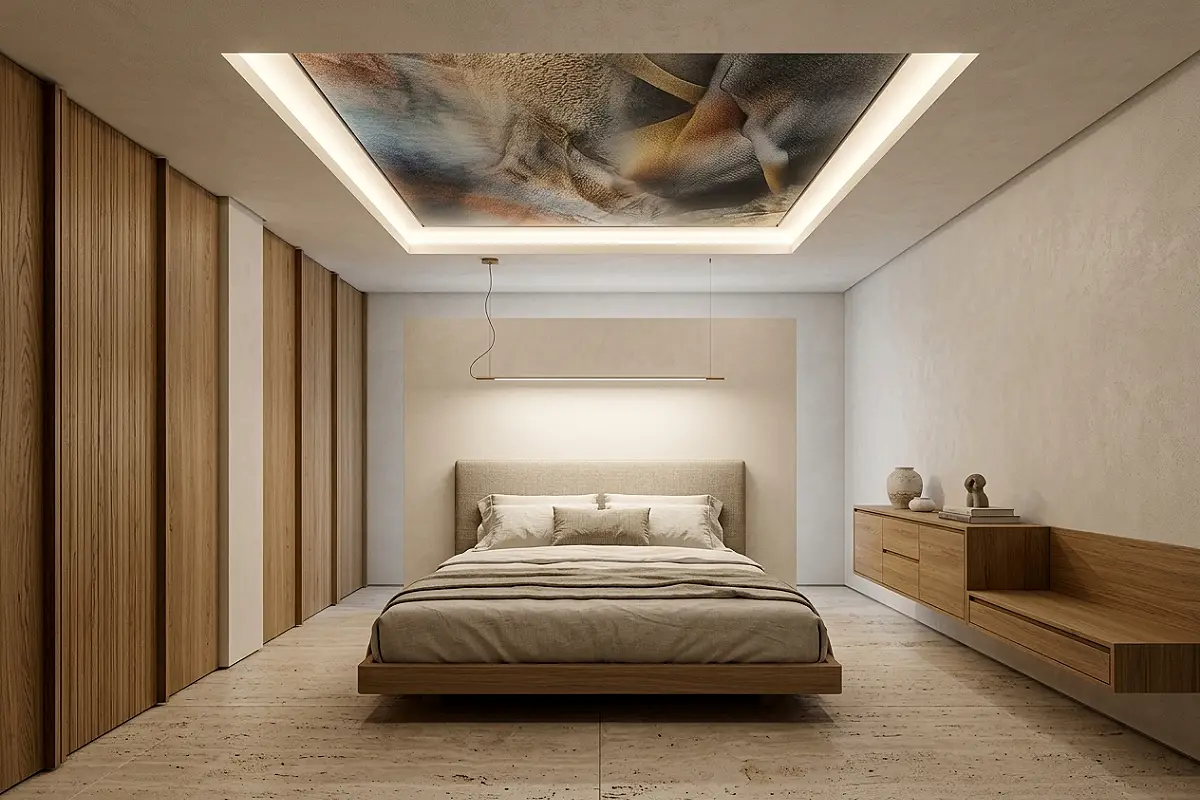
Mounting a large piece of art — a stretched canvas painting, a large-format photograph printed on aluminum, or a custom graphic panel — flush inside the tray recess, with LED cove lighting illuminating it from the perimeter, creates a ceiling that functions as a gallery installation. The tray becomes a picture frame and the room becomes a gallery in which art is displayed overhead rather than on the walls. This treatment works best in a room with a single, strong piece of art that can carry the visual attention of the ceiling without competing with pieces on the walls.
Pro Tip
Use aluminum Dibond print panels rather than stretched canvas for tray ceiling art — aluminum panels are lighter, dimensionally stable, and resistant to the humidity variation that can cause canvas to warp or sag when mounted horizontally on a ceiling.
Tray Ceiling with Faux Brick or Stone Panel Interior
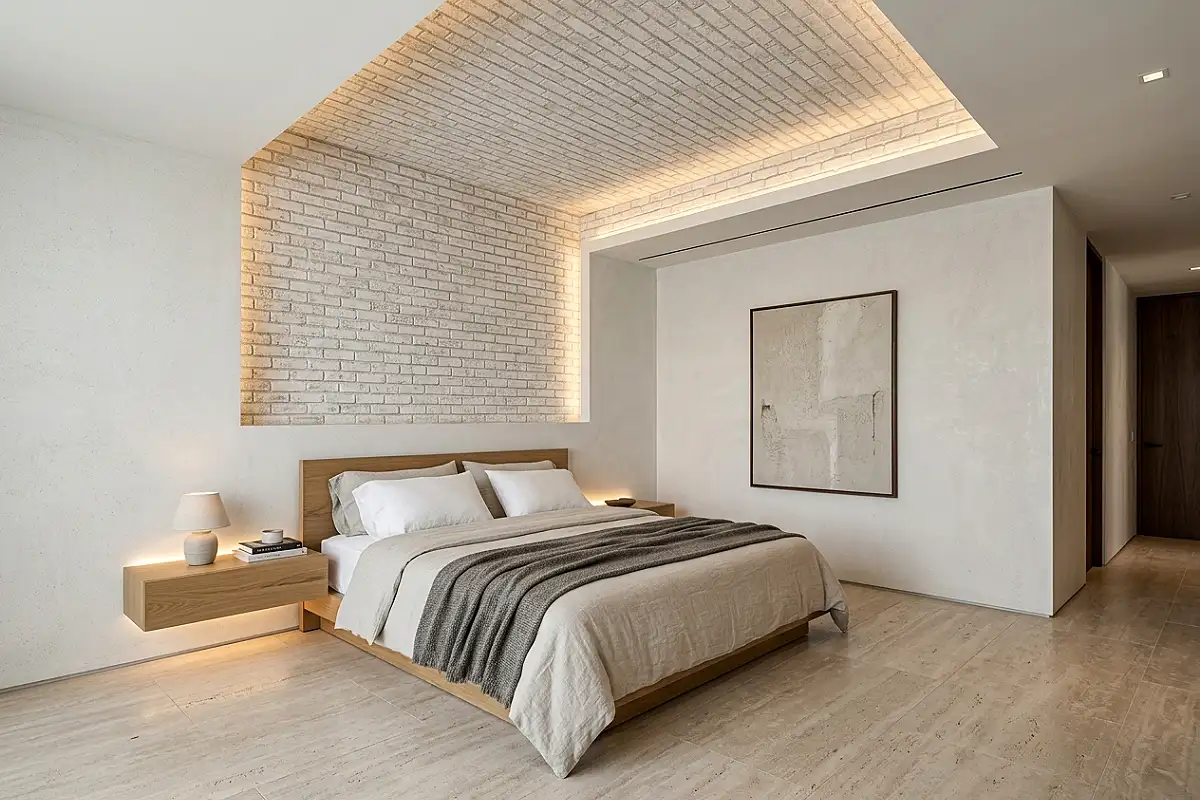
A lightweight faux brick or faux stone panel — the kind used for accent walls, available in polyurethane or high-density foam in brick, fieldstone, and cobblestone textures — installed inside a tray recess creates a ceiling with unexpected rustic or industrial character that makes the room feel like a conversion rather than a new build. The tray frames the textured panel cleanly, preventing the busy texture from spreading across the entire ceiling where it would overwhelm the room. Painted in a warm charcoal or a whitewashed finish after installation, the faux stone inside the tray reads as genuine masonry from any normal viewing distance.
Pro Tip
Install faux stone panels with construction adhesive and temporary ceiling support braces held in place while the adhesive cures — faux panels on a ceiling cannot be hand-held long enough for construction adhesive to develop the initial grab needed to support their weight. Twenty minutes of bracing saves the entire installation.
Oval Tray Ceiling in a Formal Entryway
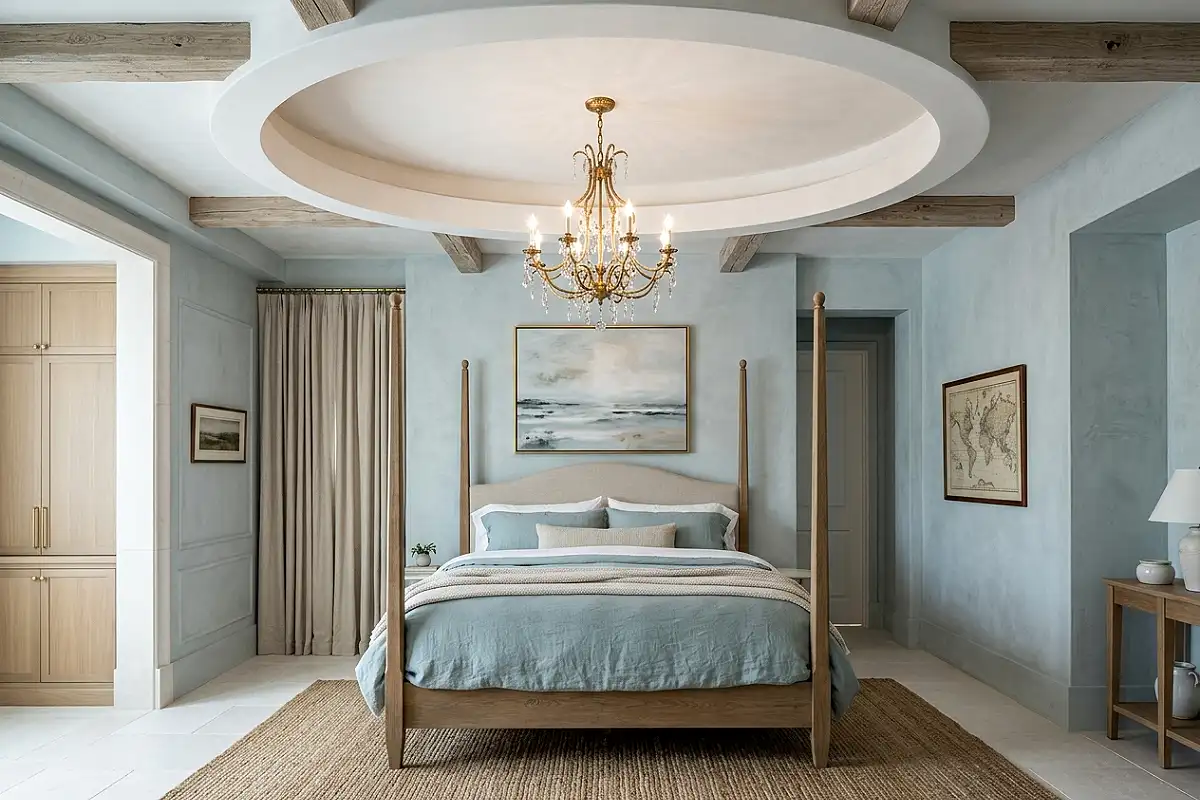
An oval tray ceiling in a formal entry hall — as opposed to the standard rectangular form — is one of the most elegant and historically resonant architectural choices available in a residential space. The oval form references the great entry halls of the Federal and Neoclassical periods, and even a relatively shallow oval tray in a painted finish adds a quality of architectural formality and care to an entryway that announces immediately that the house was designed with conviction. Combined with a crystal chandelier centered in the oval and a deep contrasting color inside the recess, the result is an entry that creates a genuinely memorable first impression.
Pro Tip
An oval tray in drywall requires a skilled plasterer or an experienced drywaller working with curved track — it is not a standard DIY project. The investment in professional installation for an oval tray is justified by the fact that it reads as a permanent, significant architectural feature rather than a decorative addition.
A tray ceiling is the room’s quiet commitment to being more than functional — and the ideas above prove that the commitment can be made in almost any direction, at almost any scale, and with results that last as long as the house itself.