25 Genius Craft Room Storage Ideas Every DIY Lover Needs
If you’ve ever lost a favorite pair of embroidery scissors beneath a landslide of scrap fabric, you already know the truth every maker eventually learns: a craft room only works if its storage does. The difference between a space that inspires and a space that overwhelms isn’t the square footage — it’s whether every ribbon, spool, glue stick, and skein has a home you can see at a glance. Good storage doesn’t just tidy a room; it makes starting your next project feel effortless, because the moment inspiration strikes, everything you need is right there, waiting.
After years of styling maker spaces for clients and shooting hundreds of craft room photos for this site, I’ve learned that the best solutions are rarely the most expensive ones. The magic happens when everyday objects — spice racks, shoe organizers, towel bars — get a second life doing clever storage duty. So whether you’re working with a whole room, a spare closet, or a single corner of the dining table, here are 25 genius craft room storage ideas that are genuinely Pinterest-worthy and, more importantly, genuinely practical.
Magnetic Backsplash Supply Wall
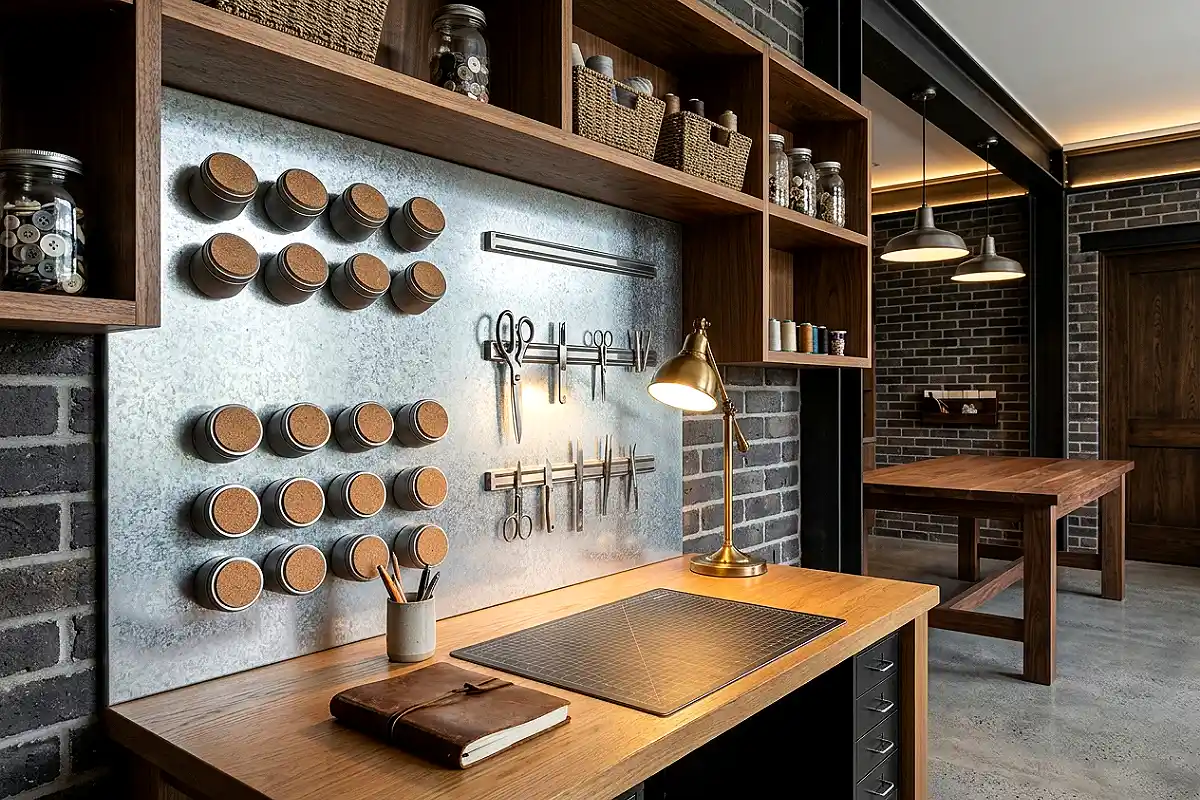
Turn the wall behind your main work surface into a galvanized steel backsplash — matte silver, slightly textured, and endlessly magnetic. Small steel canisters with cork lids hold buttons, safety pins, and brads, while slim magnetic strips cling to your most-used scissors, snips, and X-Acto blades. Against warm wood shelves and a brass desk lamp, the cool metallic panel adds an industrial edge that reads designed, not improvised. The best part: your entire “grab zone” lives within arm’s reach, and rearranging is as simple as sliding a jar a few inches.
Pro Tip
Use galvanized steel flashing from the hardware store rather than a full sheet of metal — it’s a fraction of the cost, cuts to size with tin snips, and installs with double-sided mounting tape or a few trim screws.
Pegboard Wall with Powder-Coated Hooks
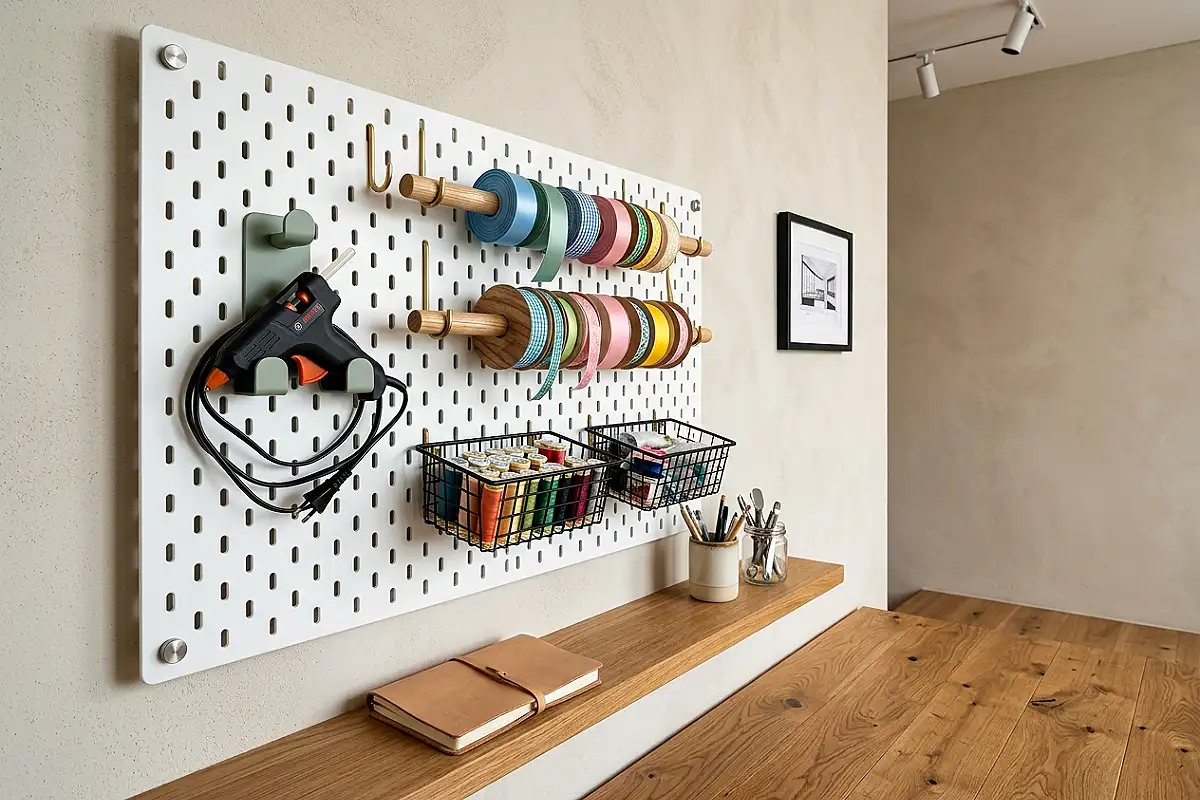
A classic white pegboard is only as pretty as its accessories, so skip the hardware-store hooks in favor of powder-coated ones in soft matte finishes — sage, blush, or warm brass. Hang hot glue guns in custom cradles, loop rolls of ribbon through dowel pegs, and nestle small wire baskets for thread spools. The clean grid pattern creates visual rhythm even when fully loaded, and anything can be repositioned in seconds as your projects evolve. Paired with a slim floating shelf beneath it, the whole wall becomes a functional bulletin of your creative life.
Pro Tip
Mount the pegboard a few inches off the wall with standoffs instead of flush — it adds depth, lets longer hooks slide in from the side, and keeps the shadow line crisp for photos.
Clear Apothecary Jar Wall
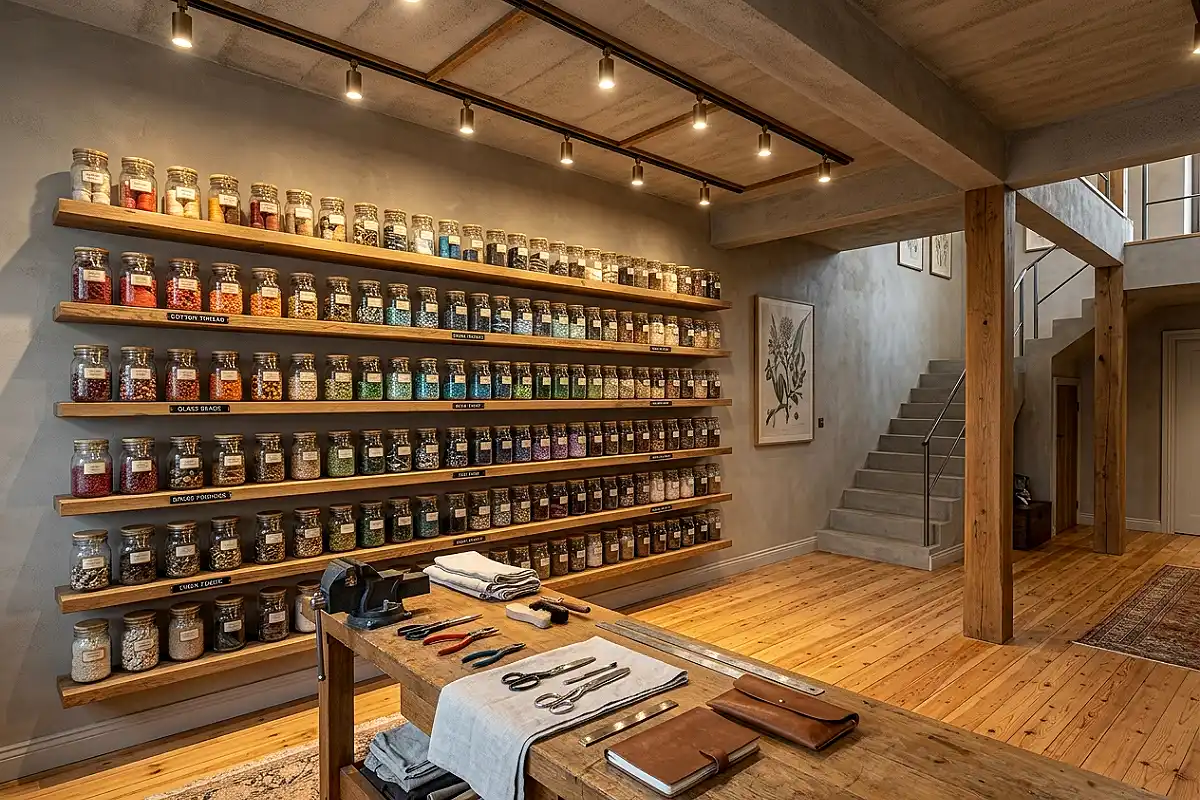
There’s a reason apothecary jars have never gone out of style: nothing makes small supplies look precious quite like glass. Line a row of floating shelves with jars featuring bamboo or brushed-brass lids, each one filled with a single category — pearl buttons, gold sequins, flat-back gems, dried botanicals — arranged in a soft color gradient. Type each label on a vintage label maker or hand-write on kraft tags for a personal touch. This approach turns your tiniest findings into a display, and for a premium feel, look for thick-walled jars with airtight seals, such as the classic offerings from Pottery Barn or a curated set of vintage apothecary jars, while budget-friendly glass versions with snap lids work beautifully too.
Pro Tip
Keep jars about three-quarters full and leave an empty one on the shelf labeled “miscellaneous” — it absorbs all the orphan items that would otherwise clutter the jars with beautiful contents.
Repurposed Spice Rack for Small Parts
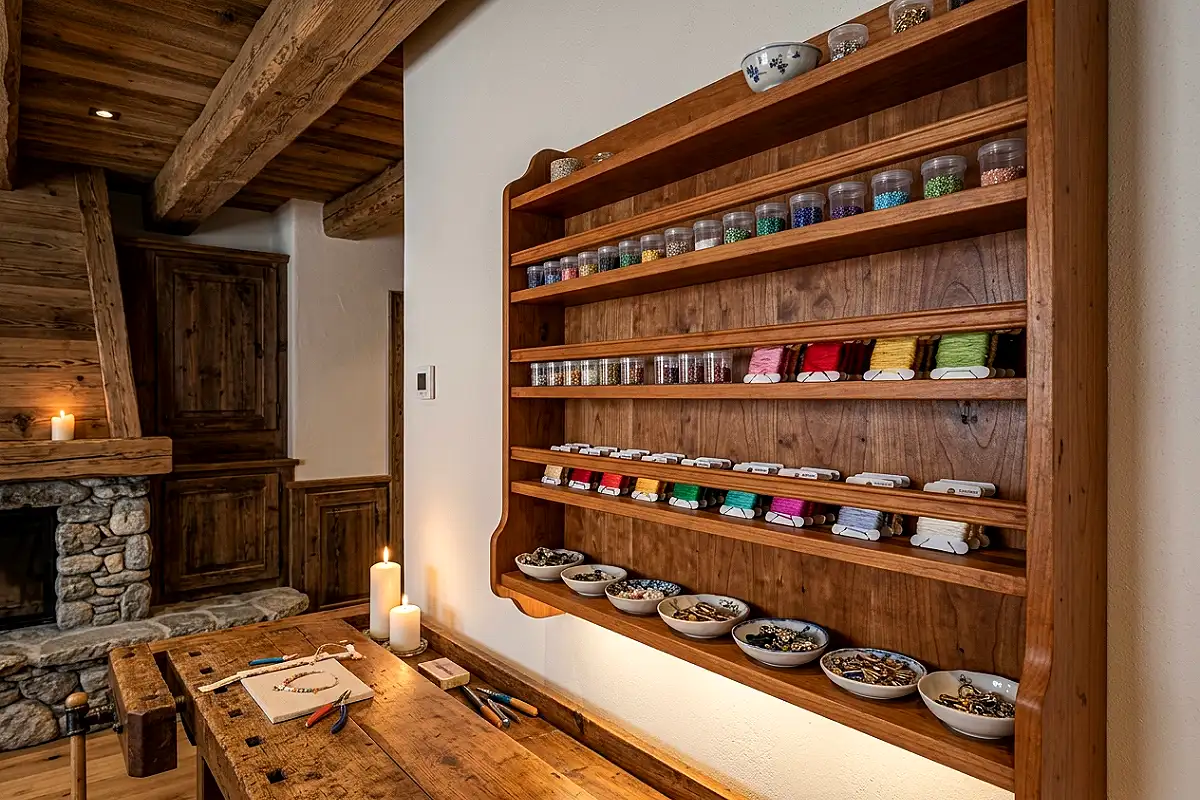
One of the most overlooked storage hacks for makers is the humble spice rack. A wall-mounted wooden rack with deep, lipped shelves — the kind that once held paprika and cumin — is perfectly proportioned for craft smalls: bead boxes, spools of thread, embroidery floss cards, and jewelry findings. A vintage cherry-wood rack against a soft white wall brings instant warmth, and the graduated shelves mean taller items sit at the back while tiny ones stay visible up front. It’s a five-dollar flea market find doing the work of a fifty-dollar organizer.
Pro Tip
Remove the original spice jars and line each shelf with tiny woven rattan baskets or vintage porcelain dishes — it keeps delicate findings from sliding and adds a layer of texture that photographs beautifully.
Rolling Cart with Tiered Drawer Organizers
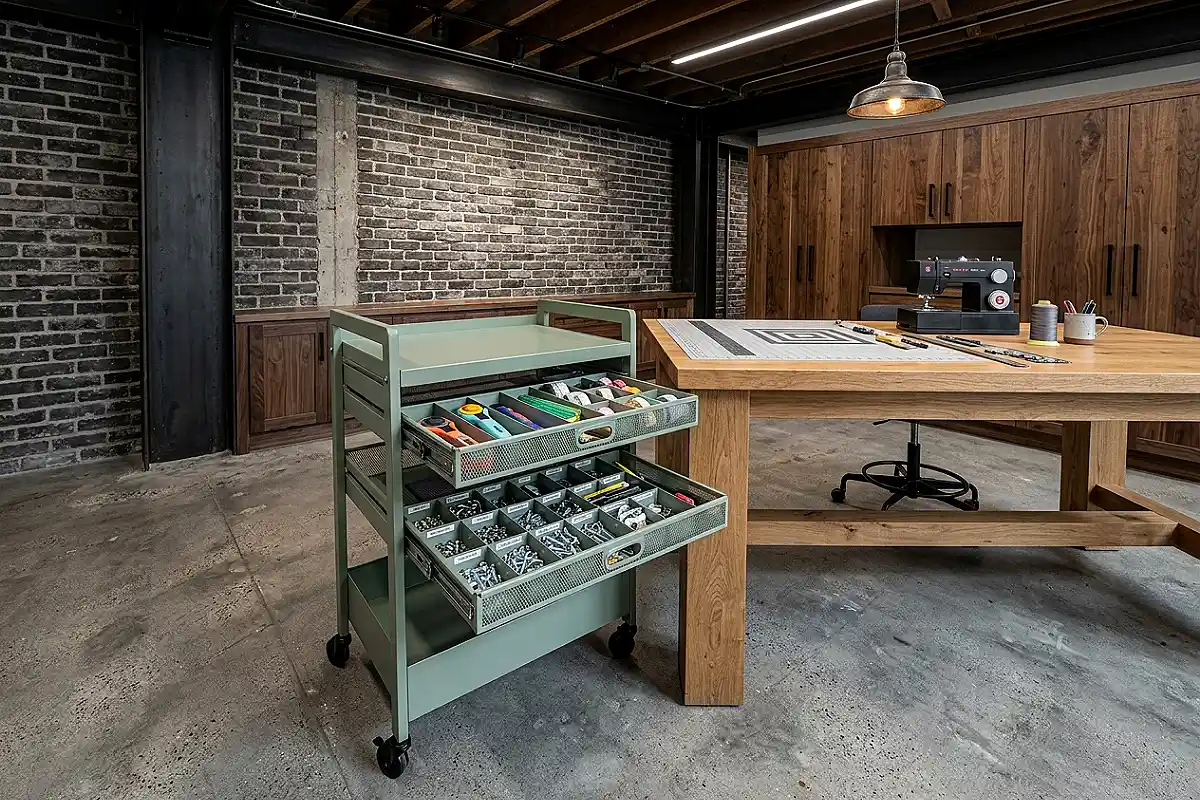
A slim three-tier rolling cart is the workhorse of the modern craft room, but the upgrade that transforms it is interior drawer organization. Drop modular plastic dividers into each shallow drawer and dedicate them by project type: one drawer for cutting supplies (rotary blades, snips, self-healing mat), one for adhesives (double-sided tape, glue dots, washi), one for hardware (eyelets, brads, binder clips). Choose a cart in a muted tone — sage, cream, or black — so it reads as furniture rather than equipment, and roll it beside your desk during projects, then tuck it into a corner when you’re done. A classic matte cart like the kind from Linon or IKEA offers serious utility at an accessible price, while The Container Store carries refined utility carts in powder-coated steel that feel decidedly more polished.
Pro Tip
Velcro small, frequently used tools to the inside of each drawer with adhesive hook-and-loop strips — pens, seam rippers, and tweezers stay put no matter how fast you roll the cart across the room.
Hanging Shoe Organizer for Ribbon and Wrapping
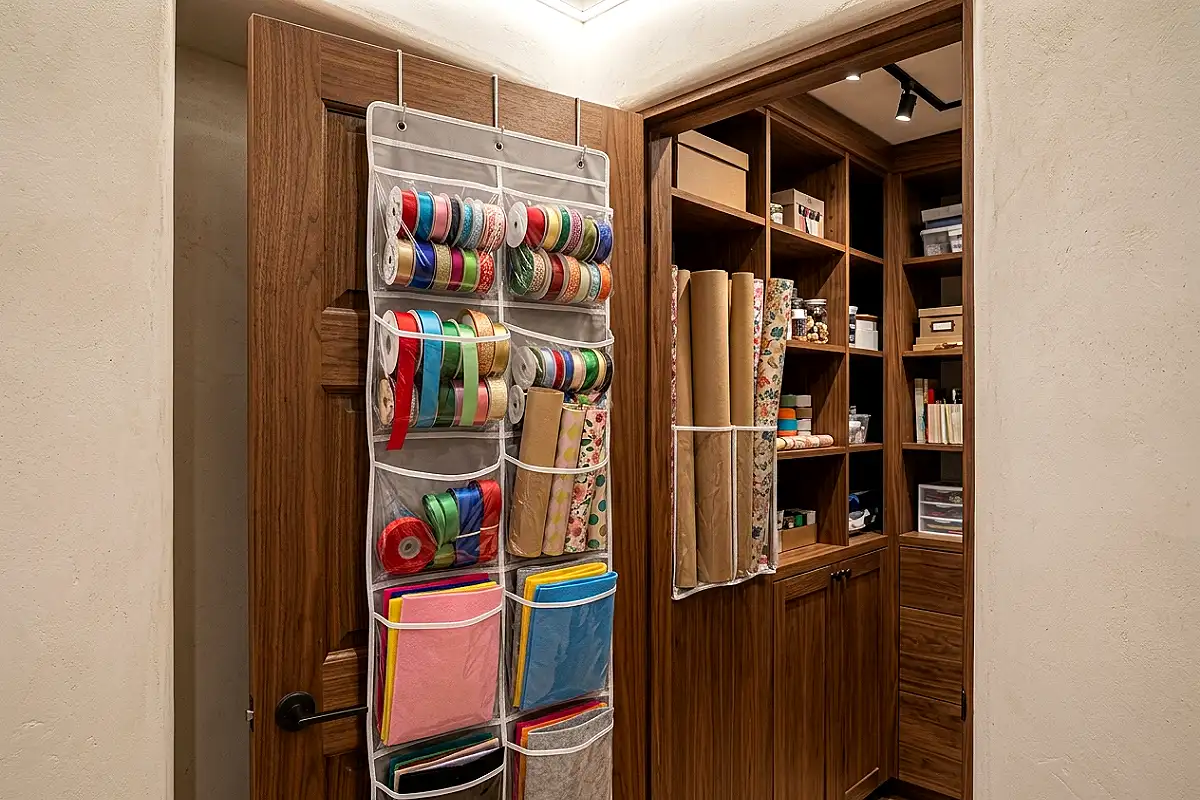
The clear-pocket over-the-door shoe organizer is a veteran of craft storage, and it still deserves a place on this list — with one styling rule: hang it inside a closet or utility room door, not on a bedroom door. The 24 pockets are sized perfectly for ribbon spools, rolls of kraft and gift wrap, sheets of foam and felt, transfer paper, and stencils. Because every pocket is transparent, you can inventory your ribbon collection in a single glance without unrolling a thing. It’s the rare storage solution that’s both completely invisible when the door closes and wildly efficient when it’s open.
Pro Tip
Stuff each pocket’s ribbon rolls around a cardboard tube or dowel stub so they stay upright and don’t tumble — your ribbon ends stay neat, and the organizer never sags.
Floating Ledge for Sketchbooks and Journals
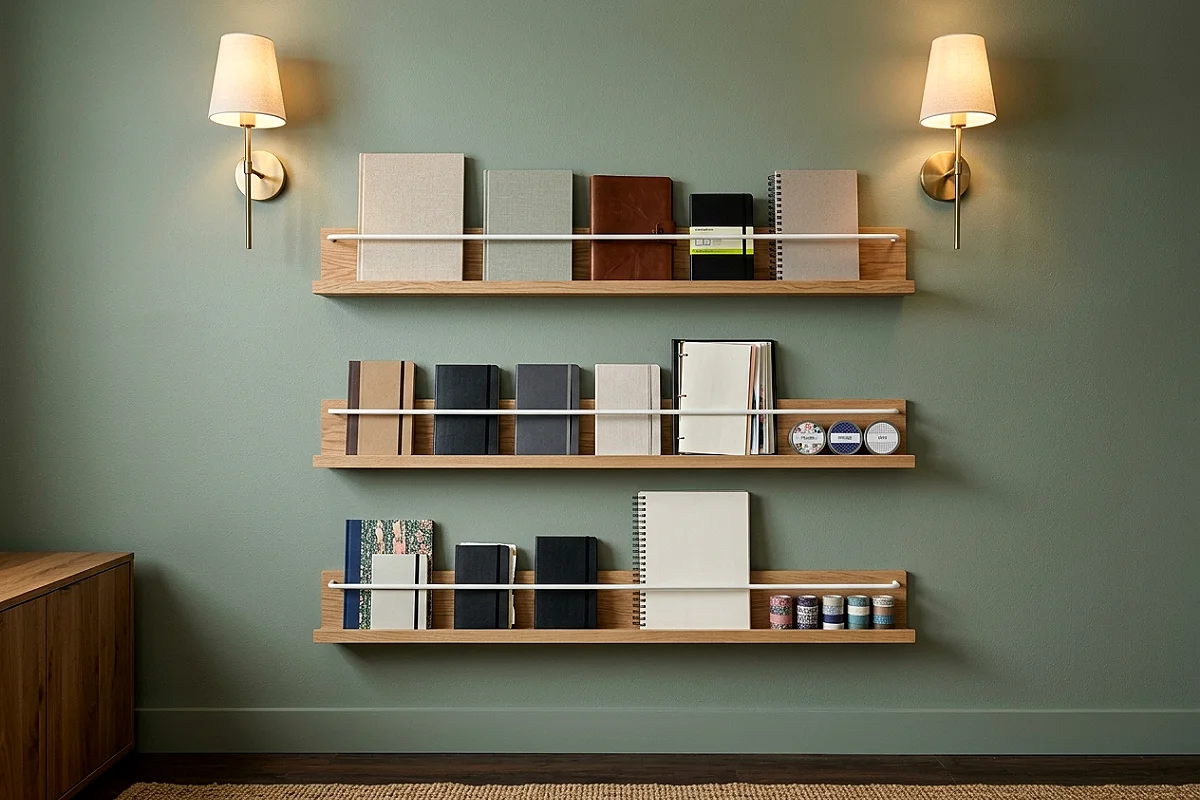
Deep picture ledges — the IKEA Mosslanda style — are quietly one of the best storage moves for a maker’s room. Mount two or three in a staggered line along an empty wall and they’ll hold an entire library of sketchbooks, project journals, and inspirational binders, all standing upright with their covers facing out like a gallery of your creative thinking. The narrow top ledge becomes home to a rotating display of washi tape, paint tubes, and a small potted plant, while the books themselves remain easy to flip through without lifting. It’s storage that behaves like decor, which is exactly the balance a craft room needs.
Pro Tip
Use a short tension rod mounted at the front edge of each ledge to keep sketchbooks from tipping forward — invisible from the front, and it lets you pull any book without disturbing its neighbors.
Suspended Glass Jars Under a Shelf
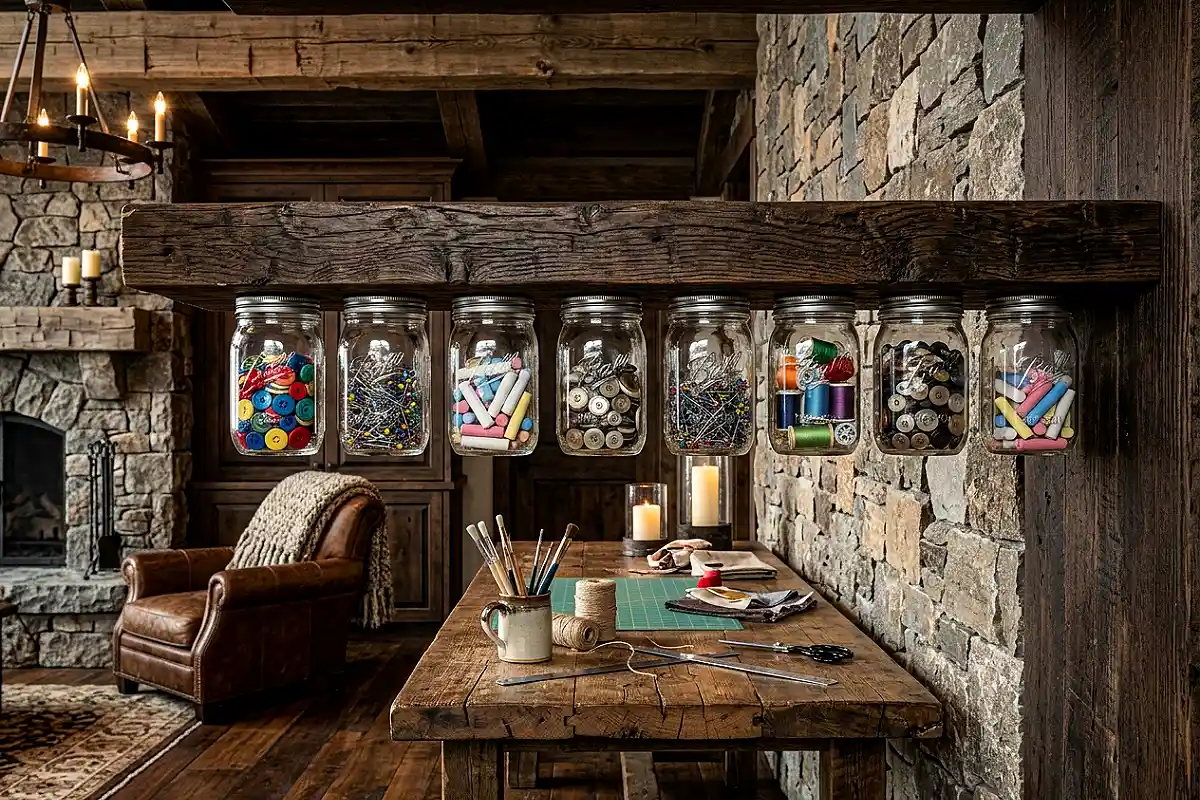
Here’s a trick borrowed from vintage pharmacies: mount clear glass jars upside down, screwed into the underside of a floating shelf or the bottom of a wall cabinet. Fill them with cotton balls, swabs, sewing pins, safety pins, and chalk pieces. Because the lids are fixed to the wood and the jars hang downward, contents are always visible through the glass and the jars never take up shelf space at all. Choose jars with fluted glass or mason-style necks for a touch of character, and position the row where your work surface sits below — they become a sculptural row of little lanterns holding exactly what you need.
Pro Tip
Drill pilot holes and secure each lid with two small screws, then twist the jar on by hand — this lets you unscrew a jar and refill it without detaching the lid from the shelf.
Rotating Lazy Susan for Glues and Paints
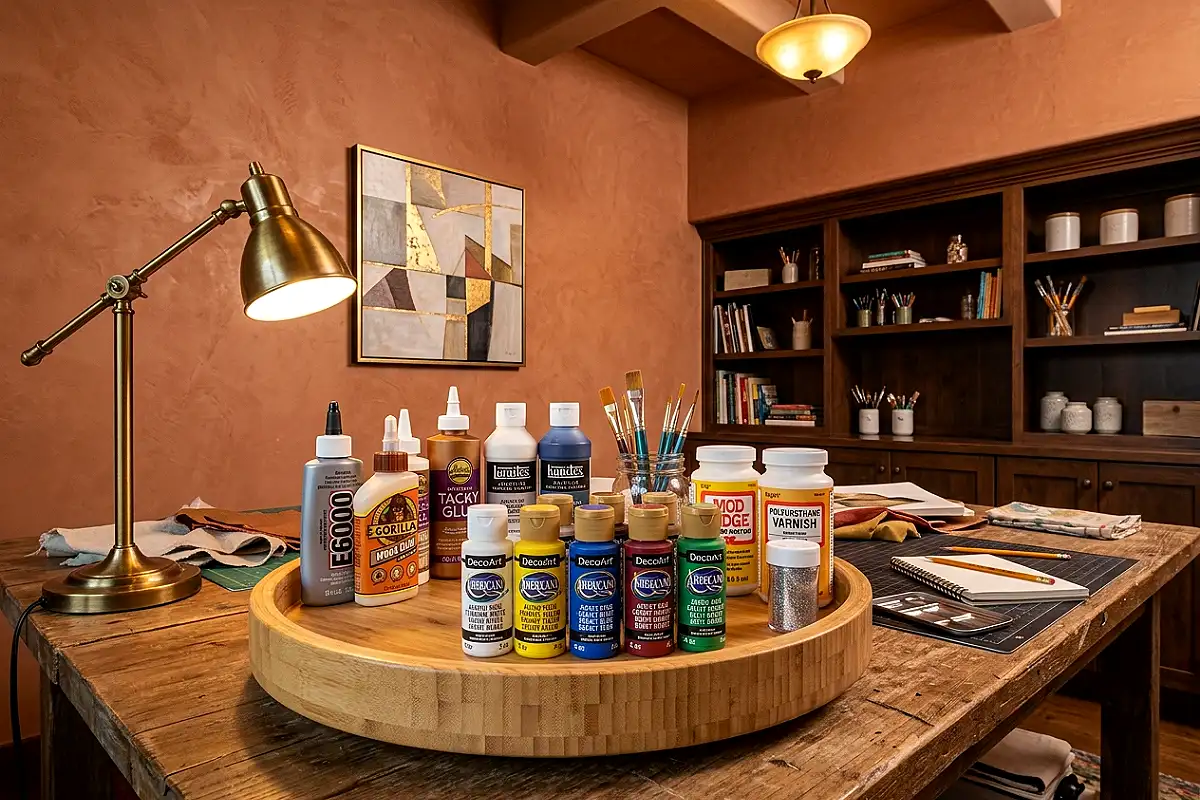
Glue bottles, paint pots, and varnishes share one fatal flaw: they all dry out if you can’t find them quickly enough to put them away. Enter the Lazy Susan. A 12-to-14-inch wooden or bamboo turntable, placed in the corner of your desk or on a shelf, holds a full rotation of bottles and jars that spin into view with a flick of the wrist. Choose a raised-edge tray style so nothing slides off mid-twirl, and group items by family — craft glues on one half, acrylics on the other. The bamboo finish warms up any corner, and the single motion of “spin and select” makes tidying after a project almost satisfying.
Pro Tip
Wipe bottle necks and lids before placing them on the turntable, and store glues upside down on the tray — it keeps adhesive from pooling in the cap and guarantees every bottle is ready at first use.
Curtain-Rod Tool Rack
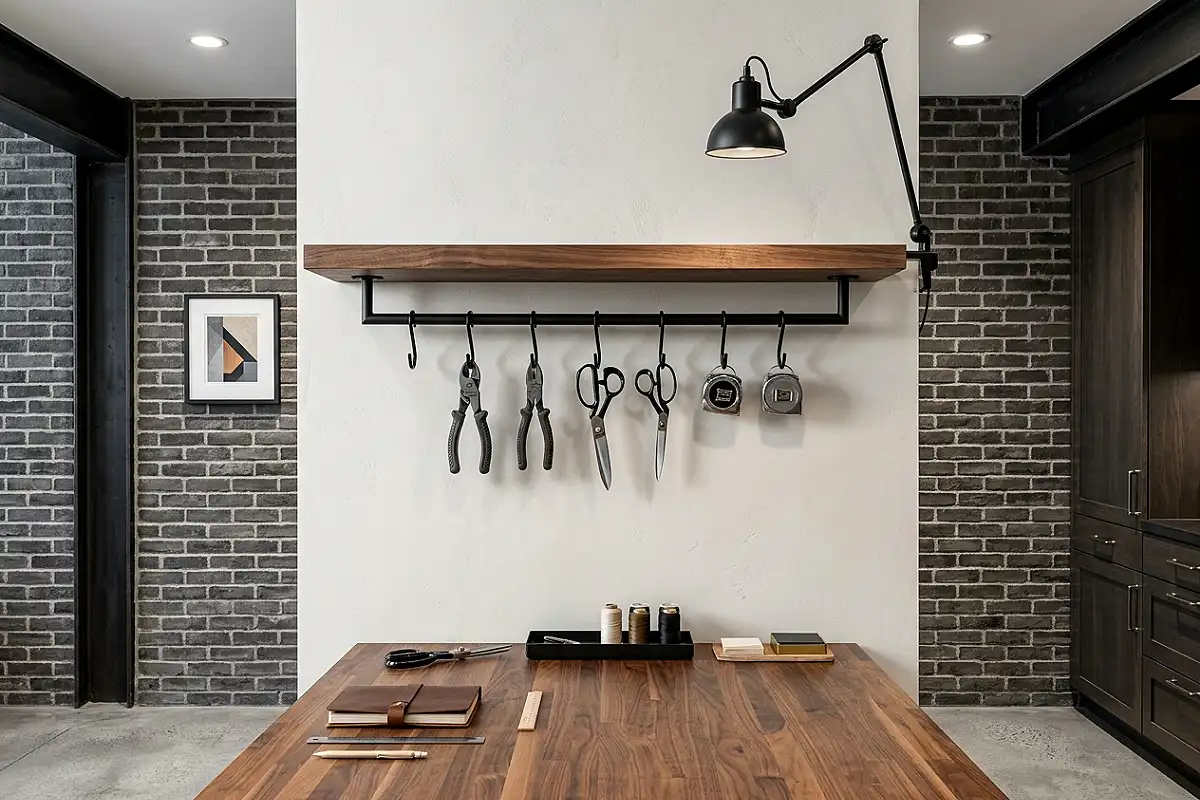
A short, inexpensive curtain rod mounted under a shelf or inside a cabinet becomes an industrial-style tool rail the moment you add S-hooks. Hang pliers, wire cutters, tape measures, seam rippers, and your favorite scissors by their handles, all in a single clean row. A matte black rod with matching black hooks feels modern against light wood; a brushed brass rod brings a hint of vintage shop charm. Everything dangles in plain sight, nothing tangles, and the empty space beneath the rail stays clear for a shelf below. It’s the kind of solution that looks like it came from a professional workshop — because that’s exactly where it came from.
Pro Tip
Use rubber bands or silicone loops through tool handles to create instant hanging points — no drilling, no modification to your tools, and a pair of S-hooks costs under a dollar.
Muffin Tin Drawer Inserts
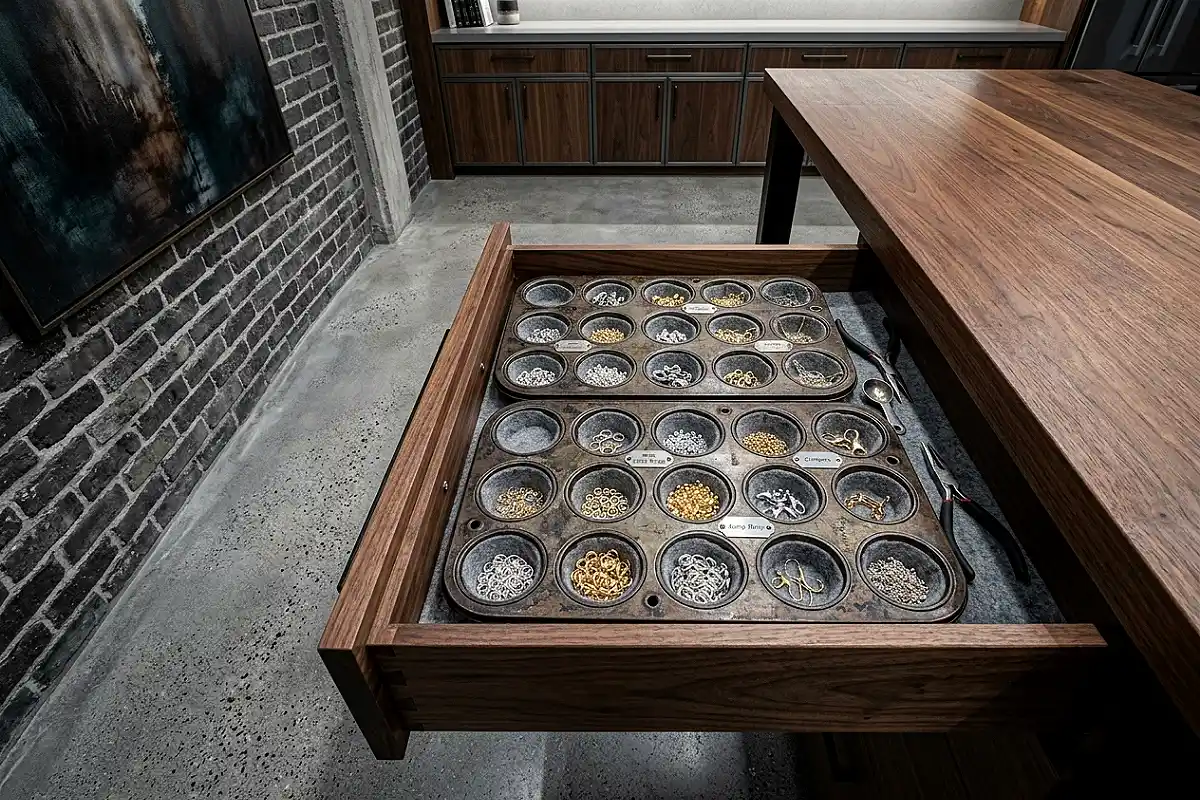
The next time you come across a well-loved mini muffin tin, resist the urge to toss it — it’s one of the finest small-parts organizers ever made. Each cup perfectly cradles a handful of jewelry findings: jump rings, head pins, crimp beads, tiny buttons, earring backs. Drop several tins flat into a wide drawer and you’ve created a subdivided storage field that costs almost nothing and looks wonderfully handmade. Vintage tins with that soft worn patina add charm; shiny new non-stick ones read clean and crisp. Either way, your tiniest pieces stop getting lost in the drawer’s dark corners.
Pro Tip
Line each cup with a small square of felt cut with a craft punch — it cushions delicate beads, prevents metal-on-metal clatter, and keeps shiny findings from scratching.
File Bin Library for Wrapping Paper
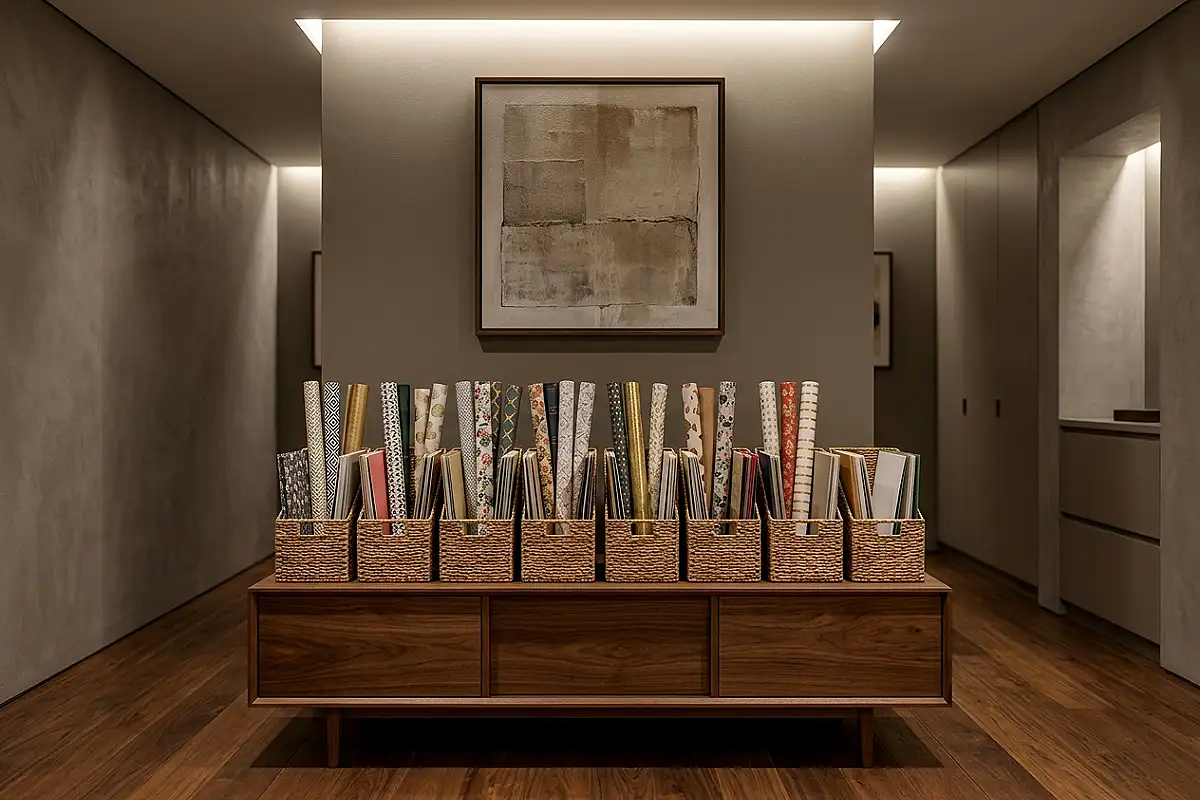
Upright magazine file bins transform a hopeless writhing pile of wrapping paper, cardstock, and foam sheets into a tidy vertical library. Choose bins in a single color family — natural jute, matte black, or woven seagrass — and line them side by side on a shelf or inside a low cabinet. Roll papers loosely and slide them spine-out, so every pattern is visible at a glance and nothing creases. The same bins welcome 12×12 scrapbook papers and tissue stacks, and a kraft paper label on each bin’s front keeps the whole arrangement looking intentional. It’s the rare upgrade that costs under twenty dollars and visibly calms a room.
Pro Tip
Sort your rolls by occasion rather than color — holidays, birthdays, and “just because” — so when a gift surprise strikes, you reach for the right bin without flipping through everything.
Shadow Box Memory Wall with a Hidden Stash
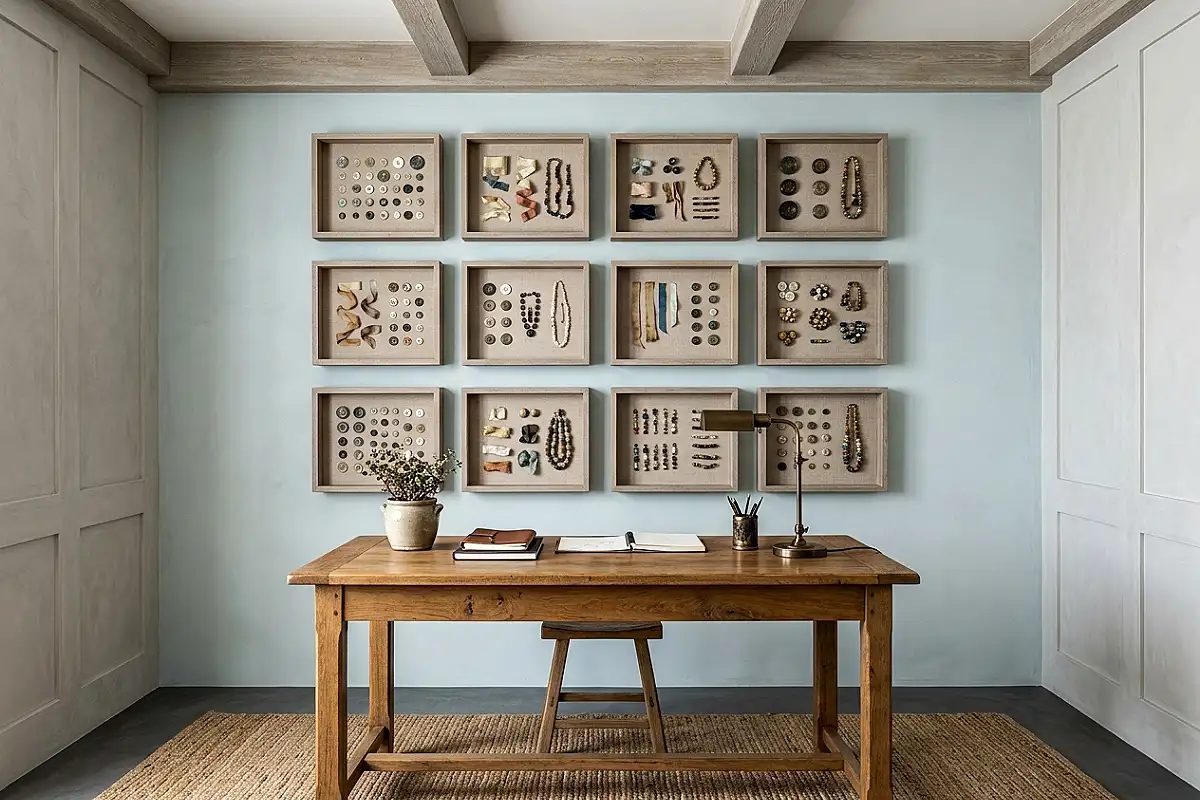
Deep-lip shadow boxes are usually reserved for memories — a pressed flower, a first pair of baby shoes — but they double as storage that displays beautifully. Mount a grid of matching frames along a wall, and behind each pane of glass, keep a small, curated stash: one box for vintage buttons, one for ribbon scraps wound around cardboard hearts, one for collected sea glass and beads. The glass keeps everything dust-free, the shallow depth forces you to edit ruthlessly, and the whole wall reads as art until you open a box and find exactly what you need. It’s storage with the confidence of a gallery piece.
Pro Tip
Keep the inside of each shadow box lined in a single fabric — linen or velvet — so tiny items show up clearly against the backdrop and the boxes stay cohesive as a set.
Cedar Chest as a Sewing Station
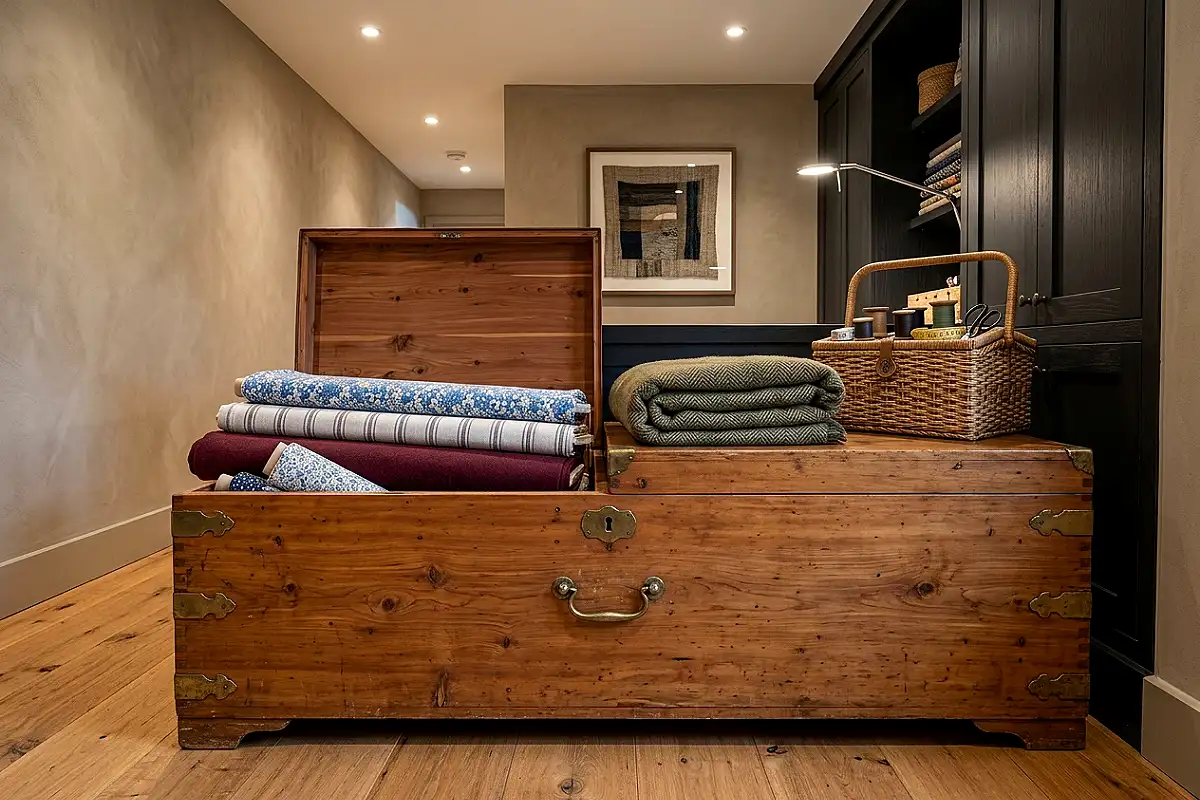
A vintage cedar chest is three pieces of furniture wearing one disguise: storage trunk, upholstered seat, and work surface. Tuck bolts of fabric inside — cedar’s natural oils keep moths and mustiness away — then top the lid with a thick wool blanket or sheepskin throw and a woven basket holding your current project. When it’s time to work, everything lifts away in one motion and the chest becomes extra seating for a friend or a place to rest your feet during long mending sessions. Look for one with brass hardware and softly worn paint; the patina is the point, and nothing says “heirloom craft room” quite like it.
Pro Tip
Store fabric in rolls around wide cardboard tubes rather than folded — it eliminates permanent creases, keeps the cedar aroma circulating, and lets you unroll and cut directly from the chest.
Thread Rack Behind the Door
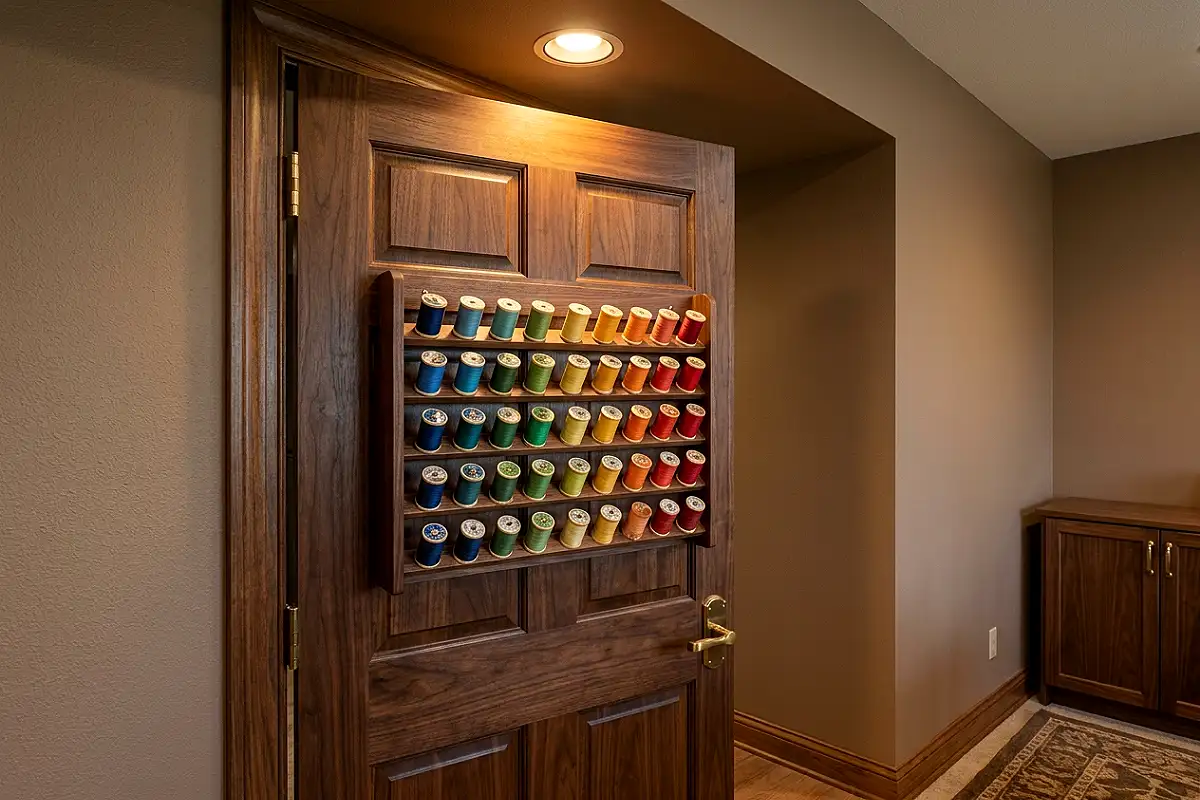
Behind every craft room door hangs an opportunity: a door-mounted thread rack. A sturdy wooden rack with graduated dowels holds fifty or more spools arranged in a satisfying color gradient — warm reds flowing into pinks, pastels bridging into blues and greens. Every shade visible, every spool instantly retrievable, and the whole rack hidden when the door closes. You can build a simple rack from a pine board and short dowels for an afternoon’s work, or invest in a handcrafted walnut spool rack from an Etsy woodworker that becomes a statement piece in its own right; both approaches solve the same problem with a different budget.
Pro Tip
Reserve the final dowel for “orphan” spools under 10 yards — a single shared peg for all the near-empty ones keeps your gradient pristine and tells you at a glance what to replenish.
Cubby Bins with Acrylic Paper Fronts
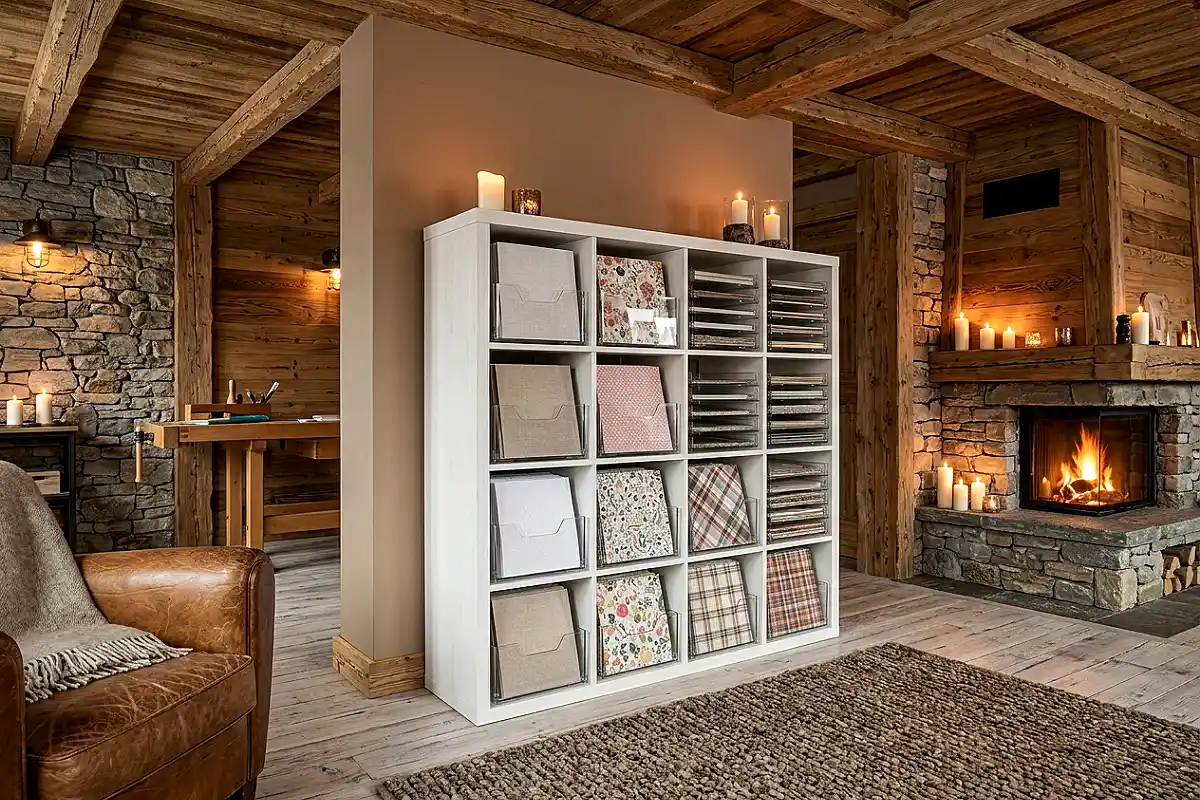
Twelve-by-twelve scrapbook paper deserves better than a crumpled heap in a plastic bag. The ideal solution is a built-in or freestanding unit of paper-height cubbies fitted with acrylic-front trays — each tray slides out like a drawer, holding a single paper line, pattern family, or color story, perfectly flat and fully visible. Brands like IRIS offer snap-together storage at an approachable price point, while custom acrylic-front units give you seamless, seamless-glide elegance if you want the elevated look. Label the acrylic fronts with a vinyl sticker, and the whole unit becomes a paper library that makes choosing your next project feel like browsing a stationery boutique.
Pro Tip
Sort paper by finish as well as pattern — keep glossy, matte, kraft, and textured papers in separate trays — so you’ll never start a project only to discover all your coordinating sheets share the same surface.
Stemware Rack for Scissors
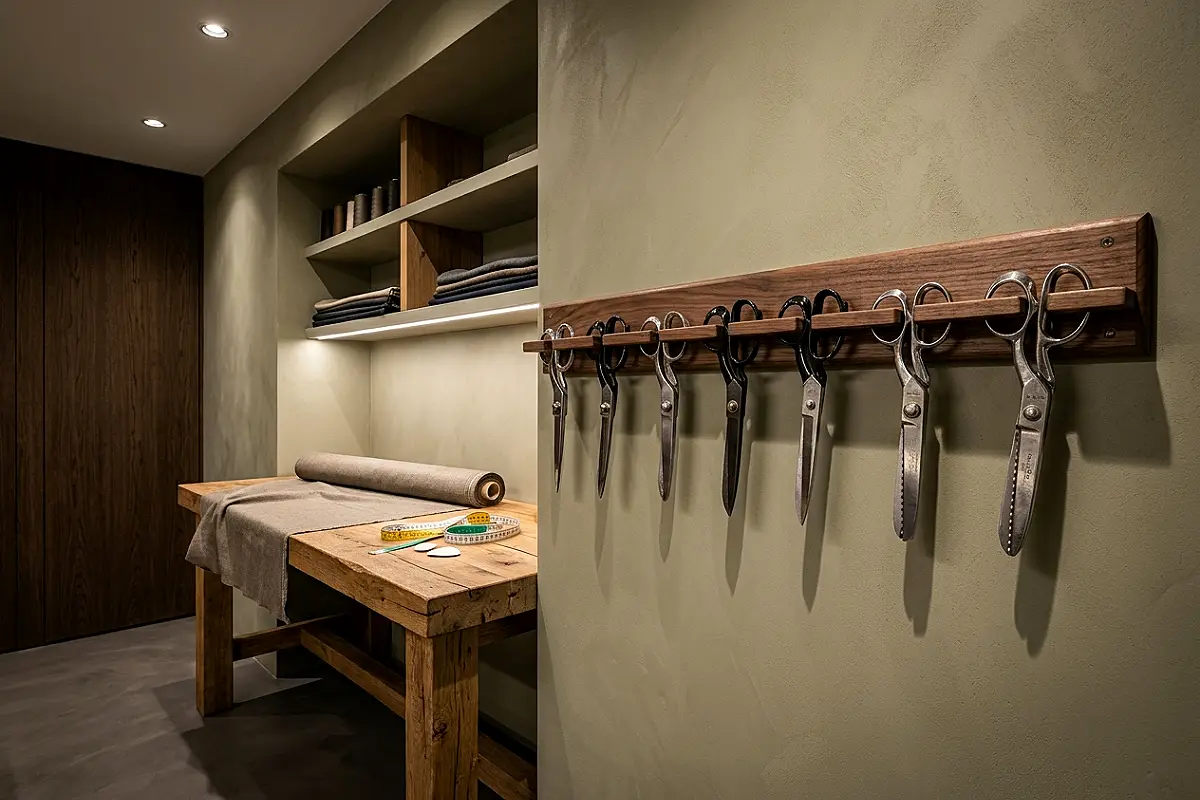
Here’s the kind of repurposing that makes people stop mid-scroll: a wooden stemware rack — built to cradle wine glasses upside down — is the perfect resting place for a serious scissor collection. Slide the finger loops of your fabric shears, embroidery scissors, pinking shears, and snips between the rack’s slots, blades up and handles resting on the wood, so every pair is separated, visible, and safely stored. A walnut rack against a white wall turns your cutting tools into a display that says this is a craft room where the tools matter. It keeps expensive shears from knocking against each other in a drawer, which alone will extend their edge for years.
Pro Tip
Mount the rack with the open side facing slightly downward rather than perfectly horizontal — the gentle angle keeps even wide-handled shears from slipping out when the rack is full.
Color-Gradient Bins on Open Cubbies
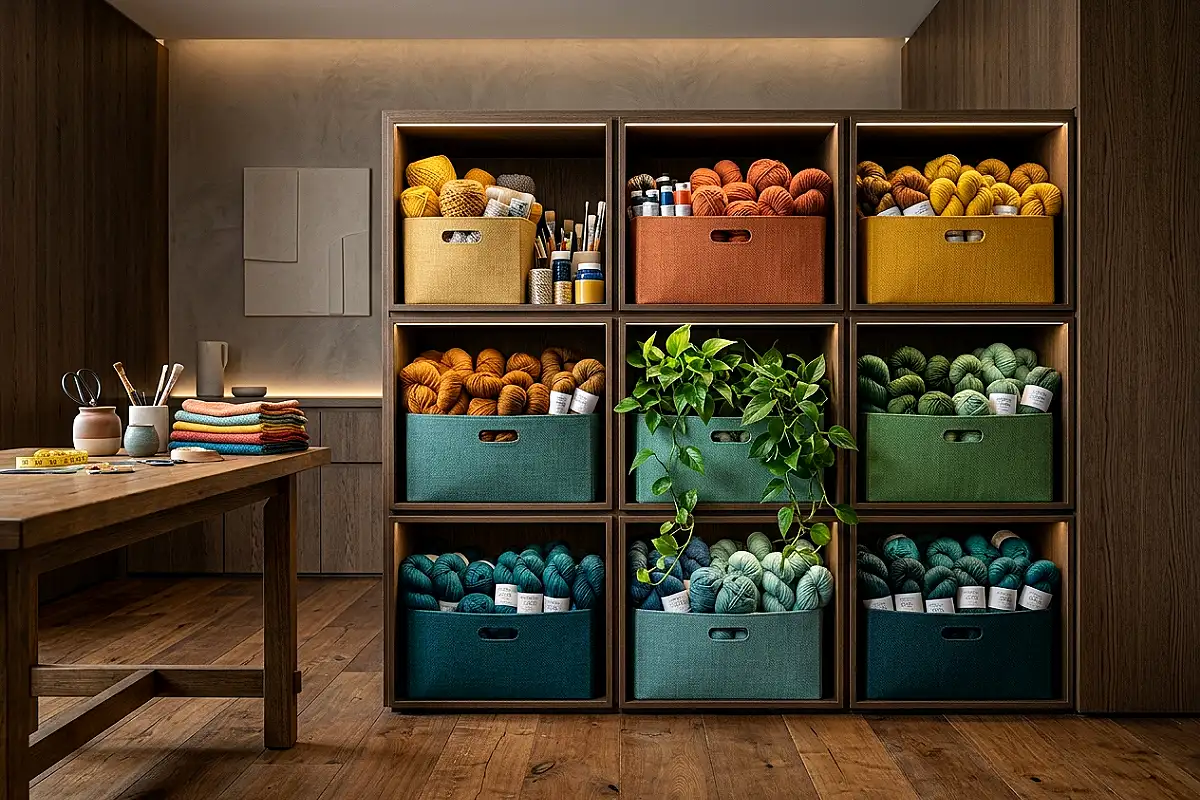
A cube storage unit only looks designed when its bins are styled with intention, and the most photogenic strategy is the color gradient. Fill matching woven or matte plastic bins with your supplies — yarn by hue, fabric scraps by family, paints by tone — then arrange the bins so colors flow across the unit from warm to cool, left to right. Add two or three styled “breathing” cubes between the filled ones: a trailing plant, a stack of art books, a small brass tray. The result is a storage wall that reads like a carefully merchandised shop display, and finding any item becomes as easy as remembering its color.
Pro Tip
Place your three most-used bins — the ones you reach for daily — in the middle row at eye level, and let the rarely-touched seasonal supplies live at the top and bottom.
Rolling Toolbox Caddy
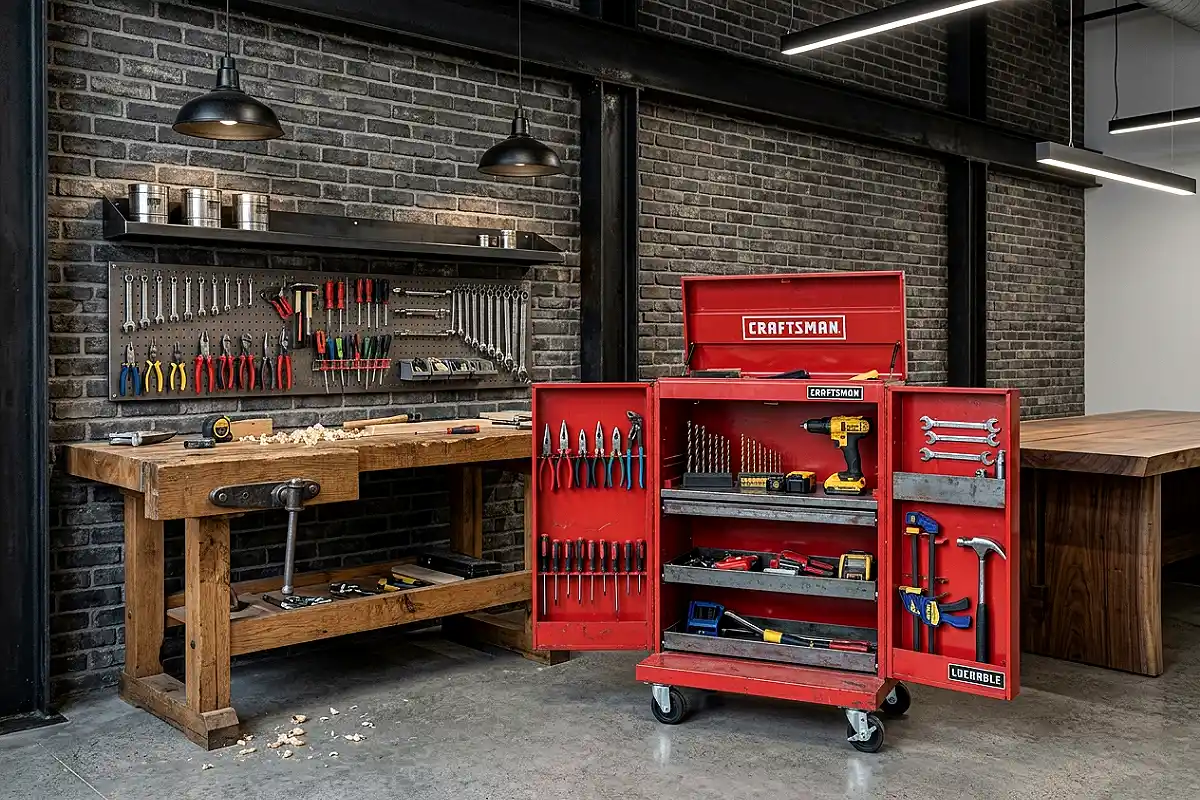
Your heavy-duty tools — pliers, hammers, hand drills, clamps, utility knives — don’t belong in a drawer with ribbon. Give them a cantilever toolbox mounted on locking casters: the tiered trays lift open fan-style, placing every tool at an accessible angle, and the whole unit rolls wherever your project goes. Powder-coated steel in graphite or industrial red reads handsome next to a craft room’s softer textures, providing a deliberate contrast rather than an apology. For makers who split time between woodworking and paper crafts, a rolling caddy means your workshop-grade tools are always mobile, always organized, and never in anyone’s way.
Pro Tip
Line each tray compartment with a thin sheet of EVA foam cut to size — tools stay cushioned and quiet when the caddy rolls, and the foam wipes clean of sawdust and glitter alike.
Clipboard Panels for In-Progress Projects
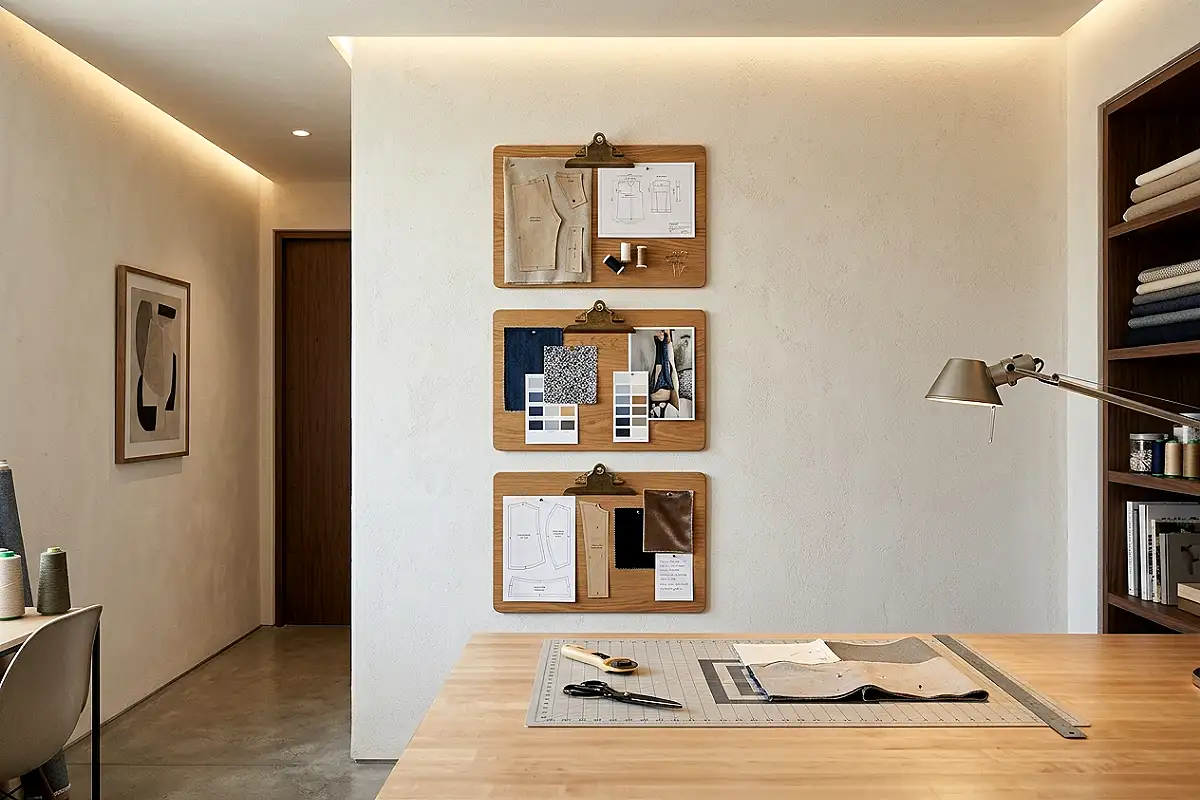
An in-progress project is a craft room’s greatest source of visual clutter — until you give it a wall. Mount two or three clipboards in a vertical row, and each one becomes a dedicated staging panel: pattern pieces clipped flat, fabric swatches pinned in place, a color palette for the current quilt, or a mood board for the project on deck. When the quilt finishes, you unclip, clear, and the clipboard is ready for the next endeavor. Choose clipboards with warm wood tops and brass clips for a tactile, studio-like feel, and hang them at standing height so the whole room can “see” what’s in the pipeline at a glance.
Pro Tip
Keep one clipboard permanently reserved as a “next up” board — pin the pattern, materials list, and fabric swatches for your next project there, so starting it takes five minutes instead of five hours of hunting.
Honeycomb Wall Cubes
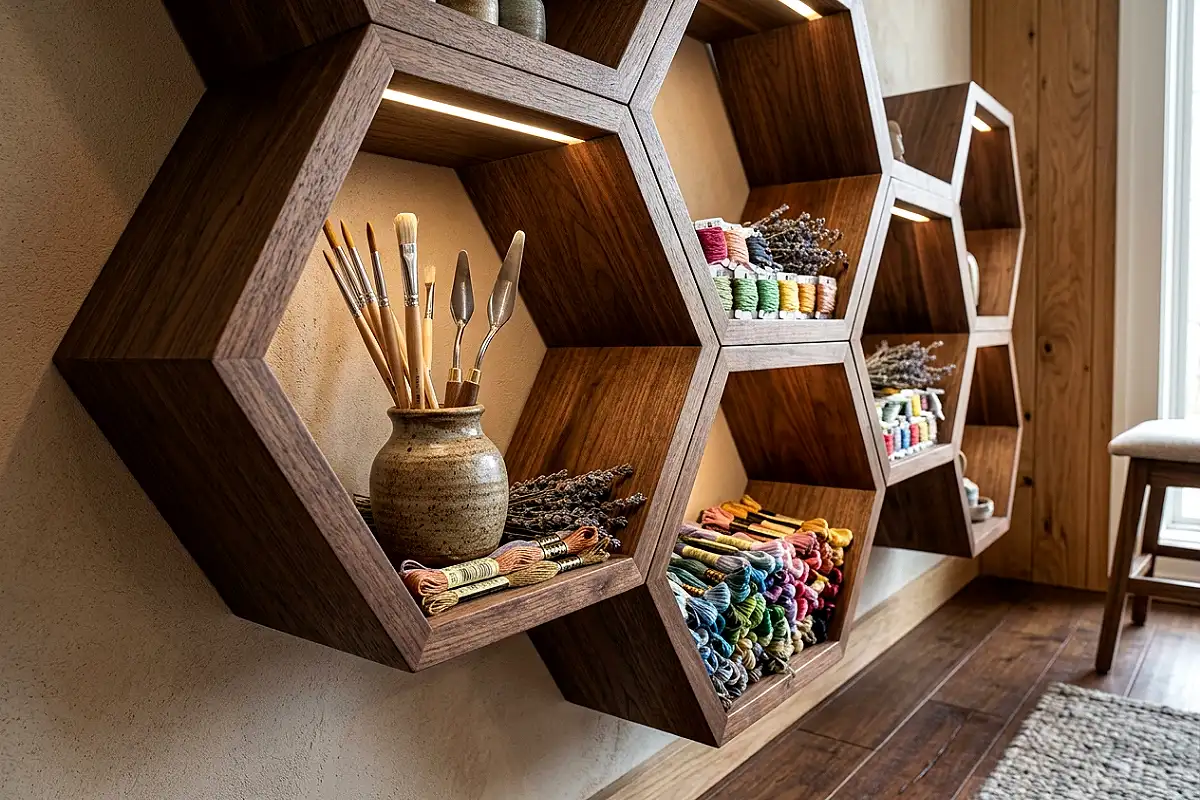
Hexagonal honeycomb shelves bring geometry and charm to a blank wall, and their deep cells are secretly excellent for small-batch storage. Dedicate each cell to a single category — one for pressed flowers and botanicals, one for spools of embroidery floss, one for tiny vases of paintbrushes, one for a stack of mini sketchbooks. Because each hex holds so little, the format forces a beautiful edit: only your favorites and most-used items earn a cell, and the honeycomb reads as sculptural decor that happens to be useful. Paint the cells white for an airy look or a deep forest green for drama — either way, the honeycomb silhouette photographs as well as it functions.
Pro Tip
Anchor the honeycomb set with a single styled cell containing a small vase of dried lavender — it adds height and fragrance to the arrangement and disguises any inevitable empty cells as deliberate styling.
Towel Bar Rack for Cutting Mats
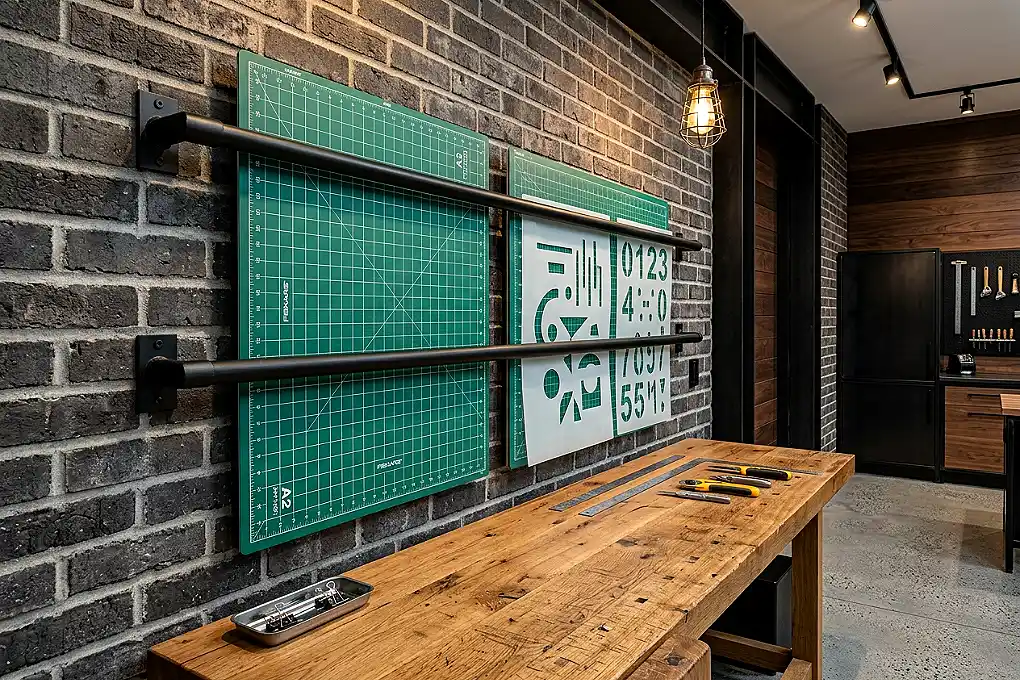
Cutting mats, stencils, and template sheets all share the same problem: stacked flat, they’re impossible to reach; hung wrong, they warp. The answer lives in the bathroom — a pair of matte towel bars mounted horizontally on the wall, spaced about six inches apart. Slip your self-healing cutting mats, thick plastic stencils, and heavy templates between the bars and the wall, and they hang perfectly flat, perfectly accessible, and perfectly invisible from across the room. Add a third bar lower down for lightweight plastic sheets and transfer paper, and an entire category of awkward, hard-to-store items simply disappears into elegant order.
Pro Tip
Store cutting mats with the measurement grid facing outward, then slide a strip of painter’s tape along the visible edge to hold your most-used measurements marked — you’ll never re-measure the mat to find 12 inches again.
Rolling Island with a Butcher-Block Top
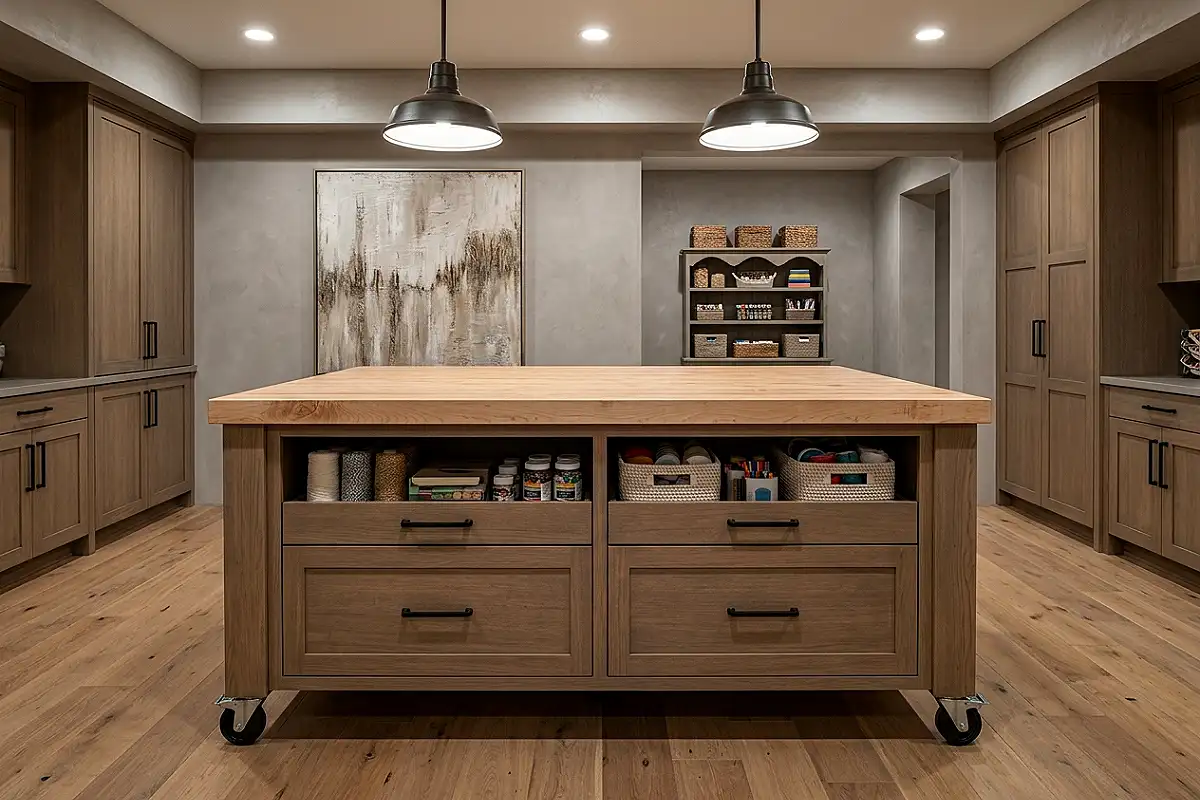
At the center of a serious craft room stands its best investment: a kitchen-grade rolling island with a thick butcher-block top and deep drawers. The butcher block becomes your dedicated cutting and stamping surface — scored and stained by projects past, it wears its history like a well-loved tool. The drawers hold your bulkiest categories: fabric, paper stacks, yarn, and the rolling cart of drawers can tuck beneath. Locking casters mean the island moves to the window for daylight-heavy work or parks against a wall for open floor space. It’s the piece that announces a craft room has grown up — functional, handsome, and impossible to replace with a folding table.
Pro Tip
Condition the butcher block with food-safe mineral oil once a season and reserve one corner as a “sacrifice zone” for glue and paint work — protecting the rest of the top keeps the island beautiful for decades.
Under-Bed Rolling Bins for Bulk Stash
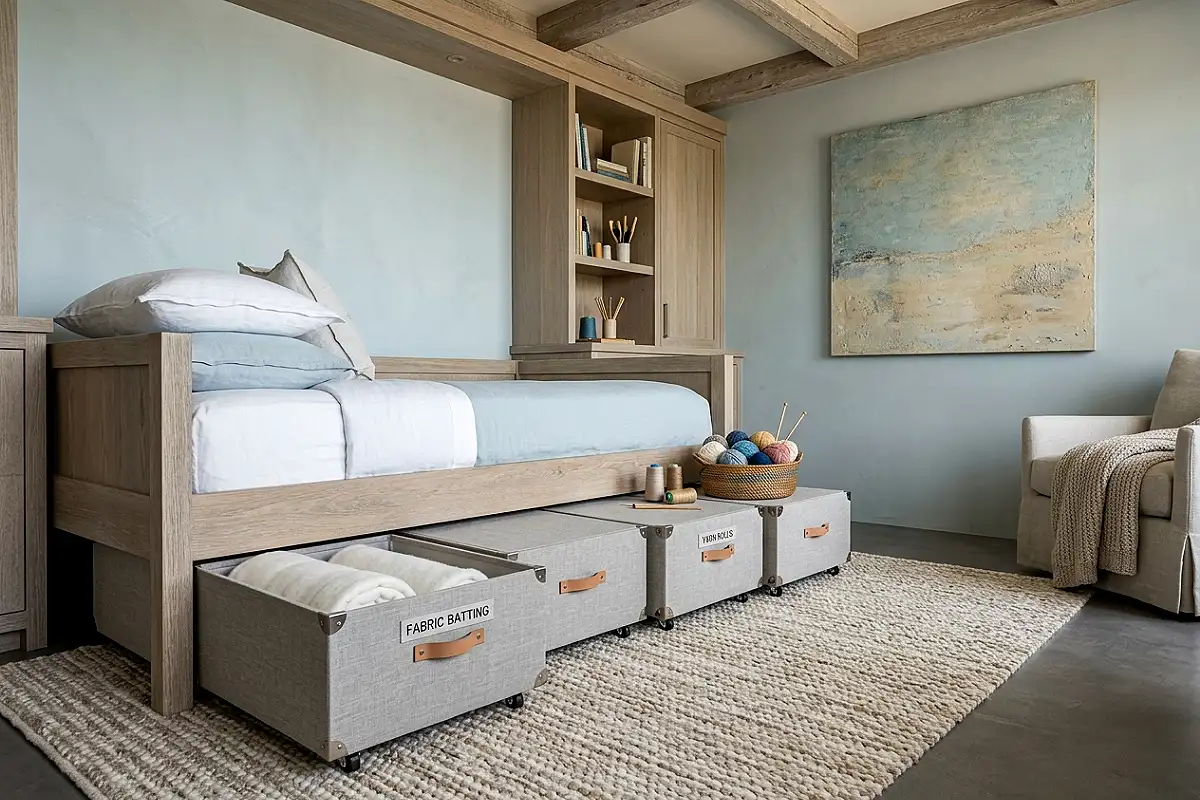
Every craft room eventually accumulates a bulk stash — the extra batting, the spare yarn, the fabric bought “for someday” — and it needs a home that’s out of sight but never out of reach. Low, wide bins on smooth-rolling casters slip beneath a bed, a bench, or a low daybed, each one labeled on the front edge and filled to a single category. The low profile keeps the room’s sightlines clean, while the casters mean even a fully loaded bin glides out with one hand when “someday” finally arrives. Choose bins in soft grey or natural linen-look fabric so they read as intentional storage rather than an afterthought.
Pro Tip
Vacuum-seal your “someday” fabric before binning it — it compresses to a fraction of the volume, stays dust-free, and a quick label of contents and yardage on the bag ends the mystery bin forever.
Cork-Lined Cabinet Doors
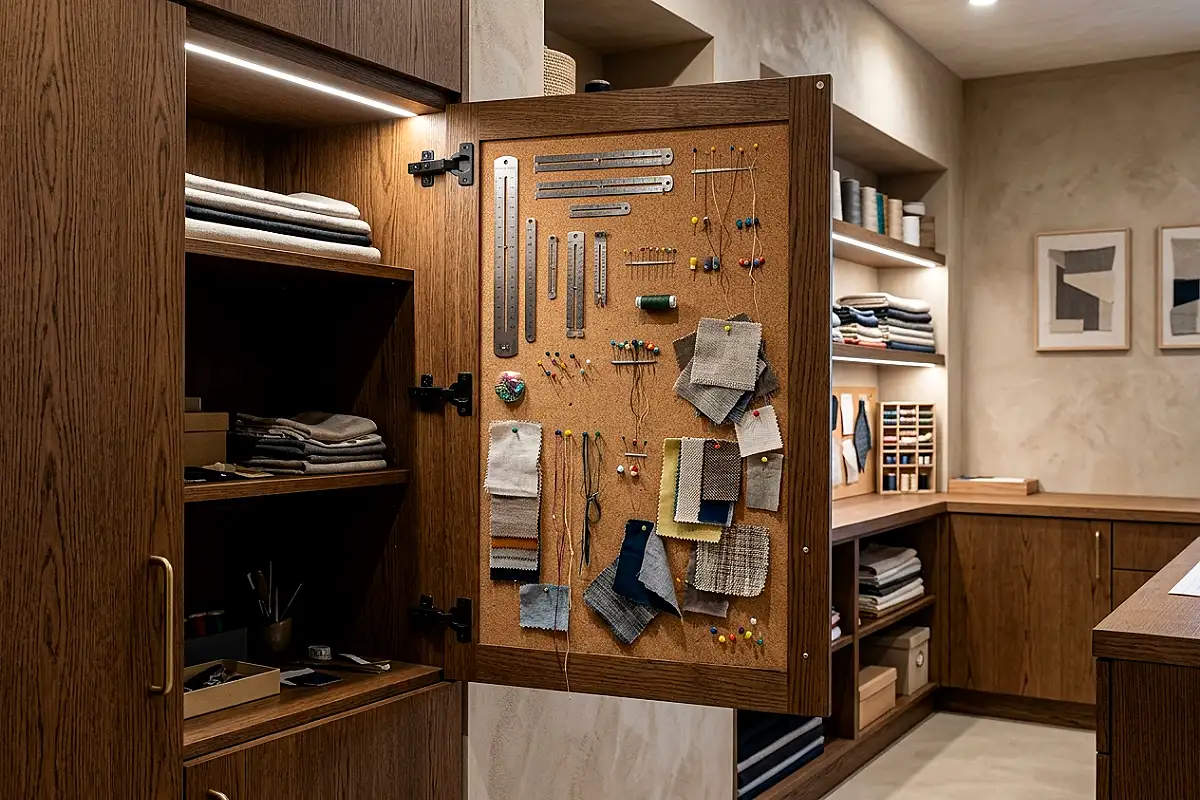
The inside of a cabinet door is the craft room’s most underused real estate. Line it with a sheet of natural cork cut to size, and suddenly you have a hidden bulletin board: pin needle keepers, seam gauge templates, small pattern pieces, and a rotating ticket stub of inspirational scraps right where they’re used. Cork’s warm tan tone softens the look, and the panel stays completely invisible when the door closes — a private workspace that only you know about. Double the value by adding a slim fabric pocket to the same door for the items you’d rather not pin, and the inside of every cabinet becomes a compact command center.
Pro Tip
Use strong double-sided carpet tape at the edges of the cork sheet rather than glue — it holds firmly, protects the cabinet finish, and lets you swap the sheet for a fresh one when it grows full of pinholes.
Your Craft Room, Effortlessly Organized
Twenty-five ideas, one promise: your craft room can be as beautiful as the things you make in it. Start with the two or three solutions that match your space and your mess — a pegboard here, a rolling island there — and let the rest follow as your collection grows.
Frequently Asked Questions
How do I store craft supplies in a small space?
Think vertically and in layers: pegboards and magnetic walls pull supplies off your work surface, over-door organizers use dead space, and slim rolling carts give you mobile storage that tucks away when not in use. The goal in a small space is to keep only your current project visible.
What is the best storage for ribbons and wrapping paper?
Upright storage is the answer for both. File bins keep wrapping paper rolls standing so patterns stay visible and uncreased, while clear-pocket hanging organizers or ribbon spools on dowels keep ribbons sorted, tangle-free, and easy to see at a glance.
How do I keep small parts like beads and buttons organized?
Separate by category and contain each category: apothecary jars, repurposed spice racks, muffin tins, or suspended glass jars all keep small parts visible and sorted. The golden rule is one container per type of item — mixed bins always become mystery bins.
How do I store fabric without it getting wrinkled or dusty?
Store fabric rolled around wide cardboard tubes rather than folded — it prevents permanent creases and makes cutting easier. For long-term storage, a cedar chest or vacuum-sealed bins under the bed protect against dust, moths, and moisture.
What’s the best way to store paint and glues so they don’t dry out?
Keep them on a rotating Lazy Susan or in a clearly visible tray so every bottle returns to its spot immediately after use. Wipe caps clean, seal lids tightly, and store glue bottles upside down so adhesive stays at the tip and ready for the next project.
How do I set up a craft room on a budget?
The best craft room storage is often the cheapest: repurposed spice racks, muffin tin drawer inserts, stemware racks for scissors, towel bars for cutting mats, and curtain-rod tool rails cost little and look intentional. Invest slowly in a few anchor pieces — a rolling cart and good drawer organizers — and build out the rest from thrifted finds.